项目中配置一些开机自启的软件,方便我们后期的维护。
脚本一般我这里名称起的就是 redis nginx rabbitmq 不加后缀了。
我们的这个脚本文件放到 /etc/init.d/ 下就可以了,
这里上传到这里后可能还是一个普通文件,我们需要给他们添加执行权限,让他们可以被执行
chmod +x redis
chmod +x nginx
chmod +x rabbitmq
好了权限赋予完成,我们就可以执行命令了。
接下来我们就是添加服务和启动了
chkconfig --add redis
chkconfig --add nginx
chkconfig --add rabbitmq
服务已经添加了我们可以来看一下
chkconfig --list
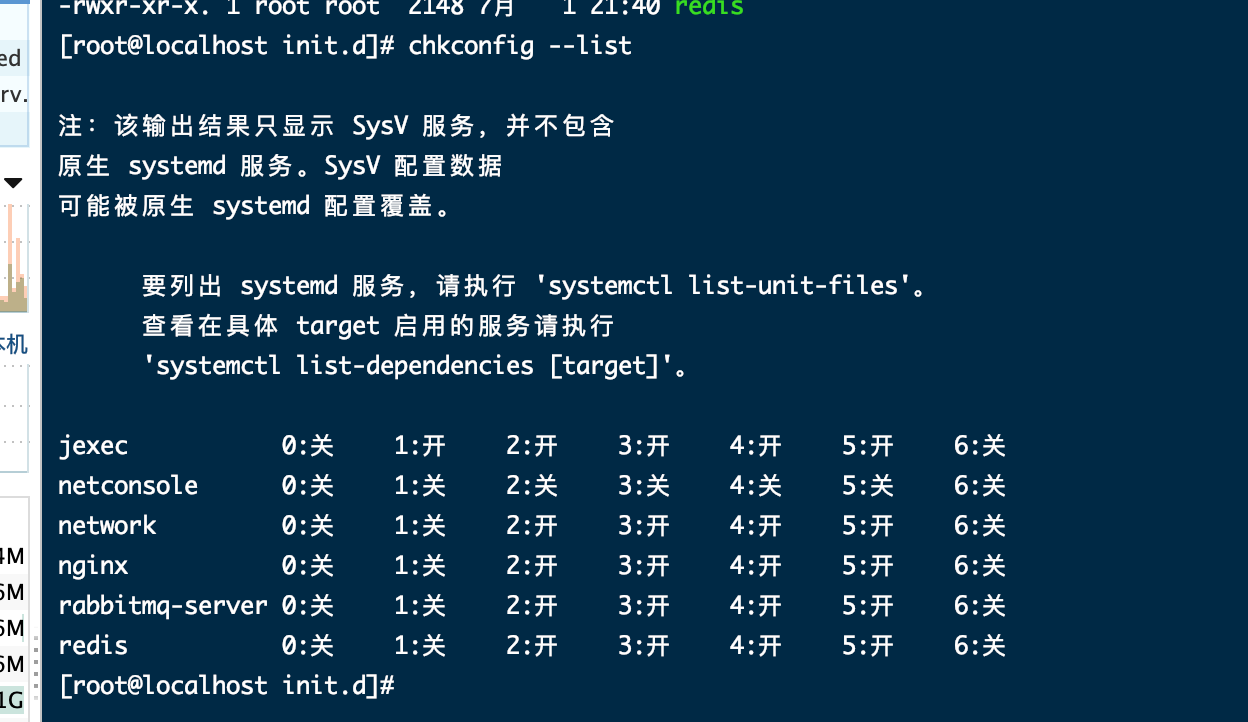
这里有的已经开启了,所以显示的是开。123456全部关,就是没有开启了。
开启服务命令
chkconfig redis on
好了,然后启动redis,之后看看是不是启动了
ps -ef|grep redis 查看redis进程
然后我们重启虚拟机,看看启动后是不是可以启动。
# 1.将(脚本)启动文件移动到 /etc/init.d/或者/etc/rc.d/init.d/目录下。(前者是后者的软连接)
mv test.sh /etc/rc.d/init.d

# 2.启动文件前面务必添加如下三行代码,否侧会提示chkconfig不支持。
#!/bin/sh             告诉系统使用的shell,所以的shell脚本都是这样
#chkconfig: 35 20 80        分别代表运行级别,启动优先权,关闭优先权,此行代码必须
#description: http server     自己随便发挥!!!,此行代码必须
/bin/echo $(/bin/date +%F_%T) >> /tmp/test.log

# 3.增加脚本的可执行权限
chmod +x /etc/rc.d/init.d/test.sh

# 4.添加脚本到开机自动启动项目中。添加到chkconfig,开机自启动。
[root@localhost ~]# cd /etc/rc.d/init.d
[root@localhost ~]# chkconfig --add test.sh
[root@localhost ~]# chkconfig test.sh on

# 5.关闭开机启动
[root@localhost ~]# chkconfig test.sh off

# 6.从chkconfig管理中删除test.sh
[root@localhost ~]# chkconfig --del test.sh

# 7.查看chkconfig管理
[root@localhost ~]# chkconfig --list test.sh
1.redis
#!/bin/sh
# chkconfig: 2345 56 26
# description: Redis Service

### BEGIN INIT INFO
# Provides:          Redis
# Required-Start:    $all
# Required-Stop:     $all
# Default-Start:     2 3 4 5
# Default-Stop:      0 1 6
# Short-Description: starts Redis
# Description:       starts the BT-Web
### END INIT INFO

# Simple Redis init.d script conceived to work on Linux systems
# as it does use of the /proc filesystem.

CONF="/usr/local/redis/redis-5.0.5/redis.conf"
REDIS_PORT=$(cat $CONF |grep port|grep -v '#'|awk '{print $2}')
REDIS_PASS=$(cat $CONF |grep requirepass|grep -v '#'|awk '{print $2}')
REDIS_HOST=$(cat $CONF |grep bind|grep -v '#'|awk '{print $2}')
if [ "$REDIS_PASS" != "" ];then
    REDIS_PASS=" -a $REDIS_PASS"
fi
#if [ -f "/www/server/redis/start.pl" ];then
#    STAR_PORT=$(cat /www/server/redis/start.pl)
#else
    STAR_PORT="6379"
#fi
EXEC=/usr/local/redis/redis-5.0.5/src/redis-server
CLIEXEC="/usr/local/redis/redis-5.0.5/src/redis-cli -h ${REDIS_HOST} -p ${STAR_PORT}${REDIS_PASS}"
PIDFILE=$(cat $CONF |grep pidfile|grep -v '#'|awk '{print $2}')  # pidfile /var/run/redis_6379.pid


redis_start(){
    if [ -f ${PIDFILE} ]; then
        ps -p $(cat ${PIDFILE}) > /dev/null 2>&1
        if [ $? -ne "0" ]; then
            echo Redis is not running, buy pid file is exits ${PIDFILE}
            exit 1
        else
            echo "redis is running! ($(cat ${PIDFILE}))"
            exit 0
        fi
    fi
    echo "Starting redis server..."
    #sudo -u redis $EXEC $CONF
    sudo $EXEC $CONF
    #echo ${REDIS_PORT} > /www/server/redis/start.pl
    echo "Starting redis success!"
}
redis_status(){
    if [ -f ${PIDFILE} ]; then
        ps -p $(cat ${PIDFILE}) > /dev/null 2>&1
        if [ $? -ne "0" ]; then
            echo "Redis is not running, buy pid file is exits ${PIDFILE}"
            exit 1
        else
            echo "redis is running! ($(cat ${PIDFILE}))"
            exit 0
        fi
    else
        echo "redis is stopped"
        exit 0
    fi
}
redis_stop(){
    echo "Stopping ..."
    $CLIEXEC shutdown
    sleep 1
    pkill -9 redis-server
    rm -f ${PIDFILE}
    echo "Redis stopped"
}

case "$1" in
    start)
        redis_start
        ;;
    stop)
        redis_stop
        ;;
    status)
        redis_status
        ;;
    restart|reload)
        redis_stop
        sleep 0.3
        redis_start
        ;;
    *)
        echo "Please use start or stop as first argument"
        ;;
esac
粗体三条路径需要自己配置:
1,配置文件路径
2,服务器启动文件路径
3,客户端启动程序的路径
这个配置文件是重宝塔安装的文件中拷贝出来的,改了该,注释的部分就是改动的,所以很好的利用上了。
2,nginx
#!/bin/sh
#
# nginx - this script starts and stops the nginx daemon
#
# chkconfig:   - 85 15
# description:  NGINX is an HTTP(S) server, HTTP(S) reverse
#               proxy and IMAP/POP3 proxy server
# processname: nginx
# config:      /etc/nginx/nginx.conf
# config:      /etc/sysconfig/nginx
# pidfile:     /var/run/nginx.pid

# Source function library.
. /etc/rc.d/init.d/functions

# Source networking configuration.
. /etc/sysconfig/network

# Check that networking is up.
[ "$NETWORKING" = "no" ] && exit 0

nginx="/usr/local/nginx/sbin/nginx" #nginx启动文件位置
prog=$(basename $nginx)

NGINX_CONF_FILE="/usr/local/nginx/conf/nginx.conf" #nginx配置文件位置

[ -f /usr/local/nginx/sbin/nginx ] && /usr/local/nginx/sbin/nginx

lockfile=/var/lock/subsys/nginx

make_dirs() {
   # make required directories
   user=`$nginx -V 2>&1 | grep "configure arguments:.*--user=" | sed 's/[^*]*--user=([^ ]*).*/1/g' -`
   if [ -n "$user" ]; then
      if [ -z "`grep $user /etc/passwd`" ]; then
         useradd -M -s /bin/nologin $user
      fi
      options=`$nginx -V 2>&1 | grep 'configure arguments:'`
      for opt in $options; do
          if [ `echo $opt | grep '.*-temp-path'` ]; then
              value=`echo $opt | cut -d "=" -f 2`
              if [ ! -d "$value" ]; then
                  # echo "creating" $value
                  mkdir -p $value && chown -R $user $value
              fi
          fi
       done
    fi
}

start() {
    [ -x $nginx ] || exit 5
    [ -f $NGINX_CONF_FILE ] || exit 6
    make_dirs
    echo -n $"Starting $prog: "
    daemon $nginx -c $NGINX_CONF_FILE
    retval=$?
    echo
    [ $retval -eq 0 ] && touch $lockfile
    return $retval
}

stop() {
    echo -n $"Stopping $prog: "
    killproc $prog -QUIT
    retval=$?
    echo
    [ $retval -eq 0 ] && rm -f $lockfile
    return $retval
}

restart() {
    configtest || return $?
    stop
    sleep 1
    start
}

reload() {
    configtest || return $?
    echo -n $"Reloading $prog: "
    killproc $prog -HUP
    retval=$?
    echo
}

force_reload() {
    restart
}

configtest() {
  $nginx -t -c $NGINX_CONF_FILE
}

rh_status() {
    status $prog
}

rh_status_q() {
    rh_status >/dev/null 2>&1
}

case "$1" in
    start)
        rh_status_q && exit 0
        $1
        ;;
    stop)
        rh_status_q || exit 0
        $1
        ;;
    restart|configtest)
        $1
        ;;
    reload)
        rh_status_q || exit 7
        $1
        ;;
    force-reload)
        force_reload
        ;;
    status)
        rh_status
        ;;
    condrestart|try-restart)
        rh_status_q || exit 0
            ;;
    *)
        echo $"Usage: $0 {start|stop|status|restart|condrestart|try-restart|reload|force-reload|configtest}"
        exit 2
esac
粗体文字的四个地方:
1,启动文件位置
2,配置文件位置
3,rabbitmq
这里的脚本只可以使用启动停止,但是自启动,我试过还是不行,不知道哪里设置错误。网上好多的都是这个问题,可以手动使用,但是自启动就是不行,使用rpm安装后的也就是自动生成的也是这个文件,哪个拿过来
就不可以开机自启动,不知道为什么。哪位懂得可以告诉一下。上边两个我都试过了,可以使用的。
#!/bin/sh
#
# rabbitmq-server RabbitMQ broker
#
# chkconfig: - 80 05
# description: Enable AMQP service provided by RabbitMQ
#

### BEGIN INIT INFO
# Provides:          rabbitmq-server
# Required-Start:    $remote_fs $network
# Required-Stop:     $remote_fs $network
# Description:       RabbitMQ broker
# Short-Description: Enable AMQP service provided by RabbitMQ broker
### END INIT INFO

# Source function library.
. /etc/init.d/functions
export HOME=/root
PATH=/sbin:/usr/sbin:/bin:/usr/bin:/usr/local/erlang/bin
NAME=rabbitmq-server
DAEMON=/usr/sbin/${NAME}
CONTROL=/usr/sbin/rabbitmqctl
DESC=rabbitmq-server
USER=root
ROTATE_SUFFIX=
INIT_LOG_DIR=/var/log/rabbitmq
PID_FILE=/var/run/rabbitmq/pid

START_PROG="daemon"
LOCK_FILE=/var/lock/subsys/$NAME

test -x $DAEMON || exit 0
test -x $CONTROL || exit 0

RETVAL=0
set -e

[ -f /etc/default/${NAME} ] && . /etc/default/${NAME}

ensure_pid_dir () {
    PID_DIR=`dirname ${PID_FILE}`
    if [ ! -d ${PID_DIR} ] ; then
        mkdir -p ${PID_DIR}
        chown -R ${USER}:${USER} ${PID_DIR}
        chmod 755 ${PID_DIR}
    fi
}

remove_pid () {
    rm -f ${PID_FILE}
    rmdir `dirname ${PID_FILE}` || :
}

start_rabbitmq () {
    status_rabbitmq quiet
    if [ $RETVAL = 0 ] ; then
        echo RabbitMQ is currently running
    else
        RETVAL=0
        ensure_pid_dir
        set +e
        RABBITMQ_PID_FILE=$PID_FILE $START_PROG $DAEMON
            > "${INIT_LOG_DIR}/startup_log"
            2> "${INIT_LOG_DIR}/startup_err"
            0<&- &
        $CONTROL wait $PID_FILE >/dev/null 2>&1
        RETVAL=$?
        set -e
        case "$RETVAL" in
            0)
                echo SUCCESS
                if [ -n "$LOCK_FILE" ] ; then
                    touch $LOCK_FILE
                fi
                ;;
            *)
                remove_pid
                echo FAILED - check ${INIT_LOG_DIR}/startup_{log, _err}
                RETVAL=1
                ;;
        esac
    fi
}

stop_rabbitmq () {
    status_rabbitmq quiet
    if [ $RETVAL = 0 ] ; then
        set +e
        $CONTROL stop ${PID_FILE} > ${INIT_LOG_DIR}/shutdown_log 2> ${INIT_LOG_DIR}/shutdown_err
        RETVAL=$?
        set -e
        if [ $RETVAL = 0 ] ; then
            remove_pid
            if [ -n "$LOCK_FILE" ] ; then
                rm -f $LOCK_FILE
            fi
        else
            echo FAILED - check ${INIT_LOG_DIR}/shutdown_log, _err
        fi
    else
        echo RabbitMQ is not running
        RETVAL=0
    fi
}

status_rabbitmq() {
    set +e
    if [ "$1" != "quiet" ] ; then
        $CONTROL status 2>&1
    else
        $CONTROL status > /dev/null 2>&1
    fi
    if [ $? != 0 ] ; then
        RETVAL=3
    fi
    set -e
}

rotate_logs_rabbitmq() {
    set +e
    $CONTROL rotate_logs ${ROTATE_SUFFIX}
    if [ $? != 0 ] ; then
        RETVAL=1
    fi
    set -e
}

restart_running_rabbitmq () {
    status_rabbitmq quiet
    if [ $RETVAL = 0 ] ; then
        restart_rabbitmq
    else
        echo RabbitMQ is not runnning
        RETVAL=0
    fi
}

restart_rabbitmq() {
    stop_rabbitmq
    start_rabbitmq
}

case "$1" in
    start)
        echo -n "Starting $DESC: "
        start_rabbitmq
        echo "$NAME."
        ;;
    stop)
        echo -n "Stopping $DESC: "
        stop_rabbitmq
        echo "$NAME."
        ;;
    status)
        status_rabbitmq
        ;;
    rotate-logs)
        echo -n "Rotating log files for $DESC: "
        rotate_logs_rabbitmq
        ;;
    force-reload|reload|restart)
        echo -n "Restarting $DESC: "
        restart_rabbitmq
        echo "$NAME."
        ;;
    try-restart)
        echo -n "Restarting $DESC: "
        restart_running_rabbitmq
        echo "$NAME."
        ;;
    *)
        echo "Usage: $0 {start|stop|status|rotate-logs|restart|condrestart|try-restart|reload|force-reload}" >&2
        RETVAL=1
        ;;
esac

exit $RETVAL
只需要改动粗体部分就可以。然后使用命令 赋权, 执行就可以
2,以服务的方式【
    https://blog.csdn.net/liangpingguo/article/details/106098907?utm_medium=distribute.pc_relevant.none-task-blog-BlogCommendFromMachineLearnPai2-9.nonecase&depth_1-utm_source=distribute.pc_relevant.none-task-blog-BlogCommendFromMachineLearnPai2-9.nonecase
  】
添加服务nginx.server

文件保存在目录下:以754的权限。目录路径:/usr/lib/systemd/system。如上面的supervisord.service文件放在这个目录下面。

[root@localhost ~]# cat /usr/lib/systemd/system/nginx.service

[root@localhost ~]# cat /usr/lib/systemd/system/supervisord.service


设置开机自启动
[root@localhost ~]# systemctl enable nginx.service
[root@localhost ~]# systemctl enable supervisord

停止开机自启动
[root@localhost ~]# systemctl disable nginx.service
[root@localhost ~]# systemctl disable supervisord

验证一下是否为开机启动
[root@localhost ~]# systemctl is-enabled nginx
[root@localhost ~]# systemctl is-enabled supervisord


# nginx.service服务文件
[Unit]
Description=nginx - high performance web server
After=network.target remote-fs.target nss-lookup.target

[Service]
Type=forking
ExecStart=/usr/local/nginx/sbin/nginx -c /usr/local/nginx/conf/nginx.conf
ExecReload=/usr/local/nginx/sbin/nginx -s reload
ExecStop=/usr/local/nginx/sbin/nginx -s stop

[Install]
WantedBy=multi-user.target