https://docs.unity3d.com/2018.4/Documentation/Manual/PostProcessingOverview.html
https://docs.unity3d.com/Packages/com.unity.postprocessing@2.1/manual/index.html
https://github.com/Unity-Technologies/PostProcessing
Home
Post-processing is the process of applying full-screen filters and effects to a camera's image buffer before it is displayed to screen. It can drastically improve the visuals of your product with little setup time.
You can use post-processing effects to simulate physical camera and film properties
Installation
Quick-start
Post-process Layer
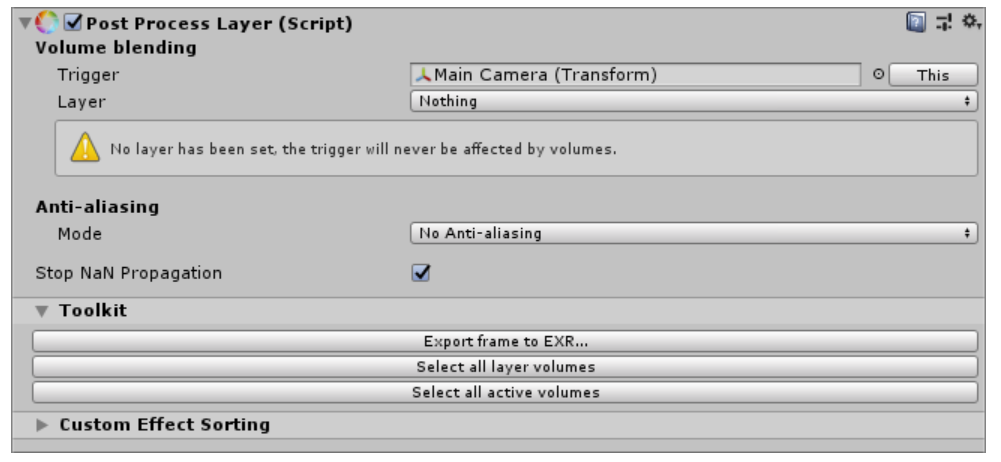
The first section describes Volume blending settings for this camera:
- Trigger: by default the camera itself will be assigned to it. This is transform that will be drive the volume blending feature. In some cases you may want to use a transform other than the camera, e.g. for a top down game you'll want the player character to drive the blending instead of the actual camera transform. Setting this field to None will disable local volumes for this layer (global ones will still work)
- Layer: a mask of layers to consider for volume blending. It allows you to do volume filtering and is especially useful to optimize volume traversal. You should always have your volumes in dedicated layers instead of the default one for best performances. By default it's set to Nothing so don't forget to change it or volumes won't have any effect.
Netx comes Ant-aliasing which has to be setup per-camera. The benefit of doing it that way instead of having a global setting in the projects is that you can optimize your cameras to only use anti-aliasing when needed. For instance, your main camera could be using Temporal Anti-aliasing but a secondary one used to render a security camera would only require FXAA.
The Stop NaN Propagation toggle will kill any invalid / NaN pixel and replace it with a black color before post-processing is applied. It's generally a good idea to keep this enabled to avoid post-processing artifact cause by broken data in the scene
The Toolkit section comes with a few utilities. You can export the current frame to EXR using one of the following modes:
- Full Name (as displayed): exports the camera as-is (if it's on the camera shown in the Game View, the export will look exactly like what's shown in the Game View)
- Disable post-processing: same as the previous mode but without any sort of post-processing applied.
- Break before Color Grading (linear): same as the first mode but will stop rendering just before Color Grading is applied. This is useful if you want to author grading LUTs in an external software.
- Break before Color Grading (log): same as the previous mode but the output will be log-encoded. This is used to author full-precision HDR grading LUTs in an external software.
Other utilities include:
- Select all layer volumes: selects all Post-process Volume components that can affect this Post-process Layer
- Select all active volumes: selects all Post-process Volume components currently affecting this Post-process Layer
Post-process Volumes
The way post-processing works in this framework is by using local & global volumes. It allows you to give each volume a priority and a set of effect overrides to automatically blend post-processing settings in your scene. For instance, you could have a light vignette effect set-up globally but when the player enters a cave you would only override the Intensity setting of the vignette to make it stronger while keeping the rest of the settings inact.
The Post-process Volume component can be added to any game object, the camera itself included. But it's generally a good idea to create a dedicated object for each volume.
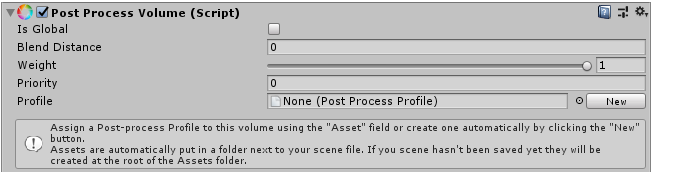
By default it's completely empty. Volumes come with two modes:
- Global: a global volume doesn't have any boundary and will be applied to the whole scene. You can of course have serveral of these in your scene
- Local: a local volume needs a collider or trigger component attached to it to define its boundaries. Any type of 3D collider will work, from cubes to complex convex meshes but we recommend you use simple colliders as much as possible, as meshes can be quite expensive to travers. Local volumes can also have a Blend Distance that represents the outer distance from the volume surface where blending will start.
Weight can be used to reduce the global contribution of the volume and all its override, with 0 being no contribution at all and 1 full contribution
The Priority field defines the volume order in the stack. The higher this number is, the higher priority a volume has.
We also need to create a profiler for this volume (or re-use an existing one).

Each field has an override checkbox on its left, you'll need to toggle the settings you want to override for this volume before you can edit them. You can quickly toggle them all on or off by using the small All and None shortcuts at the top left
The top-right On/Off toggle is used to override the active state of the effect itself in the stack (if you want, for instance, to force-disable an effect in a higher priority volume) whereas the toggle in the title bar is used to disable the set of overrides for this effect in this particular volume.
Effects
Ambient Occlusion (环境光遮蔽)

The Anti-aliasing effect gives graphics a smoother appearance. The Anti-aliasing algorithms are image-based, which is useful when support for traditional multisampling is not available, such as the deferred rendering shading path, or HDR in the forward rendering path in Unity 5.5 or earlier.
The algorithms available in the post-processing stack are:
- Fast Approximate Anti-aliasing (FXAA): a fast algorithm for mobile and platform that don't support motion vectors
- Subpixel Morphological Anti-aliasing (SMAA): a high-quality but slower algorithm for mobile and platforms that don't support motion vectors
- Temporal Anti-aliasing (TAA): an advanced technique which requires motion vectors. Ideal for desktop and console platforms
Fast Approximate Anti-aliasing (FXAA)
FXAA is the most efficent technique and is recommended for mobile and other platforms that don't support motion vectors, which are required for Temporal Anti-aliasing
Subpixel Morphological Anti-aliasing (SMAA)
SMAA is a higher quality anti-aliasing effect than FXAA but it's also slower. Depending on the art-style of your game it can work as well as Temporal Anti-aliasing while avoiding some of the shortcomings of this technique.
Temporal Anti-aliasing
TAA is an advanced anti-aliasing technique where frames are accumulated over time in a history buffer to be used to smooth edges more effectively. It is substantially better at smoothing edges in motion but requires motion vectors and is more expensive than FXAA. It is ideal for desktop and console platforms.
Auto Exposure (自动曝光)
Bloom (全屏泛光, glow)
The Bloom effect creates fringes of light extending from the borders of bright areas in an image, contribution to the illusion of an extemely bright light overwhelming the Camera.
Chromatic Aberration (色差)
Color Grading (颜色分级)
Deferred Fog (延迟(渲染)雾)
Depth of Field (景深)
Grain (颗粒)
Lens Distortion (镜头畸变)
Motion Blur (运动模糊)
Screen Space Reflections (屏幕空间反射)
Vignette
Scripting
Manipulating the Stack
Writing Custom Effects
相关文章