HTML Style Tags
CSS stands for Cascading Style Sheets.
CSS describes how HTML elements are to be displayed on screen, paper, or in other media.
CSS saves a lot of work. It can control the layout of multiple web pages all at once.
CSS can be added to HTML elements in 3 ways:
- Inline - by using the style attribute in HTML elements
- Internal - by using a <style> element in the <head> section
- External - by using an external CSS file
| Tag | Description |
|---|---|
| <style> | Defines style information for an HTML document |
| <link> | Defines a link between a document and an external resource |
- Use the HTML style attribute for inline styling
- Use the HTML <style> element to define internal CSS
- Use the HTML <link> element to refer to an external CSS file
- Use the HTML <head> element to store <style> and <link> elements
- Use the CSS color property for text colors
- Use the CSS font-family property for text fonts
- Use the CSS font-size property for text sizes
- Use the CSS border property for borders
- Use the CSS padding property for space inside the border
- Use the CSS margin property for space outside the border
-
 View Code
 1 <!DOCTYPE html>
 2 <html lang="en">
 3 <head>
 4     <meta charset="UTF-8">
 5     <title>Creating a bookmark</title>
 6 </head>
 7 <body>
 8 <
 9 <a href="#tips">Visit the useful Tips Section</a>
10 <h2>Chapter 1</h2>
11 <p>This chapter explains ba bla bla</p>
12
13 <h2>Chapter 2</h2>
14 <p>This chapter explains ba bla bla</p>
15
16 <h2>Chapter 3</h2>
17 <p>This chapter explains ba bla bla</p>
18
19 <h2 >Chapter 4</h2>
20 <p>This chapter explains ba bla bla</p>
21
22 <h2>Chapter 5</h2>
23 <p>This chapter explains ba bla bla</p>
24
25 <h2>Chapter 6</h2>
26 <p>This chapter explains ba bla bla</p>
27
28 <h2>Chapter 7</h2>
29 <p>This chapter explains ba bla bla</p>
30
31 <h2>Chapter 8</h2>
32 <p>This chapter explains ba bla bla</p>
33
34 <h2>Chapter 9</h2>
35 <p>This chapter explains ba bla bla</p>
36
37 <h2>Chapter 10</h2>
38 <p>This chapter explains ba bla bla</p>
39
40 <h2 id="tips">Chapter 11</h2>
41 <p>This chapter explains ba bla bla</p>
42
43 <h2>Chapter 12</h2>
44 <p>This chapter explains ba bla bla</p>
45
46 <h2>Chapter 13</h2>
47 <p>This chapter explains ba bla bla</p>
48
49 <h2>Chapter 14</h2>
50 <p>This chapter explains ba bla bla</p>
51
52 <h2>Chapter 15</h2>
53 <p>This chapter explains ba bla bla</p>
54
55 <h2>Chapter 16</h2>
56 <p>This chapter explains ba bla bla</p>
57
58 <h2>Chapter 17</h2>
59 <p>This chapter explains ba bla bla</p>
60 </body>
61 </html>
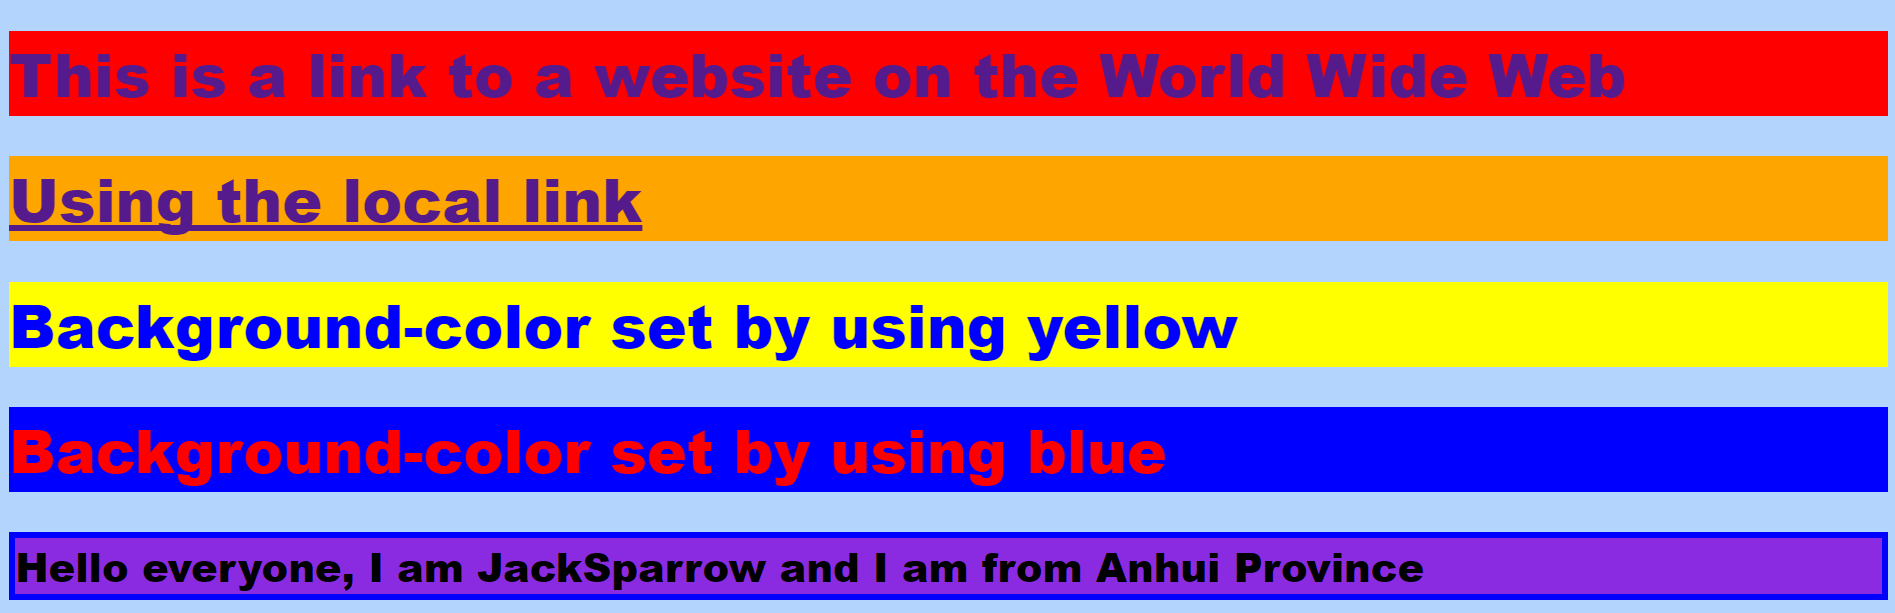
View Code1 <!DOCTYPE html> 2 <html lang="en"> 3 <head> 4 <style> 5 body{background-color: #b3d4fc} 6 h1{color: blue; 7 font-family: "Arial Black"; 8 font-size: 300%} 9 #p01{ 10 background-color: blueviolet; 11 border: 5px solid blue;<!-- 定义边界宽度和颜色--> 12 padding: 14px;<!-- 定义文字和边界之间的距离--> 13 margin: 40 px;<!-- 定义边界外的文字文字和边界之间的距离--> 14 color: red; 15 16 font-size: 200%; 17 font-family: "Arial Black"} 18 p.info{ 19 background-color: yellow; 20 color: rebeccapurple; 21 font-size: 200px; 22 } 23 #a01:link{<!--定义了连接正常的显示样式--> 24 color: yellowgreen; 25 text-decoration: none; 26 } 27 #a01:hover{<!--定义了鼠标位于连接上方时候的显示样式--> 28 color: yellow; 29 background-color: transparent; 30 text-decoration: underline; 31 } 32 33 </style> 34 <meta charset="UTF-8"> 35 <title>Color</title> 36 </head> 37 38 <body> 39 40 <h1 style="background-color: red"> <a id="a01" href="http://www.snowfox.wang/w3schools" target="_blank"> 41 This is a link to a website on the World Wide Web</a> </h1><!--href为增加超链接的标志,blank为重新打开一个窗口--> 42 <h1 style="background-color: orange"><a href="2-Formating.html" target="_blank">Using the local link </a></h1> 43 <h1 style="background-color: yellow">Background-color set by using yellow</h1> 44 <h1 style="background-color: blue;color:red;" >Background-color set by using blue</h1> 45 <p id="p01"<!--定义一个特殊的ID以区别其他的paragraph-->Hello everyone, I am JackSparrow and I am from Anhui Province</p> 46 <p class="info">天天向上,好好学习</p> 47 48 <p> Hello everyone, I am JackSparrow and I am from Anhui Province</p> 49 </body> 50 </html>