基本介绍
- NIO的通道类似于流, 但有些区别:
- 通道可以同时进行读写, 而流只能读或者只能写
- 通道可以实现异步读写数据
- 通道可以从缓冲区(Buffer)读数据, 也可以写数据到缓冲区
- BIO中的stream是单向的, 例如 FileInputStream 对象只能进行读取数据的操作, 而NIO中的通道(Channel)是双向的, 可以读操作, 也可以写操作。
- Channel在NIO中是一个接口: public interface Channel extends Closeable{}
- 常用的 Channel类有: FileChannel、DatagramChannel、ServerSocketChannel 和 SocketChannel。
- FileChannel 用于文件的数据读写, DatagramChannel 用于UDP的数据读写, ServerSocketChannel 和 SocketChannel 用于 TCP 的数据读写。
FileChannel类
-
FileChannel主要用于对本地文件进行IO操作, 常见方法有:
- public int read(ByteBuffer dst): 从通道读取数据并放到缓冲区中
- public int write(ByteBuffer src): 把缓冲区的数据写到通道中
- public long transferFrom(ReadableByteChannel src, long position, long count), 从目标通道中复制数据到当前通道
- public long transferTo(long position, long count, WritableByteChannel target), 把数据从当前通道复制给目标通道
-
一个简单demo
-
示意图
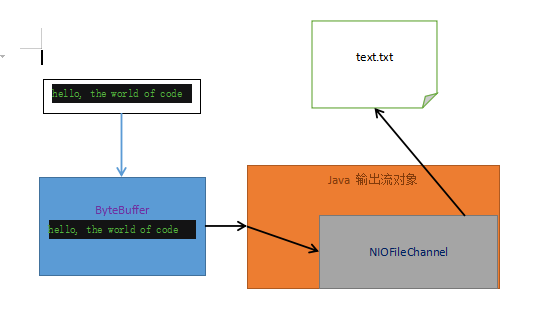
- 需要注意的是在将数据存入ByteBuffer再将数据写入到Channel中时需要对ByteBuffer进行flip转换改变模式。
-
写入案例代码
package com.ronnie.nio; import java.io.FileOutputStream; import java.io.IOException; import java.nio.ByteBuffer; import java.nio.channels.FileChannel; public class NIOFileChannel01 { public static void main(String[] args) throws IOException { String str = "hello, the world of code"; // 创建一个输出流 -> channel FileOutputStream fileOutputStream = new FileOutputStream("E:/fun/nio/doc/text.txt"); // 通过 fileOutputStream获取对应的 FileChannel // 需要注意的是: 此fileChannel真实类型是 FileChannelImpl FileChannel fileChannel = fileOutputStream.getChannel(); // 创建缓冲区 ByteBuffer ByteBuffer byteBuffer = ByteBuffer.allocate(1024); // 将 str 放入 byteBuffer byteBuffer.put(str.getBytes()); // 对byteBuffer进行反转(flip) byteBuffer.flip(); // 将byteBuffer 数据写入到channel fileChannel.write(byteBuffer); fileOutputStream.close(); } } -
细节
-
fileOutputStream.getChannel()获取的 fileChannel 真实类型是 FileChannelImpl, 是FileChannel的实现类, FileChannel本身只是一个抽象类。

-
getChannel()方法:
/** * Returns the unique {@link java.nio.channels.FileChannel * FileChannel} object associated with this file output stream. * 返回与此文件输出流相关的唯一FileChannel对象 * * <p> The initial {@link java.nio.channels.FileChannel#position() * position} of the returned channel will be equal to the * number of bytes written to the file so far unless this stream is * in append mode, in which case it will be equal to the size of the * file. * 返回的channel的初始位置与写入到此文件此文件的byte数一致(除非这个流式可 * 添加模式, 该模式下channel的初始位置会与该文件的大小一致) * Writing bytes to this stream will increment the channel's position * accordingly. * 将字节码写入到该流会增加该channel的位置 * Changing the channel's position, either explicitly or by * writing, will change this stream's file position. * 改变管道的位置, 无论是显示的修改还是通过写入修改, 都会改变此流的文件位置 * * @return the file channel associated with this file output stream * * @since 1.4 * @spec JSR-51 */ public FileChannel getChannel() { // 同步锁锁了当前输出流对象 synchronized (this) { // 如果管道为空 if (channel == null) { // 就创建一个新的FileChannelImpl对象赋给channel channel = FileChannelImpl.open(fd, path, false, true, append, this); } return channel; } }-
FileChannelImpl.open()方法:
    public static FileChannel open(FileDescriptor var0, String var1, boolean var2, boolean var3, boolean var4, Object var5) {
        return new FileChannelImpl(var0, var1, var2, var3, var4, var5);
    }
-
-
-
读取案例代码
package com.ronnie.nio; import java.io.File; import java.io.FileInputStream; import java.io.IOException; import java.nio.ByteBuffer; import java.nio.channels.FileChannel; public class NIOFileChannel02 { public static void main(String[] args) throws IOException { // 创建文件输入流 File file = new File("E:/fun/nio/doc/text.txt"); FileInputStream fileInputStream = new FileInputStream(file); // 通过fileInputStream 获取对应的fileChannel -> 实际类型 FileChannelImpl FileChannel fileChannel = fileInputStream.getChannel(); // 创建缓冲区 ByteBuffer byteBuffer = ByteBuffer.allocate((int) file.length()); // 将通道的数据读入到buffer中 fileChannel.read(byteBuffer); // 将字节数据转成String System.out.println(new String(byteBuffer.array())); fileInputStream.close(); } }- byteBuffer.array()返回的是底层的那个字节数组, 然后再将它转换成String类型。
-
一个Buffer完成文件读取案例
-
示意图

-
代码
package com.ronnie.nio;

import java.io.FileInputStream;
import java.io.FileOutputStream;
import java.io.IOException;
import java.nio.ByteBuffer;
import java.nio.channels.FileChannel;

public class NIOFileChannel03 {
    public static void main(String[] args) throws IOException {
        FileInputStream fileInputStream = new FileInputStream("1.txt");
        FileOutputStream fileOutputStream = new FileOutputStream("2.txt");

        FileChannel channel01 = fileInputStream.getChannel();
        FileChannel channel02 = fileOutputStream.getChannel();

        ByteBuffer byteBuffer = ByteBuffer.allocate(512);

        // 循环读取
        while (true){
            // 非常重要的操作, 复位(重置标志位)
            // 如果没写, 当position与limit相等时, read永远为0, 进入死循环
            byteBuffer.clear();

            int read = channel01.read(byteBuffer);
            if (read == -1){
                break;
            }
            // 将buffer 中的数据写入到 channel02
            byteBuffer.flip();
            channel02.write(byteBuffer);
        }

        // 关闭流
        fileInputStream.close();
        fileOutputStream.close();
    }
}
-
-
使用transferFrom()方法拷贝文件案例
package com.ronnie.nio;

import java.io.FileInputStream;
import java.io.FileOutputStream;
import java.io.IOException;
import java.nio.channels.FileChannel;

public class NIOFileChannel04 {
    public static void main(String[] args) throws IOException {

        // 创建线管的流
        FileInputStream fileInputStream = new FileInputStream("E:/fun/nio/doc/hadoop.jpg");
        FileOutputStream fileOutputStream = new FileOutputStream("E:/fun/nio/doc/hadoop2.jpg");

        // 获取各个流对应的fileChannel
        FileChannel sourceChannel = fileInputStream.getChannel();
        FileChannel destinationChannel = fileOutputStream.getChannel();

        // 使用transferFrom完成拷贝
        destinationChannel.transferFrom(sourceChannel, 0, sourceChannel.size());

        // 关闭相关通道和流
        sourceChannel.close();
        destinationChannel.close();
        fileInputStream.close();
        fileOutputStream.close();

    }
}
-
Buffer 和 Channel的注意事项和细节
-
ByteBuffer支持类型化的put和get, put放入的是什么数据类型, get就应该使用相应的数据类型来取出, 否则可能有 BufferUnderflowException 异常
package com.ronnie.nio;

import java.nio.ByteBuffer;

public class NIOByteBufferPutGet {
    public static void main(String[] args) {

        // 创建一个Buffer
        ByteBuffer buffer = ByteBuffer.allocate(64);

        // 类型化放入数据
        buffer.putInt(100);
        buffer.putLong(9);
        buffer.putChar('w');
        buffer.putShort((short) 4);

        // 取出
        buffer.flip();

        System.out.println();

        System.out.println(buffer.getInt());
        System.out.println(buffer.getLong());
        System.out.println(buffer.getChar());
        System.out.println(buffer.getShort());
        // 加个没的, 让它报错
        System.out.println(buffer.getLong());
    }
}
100 9 w 4 Exception in thread "main" java.nio.BufferUnderflowException at java.nio.Buffer.nextGetIndex(Buffer.java:506) at java.nio.HeapByteBuffer.getLong(HeapByteBuffer.java:412) at com.ronnie.nio.NIOByteBufferPutGet.main(NIOByteBufferPutGet.java:26) -
可以将一个普通Buffer转成只读Buffer, 转换后不能再写入
package com.ronnie.nio; import java.nio.ByteBuffer; public class ReadOnlyBuffer { public static void main(String[] args) { // 创建一个buffer ByteBuffer buffer = ByteBuffer.allocate(64); for (int i = 0; i < 64; i++){ buffer.put((byte) i); } // 读取 buffer.flip(); // 得到一个只读的Buffer ByteBuffer readOnlyBuffer = buffer.asReadOnlyBuffer(); System.out.println(readOnlyBuffer.getClass()); // 读取 while (readOnlyBuffer.hasRemaining()){ System.out.println(readOnlyBuffer.get()); } // 会抛出ReadOnlyBufferException readOnlyBuffer.put((byte) 100); } } -
NIO还提供了 MappedByteBuffer, 可以让文件直接在内存(堆外的内存)中进行修改。
package com.ronnie.nio; import java.io.IOException; import java.io.RandomAccessFile; import java.nio.MappedByteBuffer; import java.nio.channels.FileChannel; /** * MappedByteBuffer 可让文件直接在堆外内存修改, 操作系统无需将数据拷贝到用户态内存中, * 即零拷贝, kafka底层就是依靠netty实现了零拷贝 */ public class MappedByteBufferTest { public static void main(String[] args) throws IOException { RandomAccessFile randomAccessFile = new RandomAccessFile("1.txt", "rw"); // 获取对应的通道 FileChannel channel = randomAccessFile.getChannel(); /** * 参数1: FileChannel.MapMode.READ_WRITE 使用的读写模式 * 参数2: 0: 可以直接修改的起始位置 * 参数3: 5: 是映射到内存的大小(不是索引位置), 即将 1.txt 的多少个字节映射到 * 内存 * 可以直接修改的范围就是0~5, 不到5 */ MappedByteBuffer mappedByteBuffer = channel.map(FileChannel.MapMode.READ_WRITE, 0, 5); mappedByteBuffer.put(0, (byte) 'S'); mappedByteBuffer.put(3, (byte) '8'); // mappedByteBuffer.put(5, (byte) 'G'); 会抛出数组越界异常 randomAccessFile.close(); System.out.println("修改成功"); } } -
之前所说的读写操作都是通过一个Buffer完成的, NIO还支持通过多个Buffer(即Buffer数组) 完成读写操作, 即Scattering(分散) 和 Gathering(聚合)
-
案例代码:
package com.ronnie.nio; import java.io.IOException; import java.net.InetSocketAddress; import java.nio.Buffer; import java.nio.ByteBuffer; import java.nio.channels.ServerSocketChannel; import java.nio.channels.SocketChannel; import java.util.Arrays; /** * Scattering: 将数据写入到buffer时, 可以采用buffer数组, 依次写入 [分散] * Gathering: 从buffer读取数据时, 可以采用buffer数组, 依次读 */ public class ScatteringAndGatheringTest { public static void main(String[] args) throws IOException { // 使用 ServerSocketChannel 和 SocketChannel 网络 ServerSocketChannel serverSocketChannel = ServerSocketChannel.open(); InetSocketAddress inetSocketAddress = new InetSocketAddress(7000); // 绑定端口到socket, 并启动 serverSocketChannel.socket().bind(inetSocketAddress); // 创建Buffer数组 ByteBuffer[] byteBuffers = new ByteBuffer[2]; byteBuffers[0] = ByteBuffer.allocate(5); byteBuffers[1] = ByteBuffer.allocate(3); // 等待客户端连接(telnet) SocketChannel socketChannel = serverSocketChannel.accept(); // 假定从客户端接收8个字节 int messageLength = 8; // 循环的读取 while (true){ int byteRead = 0; while (byteRead < messageLength){ long l = socketChannel.read(byteBuffers); // 累计读取的字节数 byteRead += 1; System.out.println("byteRead = " + byteRead); // 使用流打印, 查看当前buffer的position和limit Arrays.stream(byteBuffers).map(buffer -> "position = " + buffer.position() + ", limit = " + buffer.limit()).forEach(System.out::println); } // 将所有的buffer进行反转(flip) Arrays.asList(byteBuffers).forEach(Buffer::flip); // 将数据读出显示到客户端 long byteWrite = 0; while(byteWrite < messageLength){ long l = socketChannel.write(byteBuffers);// 回写 byteWrite += 1; } // 将所有的 buffer 进行 clear操作 Arrays.asList(byteBuffers).forEach(Buffer::clear); System.out.println("byteRead := " + byteRead + " byteWrite = " + byteWrite + ", messageLength = " + messageLength); } } } -
windows的话打开win + R输入cmd, telnet 127.0.0.1 7000, 就就可以发送数据, 没有开启的请: 控制面板 -> 程序 -> 启用或关闭 Windows功能 -> 开启Telnet Client
-