一、下载Nexus
http://nexus.sonatype.org/downloads
我是用的版本是 nexus-2.11.4-01-bundle.tar.gz 每个版本的配置有些许差别。
二、安装
1、安装jdk
在/etc/profile下增加
# set Java environment
 JAVA_HOME=/usr/share/jdk1.6.0_43
 PATH=$JAVA_HOME/bin:$PATH
 CLASSPATH=.:$JAVA_HOME/lib/dt.jar:$JAVA_HOME/lib/tools.jar
 export JAVA_HOME
 export PATH
 export CLASSPATH
2、解压缩nexus
3、检查nexus配置 nexus-2.11.4-01/bin/jsw/conf 下的 wrapper.conf
A: 保存着私服目录(没找到在哪里配置?)
B:如果没有将java配置到环境变量中还需要修改 wrapper.java.command=java 配置
4、配置启动环境变量
在/etc/profile下增加
# nexus environment
 export RUN_AS_USER=root
5、启动nexus
cd /home/tools/nexus/nexus-2.11.4-01/bin
./nexus start
6、关闭防火墙配置
service iptables stop
7、访问nexus
http://192.168.0.40:8081/nexus
8、登陆
admin/admin123
三、linux自启动Nexus
1、复制$NEXUS_HOME/bin/jsw/linux-x86-64/nexus 到/etc/init.d/nexus
2、授于nexus脚本有可执行的权限:
chmod 755 /etc/init.d/nexus
3、修改nexus文件,配置以下参数:
a) 修改NEXUS_HOME 绝对路径,如:NEXUS_HOME="/usr/local/nexus"
b) 设置RUN_AS_USER=nexus,或都其它的用户,前提是创建了此用户。
c) 设置java环境
NEXUS_HOME="/home/tools/nexus/nexus-2.11.4-01"
 export RUN_AS_USER=root

 # set Java environment
 JAVA_HOME=/home/tools/java/jdk
 PATH=$JAVA_HOME/bin:$PATH
 CLASSPATH=.:$JAVA_HOME/lib/dt.jar:$JAVA_HOME/lib/tools.jar
 export JAVA_HOME
 export PATH
 export CLASSPATH
4、Red Hat, Fedora, CentOS增加nexus服务
cd /etc/init.d
chkconfig --add nexus
chkconfig --levels 345 nexus on
service nexus start
5、Ubuntu and Debian增加nexus服务
cd /etc/init.d
update-rc.d nexus defaults
chkconfig --levels 345 nexus on
service nexus start
四、配置
1、同步中心库索引到本地中心库
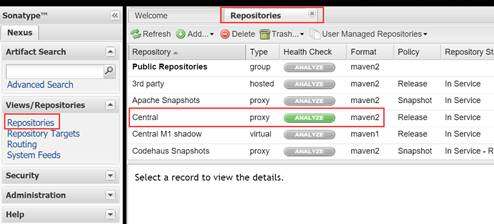
1、单击Repositories,显示中心仓库
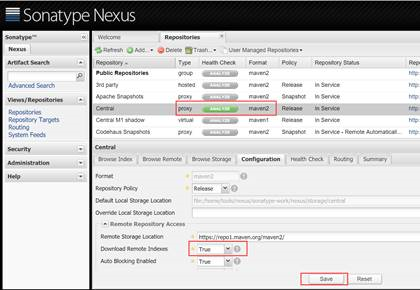
2、单击中心仓库,将下载远程中心库索引设置为true后单击save
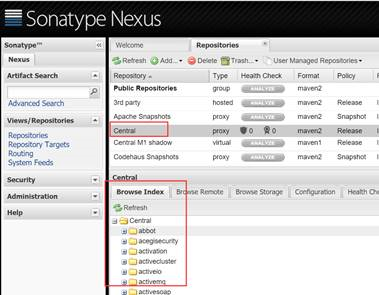
3、配置后会在本地索引中看到所有index此时jar库并没有下载
2、windows中mvn设置
1、下载
http://maven.apache.org/download.html
2、配置mvn,根据实际情况配置如下三个参数
M2_HOME
    C:apache-maven-3.3.3
path
    %M2_HOME%in
JAVA_HOME
    C:Program FilesJavajdk1.7.0_45

3、检查mvn安装是否正确
mvn –version
4、修改settings.xml指向到私服nexus仓库
打开C:apache-maven-3.3.3confsettings.xml 添加如下内容:
在<profiles></profiles>中添加
<profile>
  <id>nexus</id>
  <repositories><!--配置远程仓库-->
  <repository>
  <id>nexus</id>
  <name>Central Repository</name>
  <url>http://192.168.0.40:8081/nexus/content/groups/public</url>
  <releases>
  <enabled>true</enabled>
  </releases>
  <snapshots>
  <enabled>false</enabled><!---->
  </snapshots>
  </repository>
  </repositories>
  <pluginRepositories><!--配置Maven从什么地方下载插件构件-->
  <pluginRepository>
  <id>nexus</id>
  <name>Central Repository</name>
  <url>http://192.168.0.40:8081/nexus/content/groups/public</url>
  <releases>
  <enabled>true</enabled>
  </releases>
  <snapshots>
  <enabled>false</enabled>
  </snapshots>
  </pluginRepository>
  </pluginRepositories>
  </profile>
在<profiles></profiles>之后添加
<activeProfiles><!--激活 远程仓库-->
  <activeProfile>nexus</activeProfile>
 </activeProfiles>
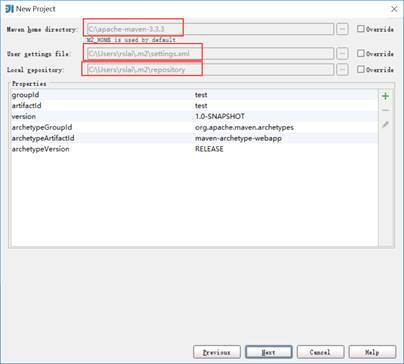
五、idea新建mvn项目
1、选择新建mavn项目后单击next

2、填写项目名称后单击next,确定本地库配置settings.xml和本地库目录后单击next
3、打开idea后在pom.xml上单击鼠标右键重新导入所需jar包

5、打开pom.xml增加spring-webmvc
<dependencies>
  <dependency>
  <groupId>spring</groupId>
  <artifactId>spring-webmvc</artifactId>
  <version>1.0.2</version>
  </dependency>
  </dependencies>
6、再次重新导入jar包,此时在linux的nexus/sonatype-work目录中看到下载的jar包
六、为本地仓库配置用户
本地仓库snapshots、releases可以使用admin账户发布,也可创建用户上传。
● Privileges(权限):为相应仓库设置权限
● Roles(角色):将一组权限生成一个角色
● Users(用户):新建用户并指定角色
1、Privileges,分别给snapshots、releases设置权限
A)新增“Repository Target Privilege”
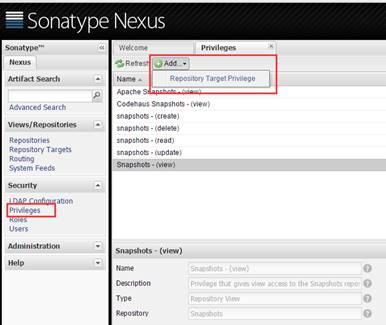
B)填写名字仓库等信息

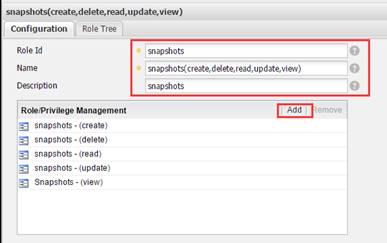
2、Roles,分别给snapshots、releases设置角色
A)新增Nexu Role
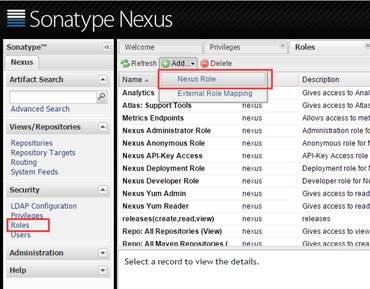
B)填写名字并设置相应权限
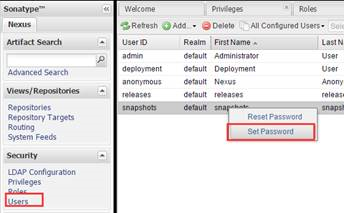
3、Users,分别给snapshots、releases设置用户
a)新增nexus user
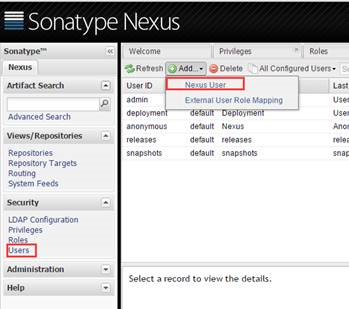
B)填写名字及选择相应role

C)为用户设置密码
七、发布到私有仓库
1、修改settings.xml
除了按照“五、idea新建mvn项目”配置settings.xml还需要添加用户刚刚创建的仓库密码
<servers>
<server>
<id>snapshots</id>
<username>snapshots</username>
<password>Gl4Fo3Sj8Ci7Jt9Ct8Bs</password>
</server>
<server>
<id>releases</id>
<username>releases</username>
<password>Gl4Fo3Sj8Ci7Jt9Ct8Bs</password>
</server>
</servers>
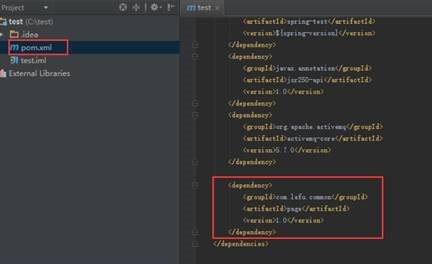
2、修改pom.xml
<version>1.0-SNAPSHOT</version>
  <groupId>com.lefu.common</groupId>
  <artifactId>page</artifactId>
  <name>page</name>
  <packaging>jar</packaging>

  <properties>
  <project.build.sourceEncoding>UTF-8</project.build.sourceEncoding>
  </properties>

  <distributionManagement>
  <repository>
  <id>releases</id>
  <name>Nexus Release Repository</name>
  <url>http://192.168.0.11:8081/nexus/content/repositories/releases/</url>
  </repository>
  <snapshotRepository>
  <id>snapshots</id>
  <name>lefu snapshots</name>
  <url>http://192.168.0.11:8081/nexus/content/repositories/snapshots/</url>
  </snapshotRepository>
  </distributionManagement>
3、发布到仓库
在命令行执行如下命令
mvn clean source:jar package -Dmaven.skip.test=true -DskipTests deploy
注:
1. mvn根据version中的SNAPSHOT来判断是发布到snapshots还是releases库中
2. releases库默认不允许重新发布,在nexus中如下设置可以重新发布
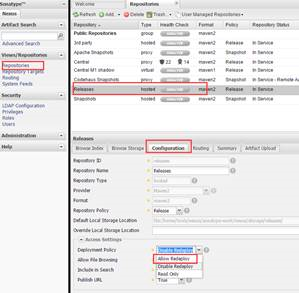
八、查询jar包并在工程中引用
1、选择“Advanced search”并指定使用“classname search”查找
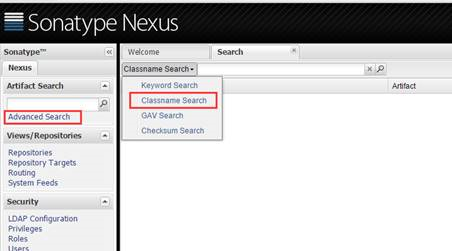
2、输入要搜索的包名,copy出dependency
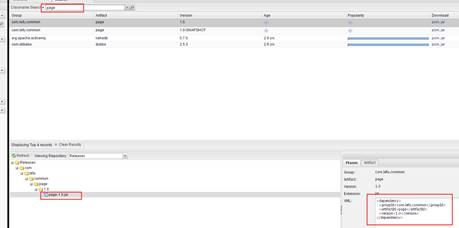
3、将dependency加入需要调用的pom文件即可