1.构造方法
构造方法是一种特殊的方法,专门用于构造/实例化对象。
构造方法根据是否有参数分为无参构造方法和有参构造方法。
1.1无参构造方法
无参构造方法就是构造方法没有任何参数。无参构造方法在创建(new class类名())时调用;无参构造方法一般用于给属性赋默认值。语法:
[修饰符]  类名(){

  .......

}
例如:
 1 public class Dog{
 2
 3     String name;
 4     int health;
 5     int love;
 6     String strain;
 7
 8     public Dog(){    //无参构造方法
9 System.out.println("构造方法");
10 health = 100; 11 love = 0; 12 } 13 … 14 }
如果开发中没有定义无参构造方法,jvm(虚拟机)默认给类分配一个无参构造方法。
1.2有参构造方法
当构造/实例化对象时,可以向方法中传递参数,这样子构造的方法叫有参构造方法。
语法:
[修饰符] 类名(Type arg1,Type arg2,…){
    // 初始化代码
}
注:有参构造方法与无参构造方法是方法重载。
1.2.1有参构造常见的问题
如果一个类中提供了有参构造的方法,则JVM(虚拟机)中就不再给该类分配无参构造。
例如:
public class Dog{
   String name;
    int health;
    int love;
    String strain;

    public Dog(String _name,int _health,int _love,String _strain){  //定义了一个有参构造方法但没有定义无参构造方法
        name = _name;
        health = _health;
        love = _love;
        strain = _strain;
    }
 1 public class TestCar{
 2     public static void main(String[] args){
 3         Dog dog = new Dog();   //调用无参构造方法
 4         dog.name = name;
 5         dog.health = 100;
 6         dog.love = 0;
 7         dog.strain = strain;
 8
 9
10         }
11 }
运行结果出错:此时jvm不在默认分配无参构造方法
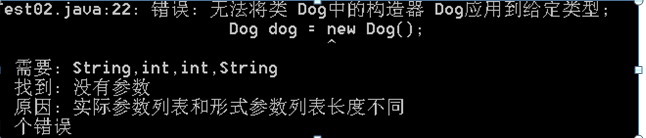
注意:在开发过程中,如果开发者提供了有参构造方法,一定要习惯性的提供无参构造。
2.This关键字
对象初始化内存图
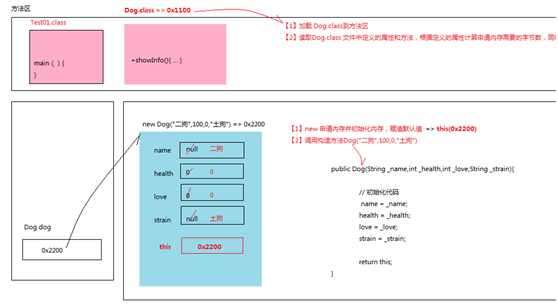
对象初始化内存图中的方法区位于栈和堆内存的上方,用于保存class和各种方法,对象初始化的过程中最先把class加载该区域,读取class文件中定义的属性和方法,根据定义的属性计算申请内存需要的字节数。
然后用 new在堆中申请内存并初始化内存。并在堆中生成This关键字,This中存放的是该对象本身的地址,也就说当调用This关键字时,还是指向对象本身。this可用于访问本对象属性,同时解决局部变量和成员变量同名的问题(成员变量可以用this.成员变量名代替)。
例如
1 public Dog2(String name,int health,int love,String strain){
2 System.out.println("this:"+this);
3     this.name = name;  //this.name代表的就是成员变量(成员属性),name代表的是你输入名。
4     this.health = health;
5     this.love = love;
6     this.strain = strain;
7 }

通过打印this中的引用,可以看出对象dog和this指向同一内存。
一般而言,dog用于类的外部,this用于类的内部。因为类的内部根本不知道 car 变量名的存在。
方法的调用内存图
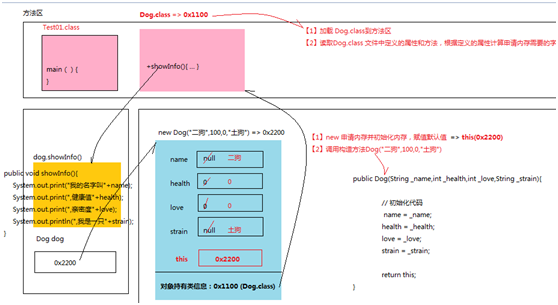
因为在方法中调用了该对象的属性,我们可以用This指向该对象,可以更加快捷的找到其属性值。
1 public void showInfo(){
2         System.out.print("我的名字叫"+this.name); //this.属性名 访问
3         System.out.print(",健康值"+this.health);
4         System.out.print(",亲密度"+this.love);
5         System.out.println(",我是一只"+this.strain);
6 }
总结:
[1] this调用属性
[2] this调用方法
[3] this调用本类的构造方法。形如:
 1 public Dog(String name,int health,int love){
 2         this.setName(name);       //调用方法
 3         this.setHealth(health);
 4         this.setLove(love);
 5     }
 6
 7
 8     public Dog(String name,int health,int love,String strain){
 9         //this.setName(name);
10         //this.setHealth(health);
11         //this.setLove(love);
12
13         // this调用本类的其他构造方法
14         this(name,health,love);  //调用本类的
15         this.setStrain(strain);
16
17         // showInfo();
18         //this.showInfo();
19     }
3.静态(static)
static 关键字表示静态,可以修饰变量,也可以修饰方法。一个类中包含静态成员(静态变量和静态方法)和实例成员(实例变量也叫属性和实例方法)
下面有这样的一个简单的需求可用static实现
需求:统计汽车工厂生成了多少量车?
ð 统计工厂生成了多少量汽车的功能应该放到类功能上,不应该属于某个对象。
ð 声明一个变量用于统计个数,这个变量应该被类的实例共享。(static)
ð 被类的实例共享的区域在方法区(Car.class)
ð 用static关键字声明这样的变量
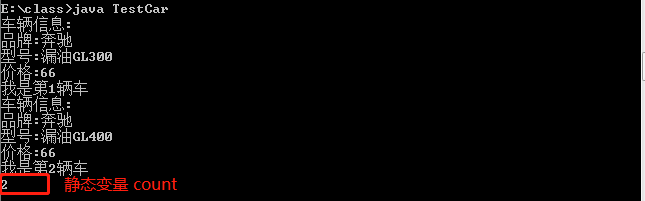
 1 public class Car{
 2     String brand;
 3     String type;
 4     int price;
 5     static int count; //静态变量的使用方法
 6     public Car(){
 7         count = 0;
 8     }
 9
10     public Car(String brand,String type,int price){
11         this.brand = brand;
12         this.type = type;
13         this.price = price;
14         count++;
15         showInfo();
16
17     }
18
19     public void showInfo(){
20         System.out.println("车辆信息:");
21         System.out.println("品牌:"+this.brand);
22         System.out.println("型号:"+this.type);
23         System.out.println("价格:"+this.price);
24         System.out.println("我是第"+Car.count+"辆车"); //静态变量的访问方式
25
26
27
28     }
29 }
 1 public class TestCar{
 2     public static void main(String[] args){
 3         Car car1 = new Car("奔驰","漏油GL300",66);
 4
 5
 6
 7         Car car2 = new Car("奔驰","漏油GL400",66);
 8
 9
10     }
11 }

从运行效果图可以我们看出定义的静态变量count并属于哪一个对象,他是属于类所有的,类中的所有对象都可以访问。其区别于其它实例变量(brand、type、price)归实例(对象)所有,每个不同的对象都可以赋不同的属性值,各个对象是之间没有什么联系的。下面我们来详细认识什么是静态变量。
3.1静态变量
static 修饰的变量称为静态变量/静态属性,语法:
static 类型 变量名称 [= 初始值]
静态变量归类所有,也叫类变量,分配在方法区(共享区)中的静态区,可以被类的实例(对象)共享访问。
内存图

静态变量的访问方法为:
[1] 类名.静态变量(推荐):更好的说明静态变量归类所有
[2] 对象.静态变量
3.2静态方法
用static修饰的方法我们称为静态方法。使用的语法:
[修饰符] static 返回值类型 方法名(arg…){
}
静态方法也归类所有,调用形式和访问静态变量一样。
[1] 类名.方法名() (推荐)
[2] 对象.方法名()
静态方法在使用过程中遇到的常见问题:
用静态方法访问实例变量
public class Car{
    String brand;
    String type;
    int price;
    static int count;
    public Car(){
        count = 0;
    }

    public Car(String brand,String type,int price){
        this.brand = brand;
        this.type = type;
        this.price = price;
        count++;
        showInfo();

    }

    public void showInfo(){
        System.out.println("车辆信息:");
        System.out.println("品牌:"+this.brand);
        System.out.println("型号:"+this.type);
        System.out.println("价格:"+this.price);
        System.out.println("我是第"+Car.count+"辆车");
    }
    public static int getCarCount(){
        //定义一个静态方法访问实例变量
        System.out.println("价格:"+this.price);
    }

}
运行结果:

用静态方法访问实例方法
public static int getCarCount(){
        //定义一个静态方法访问实例变量
        //System.out.println("价格:"+this.price);
        //静态方法访问实例方法
        this.showInfo();
    }
运行结果:

总结:可以看出通过静态方法并不能访问实例成员(实例变量与实例方法);但是实例方法却可以访问静态成员(静态变量、静态方法);
通过静态方法可以访问静态变量
public static int getCarCount(){
        //定义一个静态方法访问实例变量
        //System.out.println("价格:"+this.price);
        //静态方法访问实例方法
        //this.showInfo();
        //返回一个静态变量count
        return Car.count;

    }
public class TestCar{
    public static void main(String[] args){
        Car car1 = new Car("奔驰","漏油GL300",66);


        Car car2 = new Car("奔驰","漏油GL400",66);
        System.out.println(Car.getCarCount());   //调用静态方法并把返回值打印出来


    }
}
运行结果:
3.3静态常量
在程序运行过程中,如果一个量的值不会发生改变,可以把该量声明为静态常量,用static final修饰。
 1 public class Penguin{
 2
 3     private String name;
 4     private int health;
 5     private int love;
 6     private String gender;
 7
 8     static final String SEX_MALE = "雄";
 9     static final String SEX_FEMALE = "雌";
10
11 ....
12 }
作用:方便日后修改代码,减少重复操作。
4.类的加载机制
为什么:[1]实例方法可以访问静态成员。
[2]静态方法不能访问非静态成员。
当实例化一个对象时(Car car = new Car(…);)jvm首先把Car.class加载到方法区,然后
[1]读取Car.class 根据声明的成员变量计算申请内存需要的字节数
[2]读取Car.class 中的静态成员,给静态变量在方法区分配空间并初始化。
接着new Car 申请内存得到一个car对象,此时才有对象的空间。showInfo才可以通过car对象调用。
也就是说程序运行时是先给静态变量分配空间初始化,那时的对象还没在堆中分配有空间(通俗来说还没产生对象),这时怎么可能调用呢!
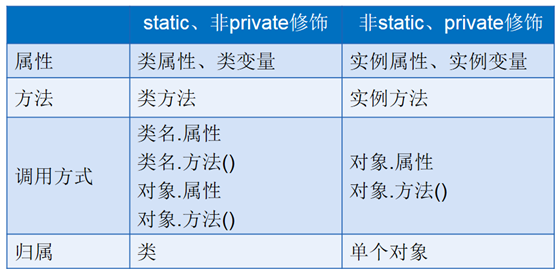
5.小结
6.封装
封装:将类的某些信息隐藏在类内部,不允许外部程序直接访问,而是通过该类提供的方法来实现对隐藏信息的操作和访问。
封装的步骤:
[1]属性私有化
[2]提供公共的设置器和访问器
[3]在设置器和访问器中添加业务校验逻辑
 1 public class Penguin{
 2     String name;
 3     // 【1】private 私有的,对外不可见
 4     private int health;
 5     int love;
 6     String gender;
 7      // 【2】提供公共的设置器(setter)和访问器(getter)
 8     public void setHealth(int health){
 9          // 【3】逻辑校验
10         if(health <0){
11             this.health = 60;
12             System.out.println("健康不合法");
13         }else{
14             this.health = health;
15         }
16     }
17     public int getHealth(){
18         return this.health;
19     }
20
21     public Penguin(){
22
23     }
24     public Penguin(String name,String gender){
25         this.name = name;
26         this.gender = gender;
27     }
28     public Penguin(String name,String gender,int health,int love){
29         this(name,gender);
30         this.setHealth(health);
31         this.love = love;
32     }
33
34     public void showInfo(){
35         System.out.print("我的名字叫"+this.name);
36         System.out.print(",健康值"+this.health);
37         System.out.print(",和主人的亲密度"+this.love);
38         System.out.println(",性别"+this.gender);
39
40     }
41 }
 1 public class Test01{
 2     public static void main(String[] args){
 3         //new 得到构造方法(调用构造方法)
 4        // Penguin penguin = new Penguin("美美","Q妹");
 5         //penguin.showInfo();
 6         Penguin penguin02 = new Penguin("壮壮","Q仔",-10,10);
 7         penguin02.showInfo();
 8         //Penguin penguin03 = new Penguin();
 9         //penguin03.setHealth(-10);
10         //penguin03.showInfo();
11     }
12 }
运行结果:

从打印结果可以看出,当你输入的健康值小于0时,经过你设定的逻辑校验时,会重新分配默认60。