本节实验将带你学习 Spring 的事务管理,事务在日常开发中非常重要,它可以对数据库中的一些异常进行回滚,这样就可以保证数据的一致性。
事务的四个特性:
- 原子性(Atomicity):事务是一个原子操作,由一系列动作组成。事务的原子性确保动作要么全部完成,要么完全不起作用。
- 一致性(Consistency):一旦事务完成(不管成功还是失败),系统必须确保它所建模的业务处于一致的状态,而不会是部分完成部分失败。在现实中的数据不应该被破坏。
- 隔离性(Isolation):可能有许多事务会同时处理相同的数据,因此每个事务都应该与其他事务隔离开来,防止数据损坏。
- 持久性(Durability):一旦事务完成,无论发生什么系统错误,它的结果都不应该受到影响,这样就能从任何系统崩溃中恢复过来。通常情况下,事务的结果被写到持久化存储器中。
知识点
- Spring 编程式事务管理
- Spring 申明式事务管理
实验步骤
这一节我们将学习 Spring 中的事务管理,Spring 中有两种事务管理的方式,一种是编程式事务管理,另一种是声明式事务管理。
- 编程式事务管理:所谓编程式事务指的是通过编码方式实现事务,允许用户在代码中精确定义事务的边界。即类似于 JDBC 编程实现事务管理。管理使用 TransactionTemplate 或者直接使用底层的 PlatformTransactionManager。对于编程式事务管理,spring 推荐使用 TransactionTemplate。
- 声明式事务管理:管理建立在 AOP 之上的。其本质是对方法前后进行拦截,然后在目标方法开始之前创建或者加入一个事务,在执行完目标方法之后根据执行情况提交或者回滚事务。声明式事务最大的优点就是不需要通过编程的方式管理事务,这样就不需要在业务逻辑代码中掺杂事务管理的代码,只需在配置文件中做相关的事务规则声明(或通过基于@Transactional 注解的方式),便可以将事务规则应用到业务逻辑中。
接下我们将通过一个转账的案例来分别讲解这两种事务管理方式。
Spring 编程式事务管理
数据库准备
本次课程使用 MySQL。首先启动 MySQL:
sudo service mysql start
然后在终端下输入以下命令,进入到 MySQL 数据库。-u 表示用户名,比如这里的 root,-p 表示密码,这里没有密码就省略了:
mysql -u root
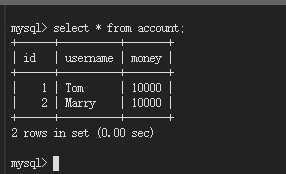
为了实验方便,我们在这里新建一个数据库并取名 transaction 用作实验。

创建账户表 account 并插入两条数据:
use transaction
create table account(
    id int,
    username varchar(20),
     money int);

insert into account values(1,'Tom',10000),(2,'Marry',10000);
检查数据插入情况:
新建项目
首先创建一个新的 maven 工程 springTansaction,打开 Terminal,选择 File->Open New Terminal,在终端中输入:
mvn archetype:generate -DgroupId=com.shiyanlou.tx -DartifactId=springTansaction -DarchetypeArtifactId=maven-archetype-quickstart
选择 File->Open Workspace 切换工作空间,选择 springTansaction 目录,必须切换到该目录下,否则识别不了项目。
修改 pom.xml 文件,添加 Spring 的依赖:
<project xmlns = "http://maven.apache.org/POM/4.0.0" xmlns:xsi = "http://www.w3.org/2001/XMLSchema-instance"
  xsi:schemaLocation = "http://maven.apache.org/POM/4.0.0 http://maven.apache.org/maven-v4_0_0.xsd">
  <modelVersion>4.0.0</modelVersion>

  <groupId>com.shiyanlou.tx</groupId>
  <artifactId>springTransaction</artifactId>
  <packaging>jar</packaging>
  <version>1.0-SNAPSHOT</version>

  <name>springTransaction</name>
  <url>http://maven.apache.org</url>

    <properties>
        <project.build.sourceEncoding>UTF-8</project.build.sourceEncoding>
        <maven.compiler.source>1.8</maven.compiler.source>
        <maven.compiler.target>1.8</maven.compiler.target>
        <spring.version>5.1.1.RELEASE</spring.version>
    </properties>

  <dependencies>
    <dependency>
        <groupId>org.springframework</groupId>
        <artifactId>spring-core</artifactId>
        <version>${spring.version}</version>
    </dependency>
    <dependency>
        <groupId>org.springframework</groupId>
        <artifactId>spring-context</artifactId>
        <version>${spring.version}</version>
    </dependency>

    <dependency>
      <groupId>org.springframework</groupId>
      <artifactId>spring-jdbc</artifactId>
      <version>${spring.version}</version>
    </dependency>

    <dependency>
        <groupId>mysql</groupId>
        <artifactId>mysql-connector-java</artifactId>
        <version>5.1.46</version>
    </dependency>

    <dependency>
        <groupId>org.springframework</groupId>
        <artifactId>spring-aop</artifactId>
        <version>${spring.version}</version>
    </dependency>


    <dependency>
      <groupId>org.springframework</groupId>
      <artifactId>spring-tx</artifactId>
      <version>${spring.version}</version>
    </dependency>


    <dependency>
      <groupId>org.springframework</groupId>
      <artifactId>spring-test</artifactId>
      <version>${spring.version}</version>
      <scope>test</scope>
    </dependency>

    <dependency>
      <groupId>junit</groupId>
      <artifactId>junit</artifactId>
      <version>4.12</version>
      <scope>test</scope>
    </dependency>
  </dependencies>
</project>
首先创建包 com.shiyanlou.tx.dao,创建 AccountDao.java,代码如下:
package com.shiyanlou.tx.dao;

public interface AccountDao {
    /**
     * 汇款
     * @param outer 汇款人
     * @param money 汇款金额
     */
    public void out(String outer,int money);

    /**
     * 收款
     * @param inner 收款人
     * @param money 收款金额
     */
    public void in(String inner,int money);

}
在再这个包下创建 AccountDaoImpl.java,代码如下:
package com.shiyanlou.tx.dao;

import org.springframework.jdbc.core.support.JdbcDaoSupport;

import com.shiyanlou.tx.dao.AccountDao;

public class AccountDaoImpl extends JdbcDaoSupport implements AccountDao {

    /**
     * 根据用户名减少账户金额
     */
    @Override
    public void out(String outer, int money) {
        this.getJdbcTemplate().update("update account set money = money - ? where username = ?",money,outer);
    }

    /**
     * 根据用户名增加账户金额
     */
    @Override
    public void in(String inner, int money) {
        this.getJdbcTemplate().update("update account set money = money + ? where username = ?",money,inner);
    }

}
创建包 com.shiyanlou.tx.service,创建 AccountService.java,代码如下:
package com.shiyanlou.tx.service;

public interface AccountService {

    /**
     * 转账
     * @param outer 汇款人
     * @param inner 收款人
     * @param money 交易金额
     */
    public void transfer(String outer,String inner,int money);

}
再在这个包下创建 AccountServiceImpl.java,代码如下:
package com.shiyanlou.tx.service;

import org.springframework.transaction.TransactionStatus;
import org.springframework.transaction.support.TransactionCallbackWithoutResult;
import org.springframework.transaction.support.TransactionTemplate;

import com.shiyanlou.tx.dao.AccountDao;
import com.shiyanlou.tx.service.AccountService;

public class AccountServiceImpl implements AccountService{

    private AccountDao accountDao;
    private TransactionTemplate transactionTemplate;

    public void setTransactionTemplate(TransactionTemplate transactionTemplate) {
        this.transactionTemplate = transactionTemplate;
    }
    public void setAccountDao(AccountDao accountDao) {
        this.accountDao = accountDao;
    }
    @Override
    public void transfer(final String outer,final String inner,final int money) {
        transactionTemplate.execute(new TransactionCallbackWithoutResult() {
            @Override
            protected void doInTransactionWithoutResult(TransactionStatus arg0) {
                accountDao.out(outer, money);
                int i = 1/0;
                accountDao.in(inner, money);
            }
        });
    }

}
我们先在 src/main/ 下新建一个 Folder,命名为 resources,现在可以开始创建 Spring Bean 配置文件,创建文件 SpringBeans.xml,配置 bean 如下。文件位于 src/main/resources 下。
编辑 SpringBeans.xml 文件如下:
<?xml version = "1.0" encoding = "UTF-8"?>
<beans xmlns = "http://www.springframework.org/schema/beans"
       xmlns:xsi = "http://www.w3.org/2001/XMLSchema-instance"
       xmlns:context = "http://www.springframework.org/schema/context"
       xmlns:aop = "http://www.springframework.org/schema/aop"
       xsi:schemaLocation = "http://www.springframework.org/schema/beans
                           http://www.springframework.org/schema/beans/spring-beans.xsd
                           http://www.springframework.org/schema/aop
                           http://www.springframework.org/schema/aop/spring-aop.xsd
                           http://www.springframework.org/schema/context
                           http://www.springframework.org/schema/context/spring-context.xsd">

    <bean id = "dataSource" class = "org.springframework.jdbc.datasource.DriverManagerDataSource">
        <property name = "driverClassName" value = "com.mysql.jdbc.Driver"/>
        <property name = "url" value = "jdbc:mysql://localhost/transaction"/>
        <property name = "username" value = "root"/>
        <property name = "password" value = ""/>
    </bean>

    <bean id = "accountDao" class = "com.shiyanlou.tx.dao.AccountDaoImpl">
        <property name = "dataSource" ref = "dataSource"></property>
    </bean>

    <bean id = "accountService" class = "com.shiyanlou.tx.service.AccountServiceImpl">
        <property name = "accountDao" ref = "accountDao"></property>
        <property name = "transactionTemplate" ref = "transactionTemplate"></property>
    </bean>

        <!-- 创建模板 -->
    <bean id = "transactionTemplate" class = "org.springframework.transaction.support.TransactionTemplate">
        <property name = "transactionManager" ref = "txManager"></property>
    </bean>

    <!-- 配置事务管理器,管理器需要事务,事务从 Connection 获得,连接从连接池DataSource获得 -->
    <bean id = "txManager" class = "org.springframework.jdbc.datasource.DataSourceTransactionManager">
        <property name = "dataSource" ref = "dataSource"></property>
    </bean>
</beans>
最后创建 App.java,在包路径 com.shiyanlou.tx 下,代码如下:
package com.shiyanlou.tx;

import org.springframework.context.ApplicationContext;
import org.springframework.context.support.ClassPathXmlApplicationContext;

import com.shiyanlou.tx.service.AccountService;

public class App {
    private static ApplicationContext context;

    public static void main(String[] args) {
        context = new ClassPathXmlApplicationContext("SpringBeans.xml");

        AccountService account = (AccountService) context.getBean("accountService");
        // Tom 向 Marry 转账1000
        account.transfer("Tom", "Marry", 1000);
    }
}
运行:
mvn compile
mvn exec:java -Dexec.mainClass="com.shiyanlou.tx.App"
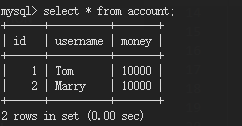
程序发生异常,此时数据库会回滚,所以没有数据的变化,查看数据库:
现在让我们修改 AccountServiceImpl.java 中的代码:
package com.shiyanlou.tx.service;

import com.shiyanlou.tx.dao.AccountDao;
import com.shiyanlou.tx.service.AccountService;

public class AccountServiceImpl implements AccountService{

    private AccountDao accountDao;

    public void setAccountDao(AccountDao accountDao) {
        this.accountDao = accountDao;
    }
    @Override
    public void transfer(String outer, String inner, int money) {
        accountDao.out(outer, money);
        int i = 1/0;
        accountDao.in(inner, money);
    }

}
再修改 SpringBeans.xml 中的代码:
<?xml version = "1.0" encoding = "UTF-8"?>
<beans xmlns = "http://www.springframework.org/schema/beans"
       xmlns:xsi = "http://www.w3.org/2001/XMLSchema-instance"
       xmlns:context = "http://www.springframework.org/schema/context"
       xmlns:aop = "http://www.springframework.org/schema/aop"
       xsi:schemaLocation = "http://www.springframework.org/schema/beans
                           http://www.springframework.org/schema/beans/spring-beans.xsd
                           http://www.springframework.org/schema/aop
                           http://www.springframework.org/schema/aop/spring-aop.xsd
                           http://www.springframework.org/schema/context
                           http://www.springframework.org/schema/context/spring-context.xsd">

    <bean id = "dataSource" class = "org.springframework.jdbc.datasource.DriverManagerDataSource">
        <property name = "driverClassName" value = "com.mysql.jdbc.Driver"/>
        <property name = "url" value = "jdbc:mysql://localhost/transaction"/>
        <property name = "username" value = "root"/>
        <property name = "password" value = ""/>
    </bean>

    <bean id = "accountDao" class = "com.shiyanlou.tx.dao.AccountDaoImpl">
        <property name = "dataSource" ref = "dataSource"></property>
    </bean>

    <bean id = "accountService" class = "com.shiyanlou.tx.service.AccountServiceImpl">
        <property name = "accountDao" ref = "accountDao"></property>
    </bean>
</beans>
再次运行:
mvn compile
mvn exec:java -Dexec.mainClass="com.shiyanlou.tx.App"
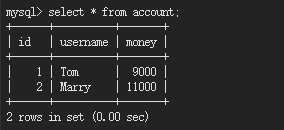
程序发生异常,由于没有加入事务,就算发生异常,还是会更新数据库的数据,查看数据库:
Spring 申明式事务管理
首先修改 SpringBeans.xml 中的代码:
<?xml version = "1.0" encoding = "UTF-8"?>
<beans xmlns = "http://www.springframework.org/schema/beans"
       xmlns:xsi = "http://www.w3.org/2001/XMLSchema-instance"
       xmlns:context = "http://www.springframework.org/schema/context"
       xmlns:aop = "http://www.springframework.org/schema/aop"
       xmlns:tx = "http://www.springframework.org/schema/tx"
       xsi:schemaLocation = "http://www.springframework.org/schema/beans
                           http://www.springframework.org/schema/beans/spring-beans.xsd
                           http://www.springframework.org/schema/aop
                           http://www.springframework.org/schema/aop/spring-aop.xsd
                           http://www.springframework.org/schema/context
                           http://www.springframework.org/schema/context/spring-context.xsd
                           http://www.springframework.org/schema/tx
                           http://www.springframework.org/schema/tx/spring-tx.xsd">

    <bean id = "dataSource" class = "org.springframework.jdbc.datasource.DriverManagerDataSource">
        <property name = "driverClassName" value = "com.mysql.jdbc.Driver"/>
        <property name = "url" value = "jdbc:mysql://localhost/transaction"/>
        <property name = "username" value = "root"/>
        <property name = "password" value = ""/>
    </bean>

    <bean id = "accountDao" class = "com.shiyanlou.tx.dao.AccountDaoImpl">
        <property name = "dataSource" ref = "dataSource"></property>
    </bean>

    <bean id = "accountService" class = "com.shiyanlou.tx.service.AccountServiceImpl">
        <property name = "accountDao" ref = "accountDao"></property>
    </bean>

<!-- 1 事务管理器 -->
    <bean id = "txManager" class = "org.springframework.jdbc.datasource.DataSourceTransactionManager">
        <property name = "dataSource" ref = "dataSource"></property>
    </bean>
    <!-- 2 将管理器交予 spring
        * transaction-manager 配置事务管理器
        * proxy-target-class
            true : 底层强制使用 cglib 代理
    -->
    <tx:annotation-driven transaction-manager = "txManager" proxy-target-class = "true"/>
</beans>
然后修改 AccountServiceImpl.java 中的代码:
package com.shiyanlou.tx.service;

import javax.annotation.Resource;

import org.springframework.beans.factory.annotation.Autowired;
import org.springframework.stereotype.Service;
import org.springframework.transaction.annotation.Isolation;
import org.springframework.transaction.annotation.Propagation;
import org.springframework.transaction.annotation.Transactional;

import com.shiyanlou.tx.dao.AccountDao;
import com.shiyanlou.tx.service.AccountService;

@Transactional(propagation = Propagation.REQUIRED , isolation = Isolation.DEFAULT)
@Service("accountService")
public class AccountServiceImpl implements AccountService{
    @Resource(name = "accountDao")
    private AccountDao accountDao;

    public void setAccountDao(AccountDao accountDao) {
        this.accountDao = accountDao;
    }
    @Override
    public void transfer(String outer, String inner, int money) {
        accountDao.out(outer, money);
        // int i = 1/0;
        accountDao.in(inner, money);
    }

}
先将 AccountServiceImpl.java 中的 int i = 1/0 注释掉,以验证代码的正确性,然后运行:
mvn compile
mvn exec:java -Dexec.mainClass="com.shiyanlou.tx.App"
查看数据库:

数据发生了变化,说明在没有异常的时候代码是正确的,然后再将 int i = 1/0 取消注释,运行:
mvn compile
mvn exec:java -Dexec.mainClass="com.shiyanlou.tx.App"
查看数据库:

由于添加了事务,发生异常过后会回滚,所以数据没有变化。
本节课程学习了 Spring 框架中的事务管理,有了事务就可以避免因为异常而导致的数据不一致的情况。希望同学们可以好好理解一下这些内容,然后自己亲手实现课程中的代码。