1. ansible-playbook文件复用
1.1) include 和 import区别
include(动态):在运行时导入
- --list-tags,--list-tasks不会显示到输出
- 不能使用notify触发来自include内处理程序名称(handlers)
import(静态):在playbook解析时预先导入
- 不能与循环一起使用
- 将变量用于目标文件或角色名称时,不能使用inventory(主机/主机组等)中的变量
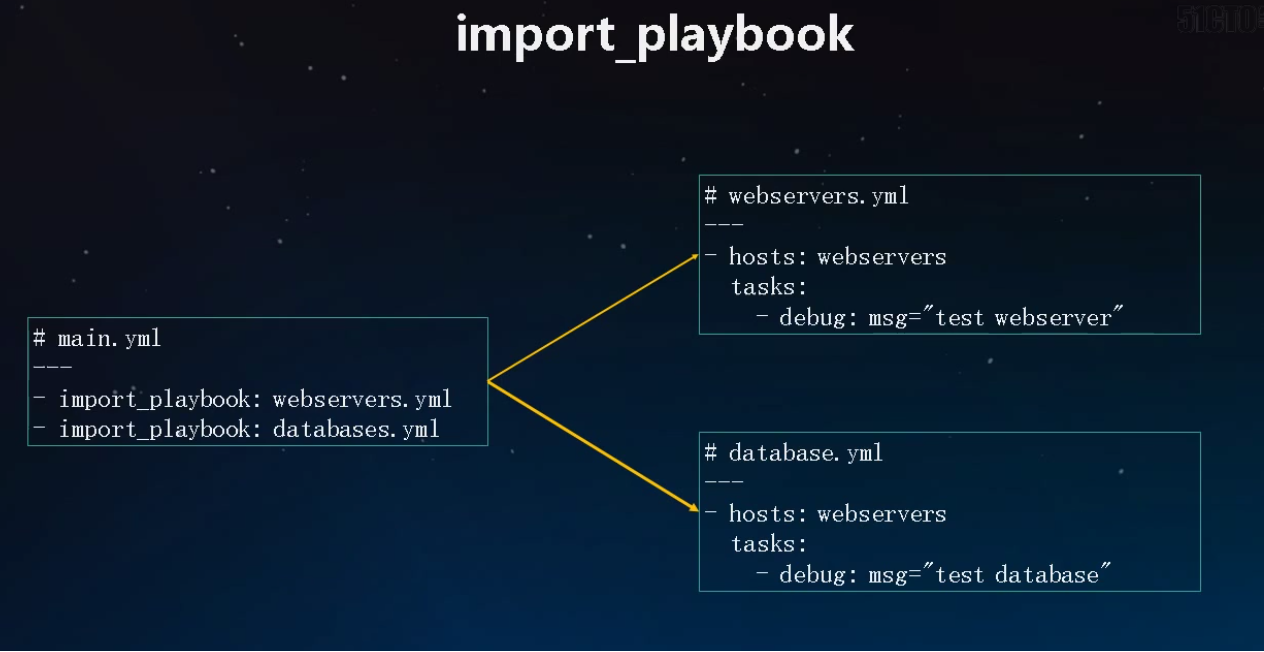
2. import_playbook
2.1) import_palybook结构详解图
3. 一下简单演示意思使用
3.1) 编写lnmp.yaml的文件测试
 1 [root@test-1 bin]# vim nginx.yaml
 2 [root@test-1 bin]# cat nginx.yaml
 3 ---
 4 - hosts: web1
 5   gather_facts: no
 6
 7   tasks:
 8   - name: Install nginx
 9     debug: msg="test nginx "
10
11 [root@test-1 bin]# vim php.yaml
12 [root@test-1 bin]# cat php.yaml
13 ---
14 - hosts: web1
15   gather_facts: no
16
17   tasks:
18   - name: Install php
19     debug: msg="test php "
20
21 [root@test-1 bin]# vim mysql.yaml
22 [root@test-1 bin]# cat mysql.yaml
23 ---
24 - hosts: web1
25   gather_facts: no
26
27   tasks:
28   - name: Install mysql
29     debug: msg="test mysql "
3.2) 编写improt执行文件引用
1 [root@test-1 bin]# vim import_lnmp.yaml
2 [root@test-1 bin]# cat import_lnmp.yaml
3 #import lnmp
4 ---
5 - import_playbook: nginx.yaml
6 - import_playbook: php.yaml
7 - import_playbook: mysql.yaml
3.3) 检查配置文件是否正常
 1 [root@test-1 bin]# ansible-playbook --syntax-check nginx.yaml
 2
 3 playbook: nginx.yaml
 4 [root@test-1 bin]# ansible-playbook --syntax-check php.yaml
 5
 6 playbook: php.yaml
 7 [root@test-1 bin]# ansible-playbook --syntax-check mysql.yaml
 8
 9 playbook: mysql.yaml
10 [root@test-1 bin]# ansible-playbook --syntax-check import_lnmp.yaml
11
12 playbook: import_lnmp.yaml
3.4) 执行improt文件
 1 [root@test-1 bin]# ansible-playbook  import_lnmp.yaml
 2
 3 PLAY [web1] ************************************************************************************************************************************
 4
 5 TASK [Install nginx] ***************************************************************************************************************************
 6 ok: [192.168.200.132] => {
 7     "msg": "test nginx "
 8 }
 9 ok: [192.168.200.133] => {
10     "msg": "test nginx "
11 }
12
13 PLAY [web1] ************************************************************************************************************************************
14
15 TASK [Install php] *****************************************************************************************************************************
16 ok: [192.168.200.132] => {
17     "msg": "test php "
18 }
19 ok: [192.168.200.133] => {
20     "msg": "test php "
21 }
22
23 PLAY [web1] ************************************************************************************************************************************
24
25 TASK [Install mysql] ***************************************************************************************************************************
26 ok: [192.168.200.132] => {
27     "msg": "test mysql "
28 }
29 ok: [192.168.200.133] => {
30     "msg": "test mysql "
31 }
32
33 PLAY RECAP *************************************************************************************************************************************
34 192.168.200.132            : ok=3    changed=0    unreachable=0    failed=0    skipped=0    rescued=0    ignored=0
35 192.168.200.133            : ok=3    changed=0    unreachable=0    failed=0    skipped=0    rescued=0    ignored=0
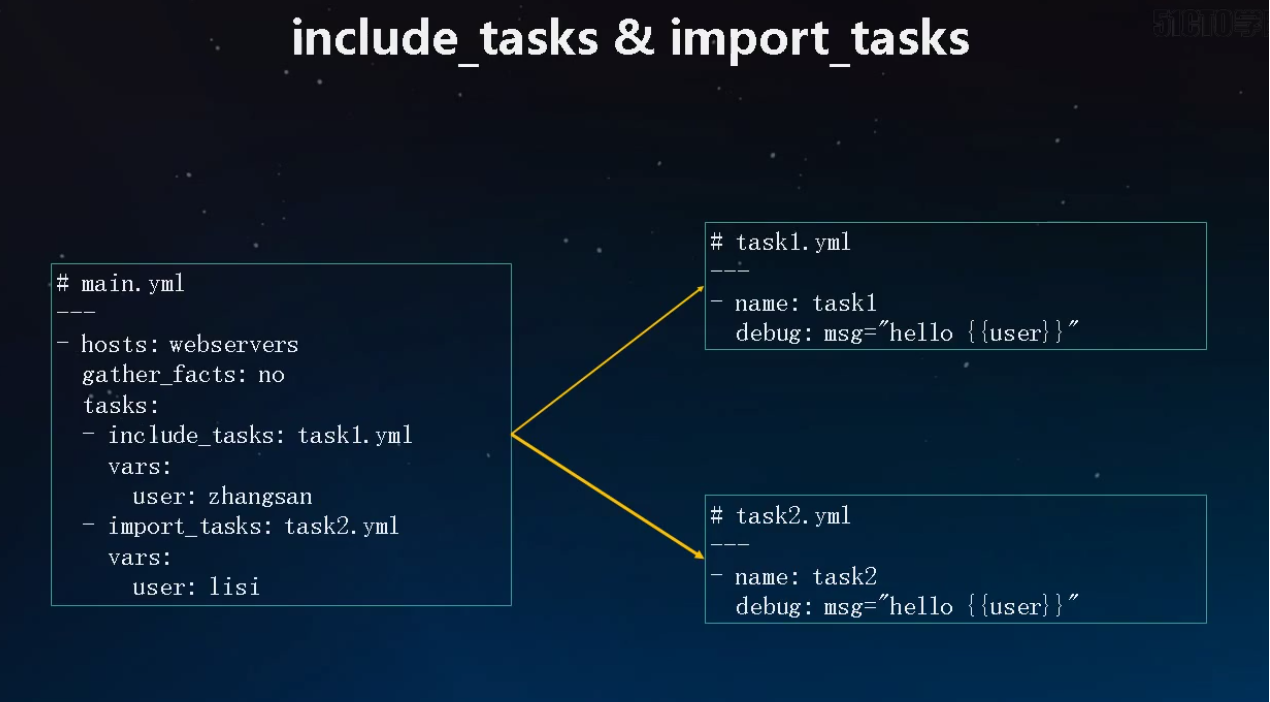
4.include_tasks和import_tasks结构详细图
5. 编写include_tasks文件
5.1) 编写include_tasks测试文件
 1 [root@test-1 bin]# vim tasks1.yaml
 2 [root@test-1 bin]# cat tasks1.yaml
 3 #tasks1.yaml
 4 ---
 5 - name: tasks1
 6   debug: msg="hello {{user}}"
 7
 8 [root@test-1 bin]# vim tasks2.yaml
 9 [root@test-1 bin]# cat tasks2.yaml
10 #tasks2.yaml
11 ---
12 - name: tasks2
13   debug: msg="hello {{user}}"
5.2) 编写include_tasks文件
1 [root@test-1 bin]# vim include_tasks.yaml
2 [root@test-1 bin]# cat include_tasks.yaml
3 ---
4 - hosts: web1
5   gather_facts: no
6
7   tasks:
8   - include_tasks: tasks1.yaml
9   - include_tasks: tasks2.yaml
5.3) 检查配置文件
1 [root@test-1 bin]# ansible-playbook --syntax-check  include_tasks.yaml
2
3 playbook: include_tasks.yaml
5.4) 执行include_tasks文件
 1 [root@test-1 bin]# ansible-playbook  include_tasks.yaml
 2
 3 PLAY [web1] ************************************************************************************************************************************
 4
 5 TASK [include_tasks] ***************************************************************************************************************************
 6 included: /ansible/import/bin/tasks1.yaml for 192.168.200.132, 192.168.200.133
 7
 8 TASK [tasks1] **********************************************************************************************************************************
 9 ok: [192.168.200.132] => {
10     "msg": "hello tasks1"
11 }
12 ok: [192.168.200.133] => {
13     "msg": "hello tasks1"
14 }
15
16 TASK [include_tasks] ***************************************************************************************************************************
17 included: /ansible/import/bin/tasks2.yaml for 192.168.200.132, 192.168.200.133
18
19 TASK [tasks2] **********************************************************************************************************************************
20 ok: [192.168.200.132] => {
21     "msg": "hello tasks2"
22 }
23 ok: [192.168.200.133] => {
24     "msg": "hello tasks2"
25 }
26
27 PLAY RECAP *************************************************************************************************************************************
28 192.168.200.132            : ok=4    changed=0    unreachable=0    failed=0    skipped=0    rescued=0    ignored=0
29 192.168.200.133            : ok=4    changed=0    unreachable=0    failed=0    skipped=0    rescued=0    ignored=0