内核代码存在于/usr/src/linux-headers-版本号中
拦截系统调用总结:
系统调用的概念:系统调用是内核和用户应用程序之间的沟通桥梁,是用户应用程序访问内核的入口点。用户程序调用响应的API函数,每一个C库中的API都对应内核中提供的一个系统调用函数。如用户程序中getpid()为得到当前进程的pid,其与内核中sys_getpid()对应。
拦截系统调用:个人理解为,每一个用户程序的API都会对应一个系统调用,当用户程序执行当前API时,最终会执行其内核的系统调用函数。而拦截系统调用,所做的事情就是:将当前API对应的系统调用替换为其他系统调用函数。当用户程序执行该API时,得到的结果为另一个错误结果。
实现一个系统调用的原理:用户程序调用syscall()执行一个系统调用。如:
#include<stdio.h>
#include<stdlib.h>
int main(void)
{
long x = 0;
x = syscall(__NR_getpid);
printf("syscall result is %ld
",x);
return 0;
}
其中__NR_getpid是一个宏定义,其值为20,即系统调用号。为什么为20?
查看方法:查看系统调用号,可以到linux/arch/x86/include/asm/unistd.h文件中查看预留的系统调用号,在unistd.h文件中,对应到unistd_32.h和unistd_64.h文件中查找,前者为32位系统,后者为64位系统(内核版本不同方法不同,2.6版本直接在unistd.h中即为系统调用号),如:
#ifndef _ASM_X86_UNISTD_32_H
#define _ASM_X86_UNISTD_32_H
/*
* This file contains the system call numbers.
*/
#define __NR_restart_syscall 0
#define __NR_exit 1
#define __NR_fork 2
#define __NR_read 3
略
#define __NR_oldstat 18
#define __NR_lseek 19
#define __NR_getpid 20
此处解释了__NR_getpid的值,从系统调用号表中得到。
现在知道了__NR_getpid为20,再次回到syscall()函数,执行该函数时,会有什么操作?
当用户程序需要系统提供服务时,执行syscall()会通过系统调用产生int 0x80软中断,该中断会进入到系统调用的入口函数,位于linux/arch/x86/kernel/entry_32.S(在linux内核2.6为该地址,3.2版本后未在该地址)。即在main函数中,执行函数syscall(20),此时产生0x80软中断,进入系统调用。
系统调用入口函数,由汇编代码实现
ENTRY(system_call)
518 RING0_INT_FRAME # can't unwind into user space anyway
519 pushl %eax # save orig_eax
#将系统调用号压入堆栈
520 CFI_ADJUST_CFA_OFFSET 4
521 SAVE_ALL
522 GET_THREAD_INFO(%ebp)
523 # system call tracing in operation / emulation
524 testl $_TIF_WORK_SYSCALL_ENTRY,TI_flags(%ebp)
525 jnz syscall_trace_entry
526 cmpl $(nr_syscalls), %eax
527 jae syscall_badsys
528 syscall_call:
529 call *sys_call_table(,%eax,4)
530 movl %eax,PT_EAX(%esp) # store the return value
现对上述代码做出解释:
519行,将当前应用程序的系统调用号20送入寄存器eax中。
521行,将寄存器eax的值压入到堆栈中,因为系统地址的取得不通过寄存器来传递参数,而是通过栈来传递。
525行,jnz syscall_trace_entry比较结果不为0进行跳转。对用户进程传递的系统调用号进行合法检查,如果不合法则跳转到syscall_badsys命令
526行,比较结果,合法则跳转响应系统调用号对应的服务例程。
528行,526合法执行后,需要在系统调用表,即sys_call_table中找到对应的系统调用例程函数的入口地址。其获得方式为,sys_call_table表的基址加上该函数再sys_call_table表中的偏移量。而sys_call_table表中的每个表项占4个字节,所以对应的将系统调用号eax乘以4加上sys_call_table基址才可得到对应的系统调用函数例程的地址。
sys_call_table(linux/arch/x86/kernel/syscall_table_32.S):
1 ENTRY(sys_call_table)
2 .long sys_restart_syscall /* 0 - old "setup()" system call, used for restarting */
3 .long sys_exit
4 .long ptregs_fork
5 .long sys_read
6 .long sys_write
7 .long sys_open /* 5 */
8 .long sys_close
9 .long sys_waitpid
10 .long sys_creat
11 .long sys_link
12 .long sys_unlink /* 10
……
13 .long sys_getpid /* 20 */
接下来,通过上一步找到的函数例程地址(eax*4+sys_call_table表基址),在sys_call_table查找系统调用服务程序入口函数的地址,再进行跳转执行函数,即sys_getpid。
而sys_getpid函数的具体定义,在linux/include/linux/syscalls.h中,sys_getpid函数的具体实现在linux/fs中(自己查阅资料得到,但并未找到该地址)。
至此给出了整个sys_getpid的实现过程,从用户程序syscall()中得到系统调用号,在系统调用入口函数中,将系统调用号赋值eax,将eax值保存在栈中。而在sys_call_table中找到对应的系统调用服务例程地址,其地址通过eax*4+基址得到,转而执行系统调用服务例程。
asmlinkage long sys_gettid(void);
asmlinkage long sys_nanosleep(struct timespec __user *rqtp, struct timespec __user *rmtp);
asmlinkage long sys_alarm(unsigned int seconds);
asmlinkage long sys_getpid(void);
asmlinkage long sys_getppid(void);
asmlinkage long sys_getuid(void);
asmlinkage long sys_geteuid(void);
asmlinkage long sys_getgid(void);
asmlinkage long sys_getegid(void);
asmlinkage long sys_getresuid(uid_t __user *ruid, uid_t __user *euid, uid_t __user *suid);
附带提一下,这里提到了宏asmlinkage,其定义为:
宏asmlinkage定义:linux/arch/x86/include/asm/linkage.h,从下面第一个代码_attribute_((regparm(0)))表示不通过寄存器传递参数,而是通过栈来传递参数,所以系统调用入口函数里面汇编指令SAVE_ALL将eax寄存器中的系统调用号压入栈。从下图第二个代码可以看出,系统调用最多可以为6个参数,可以传值给eax,ebx,ecx,edx……
代码一
#ifdef CONFIG_X86_32
#define asmlinkage CPP_ASMLINKAGE __attribute__((regparm(0)))
代码二
#define __asmlinkage_protect0(ret)
__asmlinkage_protect_n(ret)
#define __asmlinkage_protect1(ret, arg1)
__asmlinkage_protect_n(ret, "g" (arg1))
#define __asmlinkage_protect2(ret, arg1, arg2)
__asmlinkage_protect_n(ret, "g" (arg1), "g" (arg2))
#define __asmlinkage_protect3(ret, arg1, arg2, arg3)
__asmlinkage_protect_n(ret, "g" (arg1), "g" (arg2), "g" (arg3))
#define __asmlinkage_protect4(ret, arg1, arg2, arg3, arg4)
__asmlinkage_protect_n(ret, "g" (arg1), "g" (arg2), "g" (arg3),
"g" (arg4))
#define __asmlinkage_protect5(ret, arg1, arg2, arg3, arg4, arg5)
__asmlinkage_protect_n(ret, "g" (arg1), "g" (arg2), "g" (arg3),
"g" (arg4), "g" (arg5))
#define __asmlinkage_protect6(ret, arg1, arg2, arg3, arg4, arg5, arg6)
__asmlinkage_protect_n(ret, "g" (arg1), "g" (arg2), "g" (arg3),
"g" (arg4), "g" (arg5), "g" (arg6))
以上过程为操作系统根据用户程序API实现一个系统调用的原理,下述拦截系统调用原理:
通过上述分析可知,得到系统调用服务例程地址为sys_call_table地址加上eax,eax由用户程序给定,sys_call_table地址由内存决定,不能改变。但如果将sys_call_table表中调用号为20的函数替换为修改函数,通过sys_call_table+eax得到的就不再为sys_getpid,而是为sys_mycall(自己定义的一个函数)
获取内核符号表中的内容:
可以通过在/boot下的System.map中查找对应值,即grep sys_call_table System.map……具体参看该目录下名称。
也可以在/proc/kallsyms中获得。但是普通用户在kallsyms中看到的值全都为0,只能通过命令行
sudo cat /proc/kallsyms | grep "sys_call_table"得到sys_call_table的地址

从上图可以得到sys_call_table的基址为0xc15bb020,而且sys_call_table属性为R,是只读的,要想在sys_call_table表中添加或者删除一个系统调用,必须要改变sys_call_table的属性。
查阅资料得到,控制寄存器cr0的第16位是写保护位若该位清零了则允许超级权限,这里超级权限当然包括往内核空间写的权限。这样,就可以在写入之前,把那一位清零,使我们可以写入。写完后,再将那一位复原。
具体实现拦截系统调用的源代码,依然以getpid这个API函数举例。
首先是内核模块函数,用于实现拦截系统调用:
#include<linux/module.h>
#include<linux/init.h>
#include<linux/kernel.h>
#include<linux/unistd.h>
#include<linux/time.h>
#include<asm/uaccess.h>
#include<linux/sched.h>

#define __NR_syscall 20
#define sys_call_table_address 0xc15bb020

unsigned int clear_and_return_cr0(void);
void setback_cr0(unsigned int val);

int orig_cr0;
unsigned long *sys_call_table = 0;
static int (*anything_saved)(void);

unsigned int clear_and_return_cr0(void) //将cr0第16位清零
{
    unsigned int cr0 = 0;
    unsigned int ret;

    asm volatile ("movl %%cr0, %%eax"
        : "=a"(cr0)
    );
    ret = cr0;

    cr0 &= 0xfffeffff;
    asm volatile ("movl %%eax, %%cr0"
        :
        : "a"(cr0)
    );
    return ret;
}

void setback_cr0(unsigned int val)  //将cr0第16位置位
{
    asm volatile ("movl %%eax, %%cr0"
        :
        : "a"(val)
    );
}


asmlinkage long sys_mycall(void)  //拦截后的函数
{
    printk("the system call num.20 has changed!!
");
    return 19940208;
}

int init_addsyscall(void)
{
    printk("system call begin
");
    sys_call_table = (unsigned long *)sys_call_table_address;
    anything_saved = (int(*)(void))(sys_call_table[__NR_syscall]);
    orig_cr0 = clear_and_return_cr0();
    sys_call_table[__NR_syscall] = (unsigned long)&sys_mycall;
    setback_cr0(orig_cr0);
    return 0;
}

void exit_addsyscall(void)
{
    orig_cr0 = clear_and_return_cr0();
    sys_call_table[__NR_syscall] = (unsigned long)anything_saved;
    setback_cr0(orig_cr0);
    printk("call exit...
");
}

module_init(init_addsyscall);
module_exit(exit_addsyscall);

MODULE_LICENSE("GPL");
然后是用户程序的测试程序:
#include<unistd.h>
#include<pwd.h>
#include<sys/types.h>
#include<stdio.h>
#include<stdlib.h>

int main(void)
{
    pid_t my_pid;
    my_pid = getpid();  //调用getpid得到进程的pid
    printf("process ID:%ld
",my_pid);   //输出pid
    return 0;
}
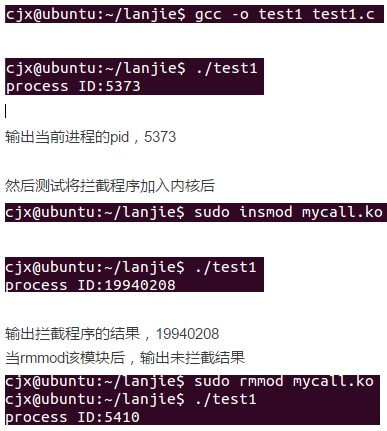
结果显示:
首先是未将拦截程序加入内核时测试程序的输出结果
