严重问题:
若移植失败将可能直接导致手机***无法开机***,导入相关文件需慎重!
达成效果:
1. ssh 远程登录 Android 终端;
2. sftp 挂载/映射 Android 根文件系统至本地网络驱动盘符;
适用场景:
前期开发过程中,需要做大量的调试,需要对Android文件系统频繁修改;
操作流程:

详细操作:
一、Linux操作系统相关的部分
1. 编译 openssh for Android
同步及编译Android源码的基础操作:[编译Android源码入门]
在一切准备就绪之后,输入以下命令:
source build/envsetup.sh
lunch cm_mako-userdebug
mmm -B external/zlib
mmm -B external/openssl
mmm -B external/openssh
将会生成以下的文件:
1.zlib
----------------------------------------
/media/Source/cm11/out/target/product/mako/system/lib/libz.so
/media/Source/cm11/out/target/product/mako/system/bin/gzip
2.openssl
----------------------------------------
out/target/product/mako/system/lib/libcrypto.so
out/target/product/mako/system/lib/libssl.so
out/target/product/mako/system/bin/ssltest
out/target/product/mako/system/bin/openssl
3.openssh
----------------------------------------
/media/Source/cm11/out/target/product/mako/system/lib/libssh.so
/media/Source/cm11/out/target/product/mako/system/bin/ssh
/media/Source/cm11/out/target/product/mako/system/bin/sftp
/media/Source/cm11/out/target/product/mako/system/bin/scp
/media/Source/cm11/out/target/product/mako/system/bin/sshd
/media/Source/cm11/out/target/product/mako/system/bin/sftp-server
/media/Source/cm11/out/target/product/mako/system/bin/ssh-keygen
/media/Source/cm11/out/target/product/mako/system/etc/ssh/sshd_config
/media/Source/cm11/out/target/product/mako/system/bin/start-ssh
把这些文件,拷贝至对应的位置即可,备份下载:http://pan.baidu.com/s/1o69DTV0
解压:tar zxf openssh_android_binary.tgz -C /
2. 配置Adnroid操作系统中的 sshd_config 文件
adb shell 登录 Android 操作系统后,vi /data/ssh/sshd_config,复制以下代码:
# Package generated configuration file
# See the sshd_config(5) manpage for details

# What ports, IPs and protocols we listen for
Port 22
# Use these options to restrict which interfaces/protocols sshd will bind to
#ListenAddress ::
#ListenAddress 0.0.0.0
Protocol 2
# HostKeys for protocol version 2

# custom configure start
# chnange the hostkey default path, by scue
HostKey /data/ssh/ssh_host_rsa_key
HostKey /data/ssh/ssh_host_dsa_key
HostKey /data/ssh/ssh_host_ecdsa_key
# custom configre end

#Privilege Separation is turned on for security
UsePrivilegeSeparation sandbox

# Lifetime and size of ephemeral version 1 server key
KeyRegenerationInterval 3600
ServerKeyBits 768

# Logging
SyslogFacility AUTH
LogLevel INFO

# Authentication:
LoginGraceTime 120
PermitRootLogin yes
StrictModes yes

RSAAuthentication yes
PubkeyAuthentication yes
AuthorizedKeysFile    /data/.ssh/authorized_keys

# Don't read the user's ~/.rhosts and ~/.shosts files
IgnoreRhosts yes
# For this to work you will also need host keys in /etc/ssh_known_hosts
RhostsRSAAuthentication no
# similar for protocol version 2
HostbasedAuthentication no
# Uncomment if you don't trust ~/.ssh/known_hosts for RhostsRSAAuthentication
#IgnoreUserKnownHosts yes

# To enable empty passwords, change to yes (NOT RECOMMENDED)
PermitEmptyPasswords yes

# Change to yes to enable challenge-response passwords (beware issues with
# some PAM modules and threads)
ChallengeResponseAuthentication no

# Change to no to disable tunnelled clear text passwords
#PasswordAuthentication yes

# Kerberos options
#KerberosAuthentication no
#KerberosGetAFSToken no
#KerberosOrLocalPasswd yes
#KerberosTicketCleanup yes

# GSSAPI options
#GSSAPIAuthentication no
#GSSAPICleanupCredentials yes

X11Forwarding yes
X11DisplayOffset 10
PrintMotd no
PrintLastLog yes
TCPKeepAlive yes
#UseLogin no

#MaxStartups 10:30:60
#Banner /etc/issue.net

# Allow client to pass locale environment variables
AcceptEnv LANG LC_*

# 这里指向 sftp 可执行文件的路径!
Subsystem    sftp    /system/bin/sftp-server

# Set this to 'yes' to enable PAM authentication, account processing,
# and session processing. If this is enabled, PAM authentication will
# be allowed through the ChallengeResponseAuthentication and
# PasswordAuthentication.  Depending on your PAM configuration,
# PAM authentication via ChallengeResponseAuthentication may bypass
# the setting of "PermitRootLogin without-password".
# If you just want the PAM account and session checks to run without
# PAM authentication, then enable this but set PasswordAuthentication
# and ChallengeResponseAuthentication to 'no'.
#UsePAM yes

# root login without passwd, by scue.
# custom configure start
PermitRootLogin without-password
RSAAuthentication yes
PubkeyAuthentication yes
PermitEmptyPasswords yes
# custom configure end
这个配置可以在 start-ssh & 执行之后,启动sshd的同时也启动了 sftp-server ,同时使root帐户无密码可登录(但需要RSA验证),同时还要执行以下命令行操作:
mount -o remount,rw /system
mv /system/etc/ssh/sshd_config{,.bak}
ln -s /data/ssh/sshd_config /system/etc/ssh/sshd_config
虽说Android代码中 sshd 执行时自动查找的是 /data/ssh/sshd_config,但是还是创建一个链接至 /system/etc/ssh/sshd_config的好,说不准哪天情况有变~
3. Android终端中生成 ssh_host_* 等等这些杂项文件:
在终端中输入以下命令:
cd /data/ssh/
ssh-keygen -t rsa -f ssh_host_rsa_key -N ""
ssh-keygen -t dsa -f ssh_host_dsa_key -N ""
ssh-keygen -t ecdsa -f ssh_host_ecdsa_key -N ""
4. 上传本地id_rsa.pub文件 >> 至 Android 手机中:
从sshd_config中的 AuthorizedKeysFile /data/.ssh/authorized_keys,这一行来看,很明了地知道,这个RSA公钥应当保存至/data/.ssh/authorized_keys文件中(这个RSA公钥在Linux中可以通过命令行 ssh-keygen -t rsa -C "your_email" 来生成,win上单独讲解)。
在Linux终端中输入以下命令:
adb root
adb push ~/.ssh/id_rsa.pub /sdcard/id_rsa.pub
adb shell
mkdir -p /data/.ssh
cat /sdcard/id_rsa.pub >> /data/.ssh/authorized_keys
chmod 0600 /data/.ssh/authorized_keys
这样子,就可以在Linux终端中,输入 ssh root@ip_addr 来登录Android手机设备进行操作了,同时 sftp root@ip_addr 对文件操作也是可以的,Enjoy!
二、Windows操作系统相关的部分
大多数人,还是在Windows中操作,为了方便对Android中的设备文件进行操作,可通过”映射网络驱动器“的方式,挂载Android根目录至一个”盘符“,以root权限进行读写操作都是可以的。
主要的工具是:stfpdrive,下载链接:http://pan.baidu.com/s/1c048BTm,具体操作看图示:

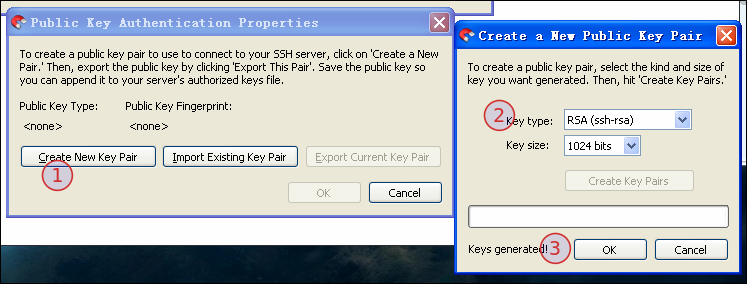
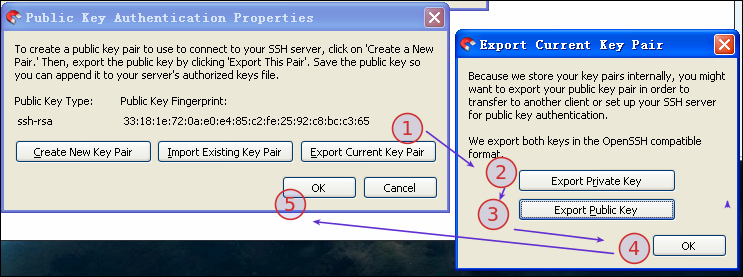

最后,点击"connect"即可链接至手机(注:ip地址请根据设备的自身实际情况进行修改),最终效果图如下:
