设计模式是软件开发讨论中,亘古不变的话题,今天又拿出来说道两句,也是对设计模式的一个复习吧。
工厂方法模式
工厂方法模型定义了一个用于创建对象的接口,让子类决定实例化哪一个类,工厂模式使一个类的实例化延迟到了其子类中。工厂方法模式是优化的简单工厂模式,它很好的支持了“开闭原则”。每一个具体的工厂只能构建一个类的对象。具体工厂类与产品类是一对一的关系。

- /// <summary>
- /// 抽象产品类
- /// </summary>
- public class Product{
- public Product(){
- Console.Write("new Product");
- }
- }
- /// <summary>
- /// 具体产品类A
- /// </summary>
- public class ConcreteProductA:Product {
- public ConcreteProduct(){
- Console.Write("创建了一个 ConcreteProductA");
- }
- }
- /// <summary>
- /// 具体产品类B
- /// </summary>
- public class ConcreteProductB:Product {
- public ConcreteProduct(){
- Console.Write("创建了一个 ConcreteProductB");
- }
- }
- /// <summary>
- /// 抽象的创建者
- /// </summary>
- abstract public class Creator{
- //抽象的工厂方法
- public abstract Product FactoryMethod();
- }
- /// <summary>
- /// 具体方法工厂A
- /// </summary>
- public class ConcreteCreatorA:Creator{
- //返回一个产品A的对象
- public override Product FactoryMethod(){
- return new ConcreteProductA();
- }
- }
- /// <summary>
- /// 具体方法工厂B
- /// </summary>
- public class ConcreteCreatorB:Creator{
- //返回一个产品B的对象
- public override Product FactoryMethod(){
- return new ConcreteProductB();
- }
- }
- //client端
- static void Main(string[] args)
- {
- Creator c = new ConcreteCreatorA();
- Product p = c.FcatoryMethod();
- c = new ConcreteCreatorB();
- p = c.FcatoryMethod();
- Console.ReadLine();
- }
适配器模式Adapter
适配器模式是将一个类的接口转换成客户希望的另外一个接口。适配器模式使得原本由于接口不兼容而不能一起工作的那些类可以一起工作。
两个成熟的类需要通信,但是接口不同,由于开闭原则,我们不能去修改这两个类的接口,所以就需要一个适配器来完成衔接过程。
变压器就是很好的适配器模式的例子。用电设备所需要的电压是9V,但是电线上的 电压却是220V的,我们不能去更改它们的电压输入或输出,所以我们用到了变压器。变压器是220V的输入,9V的输出。这样就可以将200V的电压变为 9V的电压,用变压器将用电设备连接到了电线上工作了。

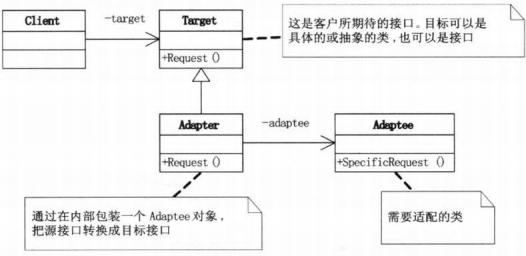
上面两幅图中,都是Client端需要Request这个方法,但是Adaptee没有这个方法,所以就需要提供一个中间件/包装类 (Wrapper)Adapter类来衔接。不同的是第一幅图Adapter继承自Adaptee,而第二幅图是在Adapter类中包装了一个 Adaptee的实例。这就决定了第一幅图讲的是“类的结构模式”,而第二幅图则是“对象的结构模式”。
- /// <summary>
- /// 目标接口,客户所期待的接口。
- /// </summary>
- public class Target{
- public virtual void Request(){
- Console.Write("我是本系统中的普通请求.");
- }
- }
- /// <summary>
- /// 适配器,匹配2个接口不一致的类
- /// </summary>
- public class Adapter:Target{
- private Adaptee adaptee = new Adaptee();
- public void Request(){
- adaptee.SpecificRequest();
- }
- }
- /// <summary>
- /// 源接口,与客户期待的接口不一致
- /// </summary>
- public class Adaptee(){
- public void SpecificRequest(){
- Console.Write("我是原有的真实调用的系统");
- }
- }
- //client端
- static void Main(string[] args)
- {
- Target t = new Adapter();
- t.Request();
- Console.ReadLine();
- }
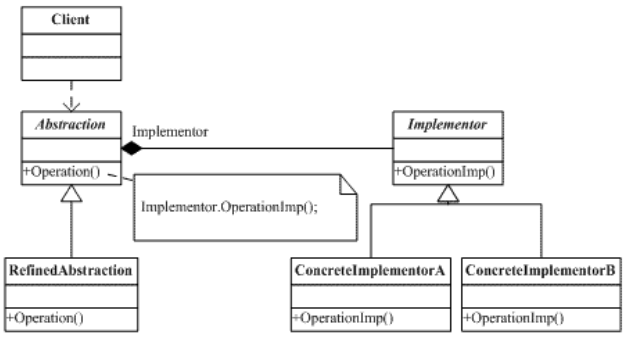
桥接模式 Bridge
桥接模式将抽象部分与它的实现部分分离,使它们都可以独立地变化。它很好的支持了开闭原则和组合及复用原则。实现系统可能有多角度分类,每一种分类都有可能变化,那么就把这些多角度分离出来让他们独立变化,减少他们之间的耦合。
2个相互耦合的系列,每个系列都有各自的产品变动。将这2个系列抽象成2个角色类,将各自的变化封装到对象的角色类中,然后再将2个角色类之间用组合的关系表示,这样就大大简化了使用类继承的复杂性,逻辑变得清晰了,易于扩展和维护。
桥接模式封装了变化,完成了解耦,实现了弱耦合。
- /// <summary>
- /// 抽象部分
- /// </summary>
- public class Abstraction{
- protected Implementor implementor;
- public void SetImplementor(Implementor implementor){
- this.implementor = implementor;
- }
- public virtual void Operation(){
- implementor.OperationImp();
- }
- }
- /// <summary>
- /// 被提炼的抽象部分
- /// </summary>
- public class RefinedAbstraction:Abstraction{
- public override void Operation(){
- implementor.OperationImp();
- }
- }
- /// <summary>
- /// 实现部分
- /// </summary>
- abstract public class Implementor{
- public abstract void OperationImp();
- }
- /// <summary>
- /// 具体实现A
- /// </summary>
- public class conscreteImplementorA:Implementor{
- pulic override void OperationImp(){
- Console.Write("我是具体的A");
- }
- }
- /// <summary>
- /// 具体实现B
- /// </summary>
- public class conscreteImplementorB:Implementor{
- pulic override void OperationImp(){
- Console.Write("我是具体的B");
- }
- }
- //client端
- static void Main(string[] args)
- {
- Abstraction ab = new RefinedAbstraction();
- ab.SetImplementor(new conscreteImplementorA());
- ab.Operaton();
- ab.SetImplementor(new conscreteImplementorB());
- ab.Operaton();
- Console.ReadLine();
- }
具体的实例可以看我的另一篇博文《面与卤的鹊桥相会——桥接模式》
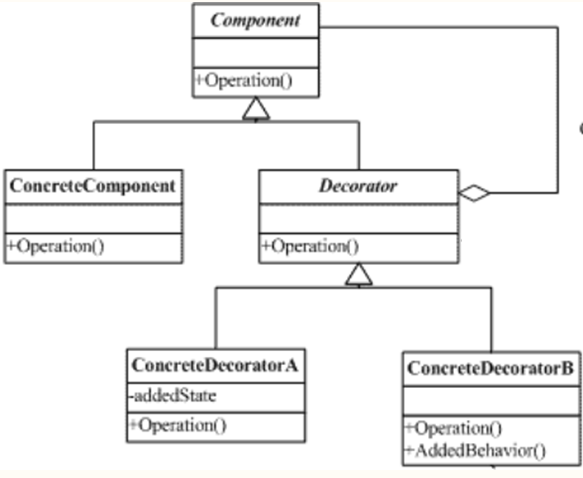
装饰模式 Decorator
装饰模式动态地给一个对象添加一些额外的职责,就增加功能来说,它比生成子类更灵活。也可以这样说,装饰模式把复杂类中的核心职责和装饰功能区分开了,这样既简化了复杂类,有去除了相关类中重复的装饰逻辑。装饰模式没有通过继承原有类来扩展功能,但却达到了一样的目的,而且比继承更加灵活,所以可以说装饰模式是继承关系的一种替代方案。装饰模式解耦了核心和装饰功能,所以也是强调了松耦合。
- /// <summary>
- /// 最高接口,被装饰者和“装饰品”都继承于此
- /// </summary>
- abstract public class Component{
- public abstract void Operation();
- }
- /// <summary>
- /// 具体的被装饰者
- /// </summary>
- public class Concretecomponent:Component{
- public override void Operation(){
- Console.Write("具体对象的装饰操作");
- }
- }
- /// <summary>
- /// 装饰类
- /// </summary>
- abstract public class Decorator:Component(){
- protected Component component;
- public void SetComponent(Component component){
- this.component = component;
- }
- public override void Operation(){
- if(component!=null) component.Operation();
- }
- }
- /// <summary>
- /// 具体的装饰类A
- /// </summary>
- public class ConcreteDecoratorA:Decorator{
- private string addedState;
- public override void Operation(){
- base.Operation();
- addedState="New State";
- Console.Write("具体装饰A的操作(添加了新的状态)");
- }
- }
- /// <summary>
- /// 具体的装饰类B
- /// </summary>
- public class ConcreteDecoratorB:Decorator{
- public override void Operartion(){
- base.Operation();
- AddedBehavior();
- Console.WriteLine("具体装饰B的操作(添加了新的方法)");
- }
- private void AddedBehavior(){
- //添加新的行为
- }
- }
- //client端
- static void Main(string[] args)
- {
- Concretecomponent c = new Concretecomponent();
- Decorator d1 = new ConcreteDecoratorA();
- Decorator d2 = new ConcreteDecoratorB();
- d1.SetComponent(c);
- d2.SetComponent(d1);//注意这里装饰的是d1,因为这里的d1是装饰了d1的c。
- d2.Operation();
- Console.ReadLine();
- }
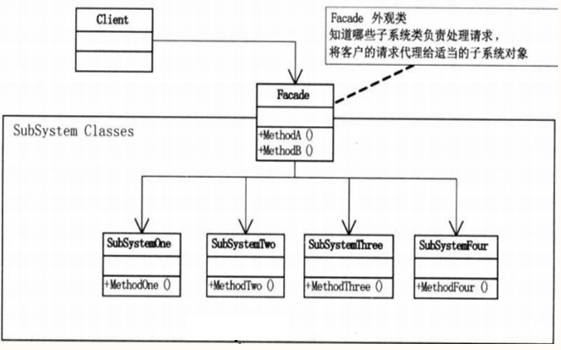
外观模式 Facade
外观模式为子系统中的一组接口提供了一个一致的界面,此模式定义了一个高层接口,这个接口使得这些子系统更加容易使用。
外观模式中,客户对各个具体的子系统是不了解的,所以对这些子系统进行了封装,对外只提供了用户所明白的单一而简单的接口,用户直接使用这个接口就可以完成操作,而不用去理睬具体的过程,而且子系统的变化不会影响到用户,这样就做到了信息隐蔽。
这就相当于新生接待员。新生对入学流程不清楚,但是接待员学长可是明白的。学生跟着接待员就可以把各个手续办理完毕了。可以说外观模式封装了细节。
- /// <summary>
- /// 高层的统一接口,封装了子系统繁杂的接口。
- /// </summary>
- public class Facade{
- private SubSystemOne one;
- private SubSystemTwo two;
- private SubSystemThree three;
- public Facade(){
- one = new SubSystemOne();
- two = new SubSystemTwo();
- three = new SubSystemThree();
- }
- public void MethodA(){
- one.MethodOne();
- two.MethodTwo();
- }
- public void MethodB(){
- one.MethodOne();
- three.MethodThree();
- }
- }
- /// <summary>
- /// 子系统One。
- /// </summary>
- public class SubSystemOne{
- public void MethodOne(){
- Console.Write("我是One");
- }
- }
- /// <summary>
- /// 子系统Two
- /// </summary>
- public class SubSystemTwo{
- public void MethodTwo(){
- Console.Write("我是Two");
- }
- }
- /// <summary>
- /// 子系统Three
- /// </summary>
- public class SubSystemThree{
- public void MethodThree(){
- Console.Write("我是Three");
- }
- }
- //client端
- static void Main(string[] args)
- {
- Facade f1 = new Facade();
- f1.MethodA();
- Facade f2 = new Facade();
- f2.MethodB();
- Console.ReadLine();
- }
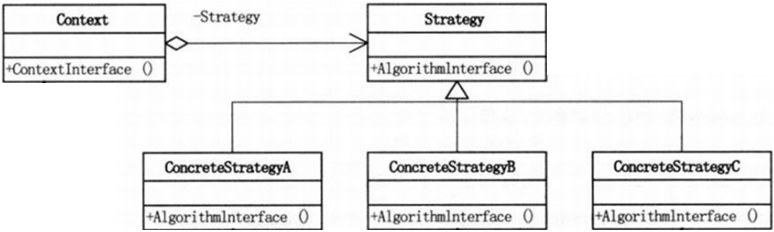
策略模式 Strategy
策略模式定义一系列的算法,把它们一个个封装起来,并且使它们可以相互替换。本模式使得算法的变化不会影响到使用算法的客户。
策略模式将每一个算法封装到一个具有公共接口的独立类中,解除了客户与具体算法的直接耦合,是客户改变算法更为容易。
策略模式+简单工厂+反射+配置文件可以组成更为灵活的方式。
- /// <summary>
- /// 算法的公共接口
- /// </summary>
- abstract public class Strategy{
- public abstract void AlgorithmInterface();
- }
- /// <summary>
- /// 具体算法A
- /// </summary>
- public class ConcreteStrategyA:Strategy{
- public override void AlgorithmInterface(){
- Console.Write("具体算法A");
- }
- }
- /// <summary>
- /// 具体算法B
- /// </summary>
- public class ConcreteStrategyB:Strategy{
- public override void AlgorithmInterface(){
- Console.Write("具体算法B");
- }
- }
- /// <summary>
- /// 具体算法C
- /// </summary>
- public class ConcreteStrategyC:Strategy{
- public override void AlgorithmInterface(){
- Console.Write("具体算法C");
- }
- }
- /// <summary>
- /// 上下文,用来维护一个对Strategy对象的引用。
- /// </summary>
- public class Context{
- private Strategy strategy;
- public Context(Strategy strategy){
- this.strategy=strategy;
- }
- //上下文接口
- public void ContextInterface(){
- strategy.AlgorithmInterface();
- }
- }
- //client端
- static void Main(string[] args)
- {
- Context context = new Context(new ConcreteStrategyA());
- context.ContextInterface();
- context = new Context(new ConcreteStrategyB());
- context.ContextInterface();
- context = new Context(new ConcreteStrategyC());
- context.ContextInterface();
- Console.ReadLine();
- }
观察者模式 Observer
观察者模式定义了对象间的一种一对多的依赖关系,当一个对象的状态发生变化时,所有依赖它的对象都会得到通知,并被自动更新,
系统中有两个方面,其中一个方面依赖与另一个方面,我们把这两个方面抽象,是各自可以独立的变化和复用。
就像我们现在所用到的分层,不就是一层层的依赖么?还有系统组件升级,系统功能也跟着变化,这也属于观察者模式。

- /// <summary>
- /// 抽象观察类
- /// </summary>
- abstract public class Observer{
- public abstract void Update();
- }
- /// <summary>
- /// 具体观察类
- /// </summary>
- public class Concreteobserver:Observer{
- private string name;
- private string observerState;
- private ConcreteSubject subject;
- public Concreteobserver(ConcreteSubject subject,string name){
- this.subject=subject;
- this.name= name;
- }
- public override void Update(){
- observerState=subject.GetState();
- Console.write("观察者{0}的新状态是{1}",name,observerState);
- }
- }
- /// <summary>
- /// 抽象主题类
- /// </summary>
- abstract public class Subject(){
- private List<observer> observers = new List<observer>() ;
- public void Attach(Observer observer){
- observers.Add(Observer);
- }
- public void Detach(Observer Observer){
- observers.Remove(Observer);
- }
- public void NotifyObservers(){
- foreach(Observer o in observers){
- o.Update();
- }
- }
- }
- /// <summary>
- /// 具体主题类
- /// </summary>
- public class ConcreteSubject:Subject{
- private string subjectState;
- public string SubjectState{
- get{return subjectstate;}
- set{subjectstrate=value;}
- }
- public void GetState(){
- return subjectstate;
- }
- }
- //client端
- static void Main(string[] args)
- {
- ConcreteSubject c = new ConcreteSubject();
- Concreteobserver o1 = new Concreteobserver(c,"X");
- Concreteobserver o2 = new Concreteobserver(c,"Y");
- Concreteobserver o3 = new Concreteobserver((c,"Z");
- c.Attach(o1);
- c.Attach(o2);
- c.Attach(o3);
- c.subjectstate="abc";
- c.Nofify();
- Console.ReadLine();
- }