一、背景:在使用GNS3构建网络实验环境中,得知GNS3在2.0版本后添加了NAT元件,可实现GNS3内部网NAT上网。
二、实验拓扑
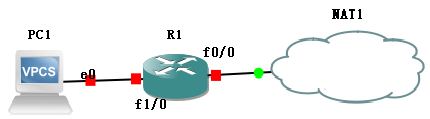
三、配置
1、路由器R1的配置(配置参考:https://www.cisco.com/c/zh_cn/support/docs/ip/network-address-translation-nat/13772-12.html#topic4)
...
interface FastEthernet0/0
ip address 192.168.122.206 255.255.255.0 #NAT元件提供的内网ip地址段:192.168.122.2~192.168.122.254,因此,需要NAT的地址必须配置在192.168.122网段
ip nat outside
ip virtual-reassembly
duplex full
!
interface FastEthernet1/0
ip address 192.168.123.1 255.255.255.0
ip nat inside
ip virtual-reassembly
duplex full
speed auto
...
ip route 0.0.0.0 0.0.0.0 192.168.122.1
ip nat pool ovlnet 192.168.122.206 192.168.122.206 prefix-length 24
ip nat inside source list 1 pool ovlnet overload
access-list 1 permit 192.168.123.0 0.0.0.255
2、VPC配置:
NAME : PC1[1]
IP/MASK : 192.168.123.5/24
GATEWAY : 192.168.123.1
DNS : 114.114.114.114 8.8.8.8
MAC : 00:50:79:66:68:01
LPORT : 20000
RHOST:PORT : 127.0.0.1:20001
MTU: : 1500
三、测试:
1、VPC上做ping、trace测试
PC1> ping wwww.baidu.com
wwww.baidu.com ->> ps_other.a.shifen.com
ps_other.a.shifen.com resolved to 39.156.66.10
84 bytes from 39.156.66.10 icmp_seq=1 ttl=126 time=83.807 ms
84 bytes from 39.156.66.10 icmp_seq=2 ttl=126 time=68.948 ms
84 bytes from 39.156.66.10 icmp_seq=3 ttl=126 time=70.912 ms
PC1> trace www.baidu.com
www.baidu.com ->> www.a.shifen.com
www.a.shifen.com resolved to 183.232.231.174
trace to www.baidu.com, 8 hops max, press Ctrl+C to stop
1 192.168.123.1 9.231 ms 9.191 ms 9.468 ms
2 192.168.122.1 19.211 ms 4294966.819 ms 19.440 ms
3 192.168.62.2 19.791 ms 19.756 ms 19.826 ms
4 * * *
5 * * *
6 * * *
7 * * *
8 * * *
2、路由器R1上查看nat信息
R2#sh ip nat translations
Pro Inside global Inside local Outside local Outside global
icmp 192.168.122.206:22765 192.168.123.5:22765 39.156.66.10:22765 39.156.66.10:22765
icmp 192.168.122.206:23021 192.168.123.5:23021 39.156.66.10:23021 39.156.66.10:23021
udp 192.168.122.206:23552 192.168.123.5:23552 183.232.231.174:23553 183.232.231.174:23553
icmp 192.168.122.206:23789 192.168.123.5:23789 39.156.66.10:23789 39.156.66.10:23789
R1#sh ip nat statistics
Total active translations: 54 (0 static, 54 dynamic; 54 extended)
Outside interfaces:
FastEthernet0/0
Inside interfaces:
FastEthernet1/0
Hits: 118 Misses: 69
CEF Translated packets: 157, CEF Punted packets: 43
Expired translations: 24
Dynamic mappings:
-- Inside Source
[Id: 1] access-list 1 pool ovlnet refcount 54
pool ovlnet: netmask 255.255.255.0
start 192.168.122.206 end 192.168.122.206
type generic, total addresses 1, allocated 1 (100%), misses 0
Queued Packets: 0
四、GNS3VM虚拟机上由dnsmasq服务实现NAT的相关配置及检查方法
1、NAT的配置文件:
gns3@gns3vm:~$ sudo cat /var/lib/libvirt/dnsmasq/default.conf
##WARNING: THIS IS AN AUTO-GENERATED FILE. CHANGES TO IT ARE LIKELY TO BE
##OVERWRITTEN AND LOST. Changes to this configuration should be made using:
## virsh net-edit default
## or other application using the libvirt API.
##
## dnsmasq conf file created by libvirt
strict-order
user=libvirt-dnsmasq
pid-file=/var/run/libvirt/network/default.pid
except-interface=lo
bind-dynamic
interface=virbr0
dhcp-range=192.168.122.2,192.168.122.254
dhcp-no-override
dhcp-authoritative
dhcp-lease-max=253
dhcp-hostsfile=/var/lib/libvirt/dnsmasq/default.hostsfile
addn-hosts=/var/lib/libvirt/dnsmasq/default.addnhosts
2、检查dnsmasq服务是否运行正常
gns3@gns3vm:~$ ps -elf|grep dnsmasq
5 S libvirt+ 826 1 0 80 0 - 12491 - 07:05 ? 00:00:00 /usr/sbin/dnsmasq --conf-file=/var/lib/libvirt/dnsmasq/default.conf --leasefile-ro --dhcp-script=/usr/lib/libvirt/libvirt_leaseshelper
1 S root 827 826 0 80 0 - 12484 - 07:05 ? 00:00:00 /usr/sbin/dnsmasq --conf-file=/var/lib/libvirt/dnsmasq/default.conf --leasefile-ro --dhcp-script=/usr/lib/libvirt/libvirt_leaseshelper
3、查看GNS3VM虚拟机上virbr0网卡信息(参考:https://www.cnblogs.com/zhaohongtian/p/6811317.html):
gns3@gns3vm:~$ ip -4 add
...
4: virbr0: <BROADCAST,MULTICAST,UP,LOWER_UP> mtu 1500 qdisc noqueue state UP group default qlen 1000
inet 192.168.122.1/24 brd 192.168.122.255 scope global virbr0
valid_lft forever preferred_lft forever
...