Flume框架的学习使用
Flume简介
- Flume提供一个分布式的,可靠的,对大数据量的日志进行高效收集、聚集、移动的服务。
- Flume基于流失架构,容错性强,也很灵活简单
- Flume,kafka用来实时进行数据收集,Spark,Storm用来实时处理数据,impala用来实时查询数据。
Flume角色
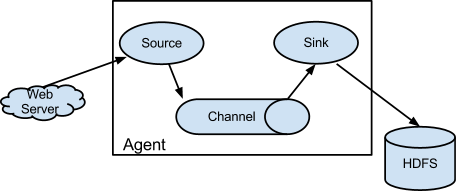
Source
用于采集数据,Source是产生数据流的地方,同时Source会将产生的数据流传输到Channel。
Channel
用于桥接Source和Sink,类似于一个队列。
Sink
从Channel中收集数据,将数据写到目标源(可以是下一个Source,也可以是HDFS或者HBASE)
Event
传输单元,Flume数据传输的基本单元,以事件的形式从源头传递到目的地。
Flume传输过程
Source监控某个文件或者数据流,数据源产生新的数据,拿到该数据之后,将数据封装到一个event中,并put到Channel后commit提交,channel队列先进先出,sink去channel队列中拉去数据,然后写出到下个源。
Flume部署及使用
文件配置
上传压缩包,解压,配置文件:flume-env.sh
export JAVA_HOME=/home/admin/modules/jdk1.8.0_121
案例
监控端口数据
目标:Flume 监控一端 Console,另一端 Console 发送消息,使被监控端实时显示。
- 安装 telnet (为了从某个端口中输出数据)
$ sudo rpm -ivh xinetd-2.3.14-40.el6.x86_64.rpm
$ sudo rpm -ivh telnet-0.17-48.el6.x86_64.rpm
$ sudo rpm -ivh telnet-server-0.17-48.el6.x86_64.rpm
创建 Flume Agent 配置文件 flume-telnet.conf(详细配置见官网)
# Name the components on this agent
a1.sources = r1
a1.sinks = k1
a1.channels = c1
# Describe/configure the source
a1.sources.r1.type = netcat
a1.sources.r1.bind = localhost
a1.sources.r1.port = 44444
# Describe the sink
a1.sinks.k1.type = logger
# Use a channel which buffers events in memory
a1.channels.c1.type = memory
a1.channels.c1.capacity = 1000
a1.channels.c1.transactionCapacity = 100
# Bind the source and sink to the channel
a1.sources.r1.channels = c1
a1.sinks.k1.channel = c1
判断 44444 端口是否被占用
$ netstat -tunlp | grep 44444
先开启 flume 先听端口
$ bin/flume-ng agent --conf conf/ --name a1 --conf-file job/flume-telnet.conf
-Dflume.root.logger==INFO,console
使用 telnet 工具向本机的 44444
$ telnet localhost 44444
实时读取本地文件到HDFS
目标:实时监控 hive 日志,并上传到 HDFS 中
由于flume需要操作Hadoop的API,需要拷贝jar包到Flume的lib目录下:
$ cp share/hadoop/common/lib/hadoop-auth-2.5.0-cdh5.3.6.jar ./lib/
$ cp share/hadoop/common/lib/commons-configuration-1.6.jar ./lib/
$ cp share/hadoop/mapreduce1/lib/hadoop-hdfs-2.5.0-cdh5.3.6.jar ./lib/
$ cp share/hadoop/common/hadoop-common-2.5.0-cdh5.3.6.jar ./lib/

$ cp ./share/hadoop/hdfs/lib/htrace-core-3.1.0-incubating.jar ./lib/
$ cp ./share/hadoop/hdfs/lib/commons-io-2.4.jar ./lib/

最后两个 jar 为 1.99 版本 flume 必须引用的 jar
创建 flume-hdfs.conf
# Name the components on this agent
a2.sources = r2
a2.sinks = k2
a2.channels = c2
# Describe/configure the source
a2.sources.r2.type = exec
a2.sources.r2.command = tail -F /home/admin/modules/apache-hive-1.2.2-bin/hive.log
a2.sources.r2.shell = /bin/bash -c
# Describe the sink
a2.sinks.k2.type = hdfs
a2.sinks.k2.hdfs.path = hdfs://linux01:8020/flume/%Y%m%d/%H
#上传文件的前缀
a2.sinks.k2.hdfs.filePrefix = logs-
#是否按照时间滚动文件夹
a2.sinks.k2.hdfs.round = true
#多少时间单位创建一个新的文件夹
a2.sinks.k2.hdfs.roundValue = 1
#重新定义时间单位
a2.sinks.k2.hdfs.roundUnit = hour
#是否使用本地时间戳
a2.sinks.k2.hdfs.useLocalTimeStamp = true
#积攒多少个 Event 才 flush 到 HDFS 一次
a2.sinks.k2.hdfs.batchSize = 1000
#设置文件类型,可支持压缩
a2.sinks.k2.hdfs.fileType = DataStream
#多久生成一个新的文件
a2.sinks.k2.hdfs.rollInterval = 600
#设置每个文件的滚动大小
a2.sinks.k2.hdfs.rollSize = 134217700
#文件的滚动与 Event 数量无关
a2.sinks.k2.hdfs.rollCount = 0
#最小冗余数
a2.sinks.k2.hdfs.minBlockReplicas = 1
# Use a channel which buffers events in memory
a2.channels.c2.type = memory
a2.channels.c2.capacity = 1000
a2.channels.c2.transactionCapacity = 100
# Bind the source and sink to the channel
a2.sources.r2.channels = c2
a2.sinks.k2.channel = c2
执行监控配置
$ bin/flume-ng agent --conf conf/ --name a2 --conf-file job/flume-hdfs.conf
实时读取目录文件到HDFS
目 标:使用 flume 监听整个目录的文件
创建配置文件 flume-dir.conf
a3.sources = r3
a3.sinks = k3
a3.channels = c3
# Describe/configure the source
a3.sources.r3.type = spooldir
a3.sources.r3.spoolDir = /home/admin/modules/apache-flume-1.7.0-bin/upload
a3.sources.r3.fileSuffix = .COMPLETED
a3.sources.r3.fileHeader = true
#忽略所有以.tmp 结尾的文件,不上传
a3.sources.r3.ignorePattern = ([^ ]*.tmp)
# Describe the sink
a3.sinks.k3.type = hdfs
a3.sinks.k3.hdfs.path = hdfs://linux01:8020/flume/upload/%Y%m%d/%H
#上传文件的前缀
a3.sinks.k3.hdfs.filePrefix = upload-
#是否按照时间滚动文件夹
a3.sinks.k3.hdfs.round = true
#多少时间单位创建一个新的文件夹
a3.sinks.k3.hdfs.roundValue = 1
#重新定义时间单位
a3.sinks.k3.hdfs.roundUnit = hour
#是否使用本地时间戳
a3.sinks.k3.hdfs.useLocalTimeStamp = true
#积攒多少个 Event 才 flush 到 HDFS 一次
a3.sinks.k3.hdfs.batchSize = 100
#设置文件类型,可支持压缩
a3.sinks.k3.hdfs.fileType = DataStream
#多久生成一个新的文件
a3.sinks.k3.hdfs.rollInterval = 600
#设置每个文件的滚动大小大概是 128M
a3.sinks.k3.hdfs.rollSize = 134217700
#文件的滚动与 Event 数量无关
a3.sinks.k3.hdfs.rollCount = 0
#最小冗余数
a3.sinks.k3.hdfs.minBlockReplicas = 1
# Use a channel which buffers events in memory
a3.channels.c3.type = memory
a3.channels.c3.capacity = 1000
a3.channels.c3.transactionCapacity = 100
# Bind the source and sink to the channel
a3.sources.r3.channels = c3
a3.sinks.k3.channel = c3
执行测试:执行如下脚本后,请向 upload 文件夹中添加文件试试
$ bin/flume-ng agent --conf conf/ --name a3 --conf-file job/flume-dir.conf
注意:在使用 Spooling Directory Source 时
- 不要在监控目录中创建并持续修改文件
- 上传完成的文件会以.COMPLETED 结尾
- 被监控文件夹每 600 毫秒扫描一次文件变动
Flume与Flume之间数据传递:单Flume多Channel、Sink
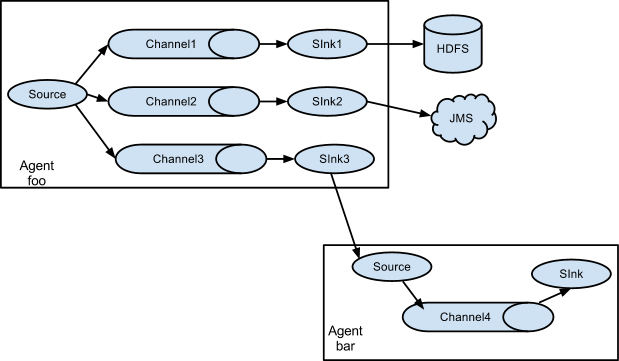
目标:使用 flume-1 监控文件变动,flume-1 将变动内容传递给 flume-2,flume-2 负责存储到HDFS。同时 flume-1 将变动内容传递给 flume-3,flume-3 负责输出到local filesystem。
- 创建 flume-1.conf,用于监控 hive.log 文件的变动,同时产生两个 channel 和两个 sink 分
别输送给 flume-2 和 flume3:
# Name the components on this agent
a1.sources = r1
a1.sinks = k1 k2
a1.channels = c1 c2
# 将数据流复制给多个 channel
a1.sources.r1.selector.type = replicating
# Describe/configure the source
a1.sources.r1.type = exec
a1.sources.r1.command = tail -F /home/admin/modules/apache-hive-1.2.2-bin/hive.log
a1.sources.r1.shell = /bin/bash -c
# Describe the sink
a1.sinks.k1.type = avro
a1.sinks.k1.hostname = linux01
a1.sinks.k1.port = 4141
a1.sinks.k2.type = avro
a1.sinks.k2.hostname = linux01
a1.sinks.k2.port = 4142
# Describe the channel
a1.channels.c1.type = memory
a1.channels.c1.capacity = 1000
a1.channels.c1.transactionCapacity = 100
a1.channels.c2.type = memory
a1.channels.c2.capacity = 1000
a1.channels.c2.transactionCapacity = 100
# Bind the source and sink to the channel
a1.sources.r1.channels = c1 c2
a1.sinks.k1.channel = c1
a1.sinks.k2.channel = c2
- 创建 flume-2.conf,用于接收 flume-1 的 event,同时产生 1 个 channel 和 1 个 sink,将数
据输送给 hdfs:
# Name the components on this agent
a2.sources = r1
a2.sinks = k1
a2.channels = c1
# Describe/configure the source
a2.sources.r1.type = avro
a2.sources.r1.bind = linux01
a2.sources.r1.port = 4141
# Describe the sink
a2.sinks.k1.type = hdfs
a2.sinks.k1.hdfs.path = hdfs://linux01:8020/flume2/%Y%m%d/%H
#上传文件的前缀
a2.sinks.k1.hdfs.filePrefix = flume2-
#是否按照时间滚动文件夹
a2.sinks.k1.hdfs.round = true
#多少时间单位创建一个新的文件夹
a2.sinks.k1.hdfs.roundValue = 1
#重新定义时间单位
a2.sinks.k1.hdfs.roundUnit = hour
#是否使用本地时间戳
a2.sinks.k1.hdfs.useLocalTimeStamp = true
#积攒多少个 Event 才 flush 到 HDFS 一次
a2.sinks.k1.hdfs.batchSize = 100
#设置文件类型,可支持压缩
a2.sinks.k1.hdfs.fileType = DataStream
#多久生成一个新的文件
a2.sinks.k1.hdfs.rollInterval = 600
#设置每个文件的滚动大小大概是 128M
a2.sinks.k1.hdfs.rollSize = 134217700
#文件的滚动与 Event 数量无关
a2.sinks.k1.hdfs.rollCount = 0
#最小冗余数
a2.sinks.k1.hdfs.minBlockReplicas = 1
# Describe the channel
a2.channels.c1.type = memory
a2.channels.c1.capacity = 1000
a2.channels.c1.transactionCapacity = 100
# Bind the source and sink to the channel
a2.sources.r1.channels = c1
a2.sinks.k1.channel = c1
创建 flume-3.conf,用于接收 flume-1 的 event,同时产生 1 个 channel 和 1 个 sink,将数
据输送给本地目录:
# Name the components on this agent
a3.sources = r1
a3.sinks = k1
a3.channels = c1
# Describe/configure the source
a3.sources.r1.type = avro
a3.sources.r1.bind = linux01
a3.sources.r1.port = 4142
# Describe the sink
a3.sinks.k1.type = file_roll
a3.sinks.k1.sink.directory = /home/admin/Desktop/flume3
# Describe the channel
a3.channels.c1.type = memory
a3.channels.c1.capacity = 1000
a3.channels.c1.transactionCapacity = 100
# Bind the source and sink to the channel
a3.sources.r1.channels = c1
a3.sinks.k1.channel = c1

输出的本地目录必须是已经存在的目录,如果该目录不存在,并不会创建新的目录。
执行测试:分别开启对应 flume-job(依次启动 flume-3,flume-2,flume-1),同时产生
文件变动并观察结果:
$ bin/flume-ng agent --conf conf/ --name a3 --conf-file job/group-job1/flume-3.conf
$ bin/flume-ng agent --conf conf/ --name a2 --conf-file job/group-job1/flume-2.conf
$ bin/flume-ng agent --conf conf/ --name a1 --conf-file job/group-job1/flume-1.conf
Flume与Flume之间数据传递:多Flume汇总数据到单Flume
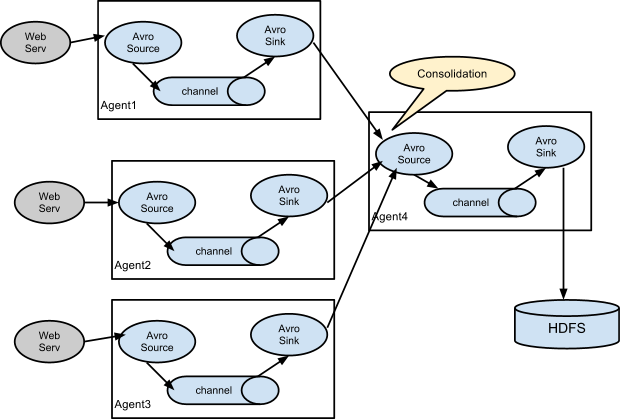
目标:flume-1 监控文件 hive.log,flume-2 监控某一个端口的数据流,flume-1 与 flume-2 将
数据发送给 flume-3,flume3 将最终数据写入到 HDFS。
创建 flume-1.conf,用于监控 hive.log 文件,同时 sink 数据到 flume-3:
# Name the components on this agent
a1.sources = r1
a1.sinks = k1
a1.channels = c1
# Describe/configure the source
a1.sources.r1.type = exec
a1.sources.r1.command = tail -F /home/admin/modules/apache-hive-1.2.2-bin/hive.log
a1.sources.r1.shell = /bin/bash -c
# Describe the sink
a1.sinks.k1.type = avro
a1.sinks.k1.hostname = linux01
a1.sinks.k1.port = 4141
# Describe the channel
a1.channels.c1.type = memory
a1.channels.c1.capacity = 1000
a1.channels.c1.transactionCapacity = 100
# Bind the source and sink to the channel
a1.sources.r1.channels = c1
a1.sinks.k1.channel = c1
创建 flume-2.conf,用于监控端口 44444 数据流,同时 sink 数据到 flume-3
# Name the components on this agent
a2.sources = r1
a2.sinks = k1
a2.channels = c1
# Describe/configure the source
a2.sources.r1.type = netcat
a2.sources.r1.bind = linux01
a2.sources.r1.port = 44444
# Describe the sink
a2.sinks.k1.type = avro
a2.sinks.k1.hostname = linux01
a2.sinks.k1.port = 4141
# Use a channel which buffers events in memory
a2.channels.c1.type = memory
a2.channels.c1.capacity = 1000
a2.channels.c1.transactionCapacity = 100
# Bind the source and sink to the channel
a2.sources.r1.channels = c1
a2.sinks.k1.channel = c1
创建 flume-3.conf,用于接收 flume-1 与 flume-2 发送过来的数据流,最终合并后 sink 到HDFS:
# Name the components on this agent
a3.sources = r1
a3.sinks = k1
a3.channels = c1
# Describe/configure the source
a3.sources.r1.type = avro
a3.sources.r1.bind = linux01
a3.sources.r1.port = 4141
# Describe the sink
a3.sinks.k1.type = hdfs
a3.sinks.k1.hdfs.path = hdfs://linux01:8020/flume3/%Y%m%d/%H
#上传文件的前缀
a3.sinks.k1.hdfs.filePrefix = flume3-
#是否按照时间滚动文件夹
a3.sinks.k1.hdfs.round = true
#多少时间单位创建一个新的文件夹
a3.sinks.k1.hdfs.roundValue = 1
#重新定义时间单位
a3.sinks.k1.hdfs.roundUnit = hour
#是否使用本地时间戳
a3.sinks.k1.hdfs.useLocalTimeStamp = true
#积攒多少个 Event 才 flush 到 HDFS 一次
a3.sinks.k1.hdfs.batchSize = 100
#设置文件类型,可支持压缩
a3.sinks.k1.hdfs.fileType = DataStream
#多久生成一个新的文件
a3.sinks.k1.hdfs.rollInterval = 600
#设置每个文件的滚动大小大概是 128M
a3.sinks.k1.hdfs.rollSize = 134217700
#文件的滚动与 Event 数量无关
a3.sinks.k1.hdfs.rollCount = 0
#最小冗余数
a3.sinks.k1.hdfs.minBlockReplicas = 1
# Describe the channel
a3.channels.c1.type = memory
a3.channels.c1.capacity = 1000
a3.channels.c1.transactionCapacity = 100
# Bind the source and sink to the channel
a3.sources.r1.channels = c1
a3.sinks.k1.channel = c1
执行测试:分别开启对应 flume-job(依次启动 flume-3,flume-2,flume-1),同时产生文件变动并观察结果
$ bin/flume-ng agent --conf conf/ --name a3 --conf-file job/group-job2/flume-3.conf
$ bin/flume-ng agent --conf conf/ --name a2 --conf-file job/group-job2/flume-2.conf
$ bin/flume-ng agent --conf conf/ --name a1 --conf-file job/group-job2/flume-1.conf
测试时记得启动 hive 产生一些日志,同时使用 telnet 向 44444 端口发送内容,
$ bin/hive
$ telnet linux01 44444
Flume监控Ganglia
Ganglia的安装部署
安装 httpd 服务与 php
# yum -y install httpd php
安装其他依赖
# yum -y install rrdtool perl-rrdtool rrdtool-devel
# yum -y install apr-devel
安装 ganglia
# rpm -Uvh http://dl.fedoraproject.org/pub/epel/6/x86_64/epel-release-6-8.noarch.rpm
# yum -y install ganglia-gmetad
# yum -y install ganglia-web
# yum install -y ganglia-gmond
修改配置文件 ganglia.conf :
# vi /etc/httpd/conf.d/ganglia.conf
修改为:
#
# Ganglia monitoring system php web frontend
#
Alias /ganglia /usr/share/ganglia
<Location /ganglia>
Order deny,allow
Deny from all
Allow from all
# Allow from 127.0.0.1
# Allow from ::1
# Allow from .example.com
</Location>
文件 gmetad.conf :
# vi /etc/ganglia/gmetad.conf
修改为: :
data_source "linux" 192.168.216.20
文件 gmond.conf :
# vi /etc/ganglia/gmond.conf
修改为:
cluster {
name = "linux"
owner = "unspecified"
latlong = "unspecified"
url = "unspecified"
}
udp_send_channel {
#bind_hostname = yes # Highly recommended, soon to be default.
# This option tells gmond to use a source address
# that resolves to the machine's hostname. Without
# this, the metrics may appear to come from any
# interface and the DNS names associated with
# those IPs will be used to create the RRDs.
# mcast_join = 239.2.11.71
host = 192.168.216.20
port = 8649
ttl = 1
}
udp_recv_channel {
# mcast_join = 239.2.11.71
port = 8649
bind = 192.168.216.20
retry_bind = true
# Size of the UDP buffer. If you are handling lots of metrics you really
# should bump it up to e.g. 10MB or even higher.
# buffer = 10485760
}
文件 config :
# vi /etc/selinux/config
修改为:
# This file controls the state of SELinux on the system.
# SELINUX= can take one of these three values:
# enforcing - SELinux security policy is enforced.
# permissive - SELinux prints warnings instead of enforcing.
# disabled - No SELinux policy is loaded.
SELINUX=disabled
# SELINUXTYPE= can take one of these two values:
# targeted - Targeted processes are protected,
# mls - Multi Level Security protection.
SELINUXTYPE=targeted
selinux 本次生效关闭必须重启,如果此时不想重启,可以临时生效之:
$ sudo setenforce 0
启动 ganglia
$ sudo service httpd start
$ sudo service gmetad start
$ sudo service gmond start
打开网页浏览 ganglia
http://192.168.216.20/ganglia
如果完成以上操作依然出现权限不足错误,请修改/var/lib/ganglia 目录的权限
$ sudo chmod -R 777 /var/lib/ganglia
操作Flume测试监控
修改 flume-env.sh 配置:
JAVA_OPTS="-Dflume.monitoring.type=ganglia
-Dflume.monitoring.hosts=192.168.216.20:8649
-Xms100m
-Xmx200m"
启动 flume 任务
$ bin/flume-ng agent
--conf conf/
--name a1
--conf-file job/group-job0/flume-telnet.conf
-Dflume.root.logger==INFO,console
-Dflume.monitoring.type=ganglia
-Dflume.monitoring.hosts=192.168.216.20:8649
发送数据观察 ganglia 监测图
$ telnet localhost 44444
| 字段(图表名称) | 字段含义 |
|---|---|
| EventPutAttemptCount | source 尝试写入 channel 的事件总数量 |
| EventPutSuccessCount | 成功写入 channel 且提交的事件总数量 |
| EventTakeAttemptCount | sink 尝试从 channel 拉取事件的总数量。这不意味着每次事件都被返回,因为 sink 拉取的时候 channel 可能没有任何数据。 |
| EventTakeSuccessCount | sink 成功读取的事件的总数量 |
| StartTime | channel 启动的时间(毫秒) |
| StopTime | channel 停止的时间(毫秒) |
| ChannelSize | 目前 channel 中事件的总数量 |
| ChannelFillPercentage | channel 占用百分比 |
| ChannelCapacity | channel 的容量 |
本博客仅为博主学习总结,感谢各大网络平台的资料。蟹蟹!!