一、Linux下离线安装Docker
基础环境
1、操作系统:CentOS 7
2、Docker版本:docker-19.03.9.tgz 官方下载地址(打不开可能需要科学-上网)
3、官方参考文档:https://docs.docker.com/install/linux/docker-ce/binaries/#install-static-binaries
二、Docker安装
1、解压
tar -zxvf docker-19.03.9.tgz
2、将解压出来的docker文件内容移动到 /usr/bin/ 目录下
cp docker/* /usr/bin/
3、将docker注册为service
vim /etc/systemd/system/docker.service
将下列配置加到docker.service中并保存(如果没有该文件会自动创建,编辑ok保存就好)
[Unit]

Description=Docker Application Container Engine

Documentation=https://docs.docker.com

After=network-online.target firewalld.service

Wants=network-online.target

[Service]

Type=notify

# the default is not to use systemd for cgroups because the delegate issues still

# exists and systemd currently does not support the cgroup feature set required

# for containers run by docker

ExecStart=/usr/bin/dockerd

ExecReload=/bin/kill -s HUP $MAINPID

# Having non-zero Limit*s causes performance problems due to accounting overhead

# in the kernel. We recommend using cgroups to do container-local accounting.

LimitNOFILE=infinity

LimitNPROC=infinity

LimitCORE=infinity

# Uncomment TasksMax if your systemd version supports it.

# Only systemd 226 and above support this version.

#TasksMax=infinity

TimeoutStartSec=0

# set delegate yes so that systemd does not reset the cgroups of docker containers

Delegate=yes

# kill only the docker process, not all processes in the cgroup

KillMode=process

# restart the docker process if it exits prematurely

Restart=on-failure

StartLimitBurst=3

StartLimitInterval=60s


[Install]

WantedBy=multi-user.target
4、启动
chmod +x /etc/systemd/system/docker.service #添加文件权限并启动docker
systemctl daemon-reload #重载unit配置文件
systemctl start docker #启动Docker
systemctl enable docker.service #设置开机自启
5、验证
systemctl status docker #查看Docker状态
docker -v #查看Docker版本
以上请参考:https://www.cnblogs.com/luoSteel/p/10038954.html
三、fastDFS文件服务器安装
1、(有网机器)从有镜像的机器上获取镜像文件(及找一台联网的linux机器)
在有网的linux上执行(执行前确认docker是否安装)拉取镜像: docker pull morunchang/fastdfs
2、(有网机器)镜像转文件的命令是: docker save morunchang/fastdfs > /root/fastdfs.tar
3、(离线机器)复制文件到离线机器 然后导入:docker load < /root/fastdfs.tar
4、启动tracker: docker run -d --name tracker --net=host morunchang/fastdfs sh tracker.sh
注意:可能会报错

原因:
“write /proc/self/attr/keycreate: permission denied” 表示文件没有写入权限,被拒绝访问了
selinux是linux为了系统安全性做的控制,会控制用户可以访问、读取、修改哪些文件,比如,前面的write /proc/self/attr/keycreate文件没有权限,就是被selinux控制了。
selinux有三种模式:enforcing 强制 permissive 宽容的 diabled 禁止的,顾名思义,权限限制,从高到低。
解决方法:
将/etc/selinux下的config文件中的SELINUX属性改为disabled
步骤:
vi /etc/selinux/config
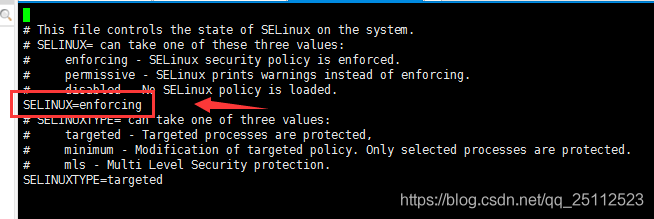
按I键进入编辑模式,将SELINUX属性改为disabled,保存退出:wq,重启liunx系统即可
错误解决办法参考:https://www.cnblogs.com/liaoyanglong/p/13826869.html
5、启动tracker: docker run -d --name tracker --net=host morunchang/fastdfs sh tracker.sh
这时候可能还会报错,提示你已经启动过该容器了,你可以:
docker rm 你的id,然后再次执行上述命令
6、启动storage (172.21.91.218 ip 自行替换为docker 所在服务器的ip )( 此镜像不支持-p 参数)
docker run -d --name storage --net=host -e TRACKER_IP=172.21.91.218:22122 -e GROUP_NAME=group1 morunchang/fastdfs sh storage.sh
可选配置
storage 内部nginx 端口修改 以22999为例
1.进入容器内部: docker exec -it storage /bin/bash
2.修改nginx配置文件: vim /etc/nginx/conf/nginx.conf
修改 http.server.listen 8080 为 22999
sed -i 's/8080/22999/g' /etc/nginx/conf/nginx.conf
3.退出容器
exit
4.重启storage
docker restart storage
//浏览器访问路径 http://172.21.91.218:22999/group1/M00/00/00/rBVb2lwPNYeAZtTLAAAXxD4H4Z8674.txt

相关端口开放
firewall-cmd --zone=public --add-port=22122/tcp --permanent
firewall-cmd --zone=public --add-port=23000/tcp --permanent
firewall-cmd --zone=public --add-port=8080/tcp --permanent
firewall-cmd --reload