转自:https://blog.csdn.net/dataiyangu/article/details/87214773
什么是NIO
Buffer && Channel
Buffer
举个栗子
NIO复制文件
Buffer中有3个重要的参数:
代码展示
图解
新建
存入10byte
flip
五次读操作
flip
几个重要的函数
文件映射到内存
网络编程
多线程网络服务器的一般结构
简单案例 EchoServer
EchoServer
HandleMsg
EchoServer的客户端
问题:
解决
模拟低效的客户端
服务器输出
网络编程NIO
参考代码
AIO
特点总结:
基本思想
其他的方法
代码实现
为什么需要了解NIO和AIO?
什么是NIO
NIO是New I/O的简称,与旧式的基于流的I/O方法相对,从名字看,它表示新的一套Java I/O标 准。它是在Java 1.4中被纳入到JDK中的,并具有以下特性:
– NIO是基于块(Block,硬盘上的块)的,它以块为基本单位处理数据,传统的是基于字节的,最小单位是字节,NIO最小单位是块。
– 为所有的原始类型提供(Buffer)缓存支持
– 增加通道(Channel)对象,作为新的原始 I/O 抽象
– 支持锁和内存映射文件的文件访问接口,拿文件系统来实现锁,就是我们平常的.log文件。
– 提供了基于Selector的异步网络I/O
Buffer && Channel
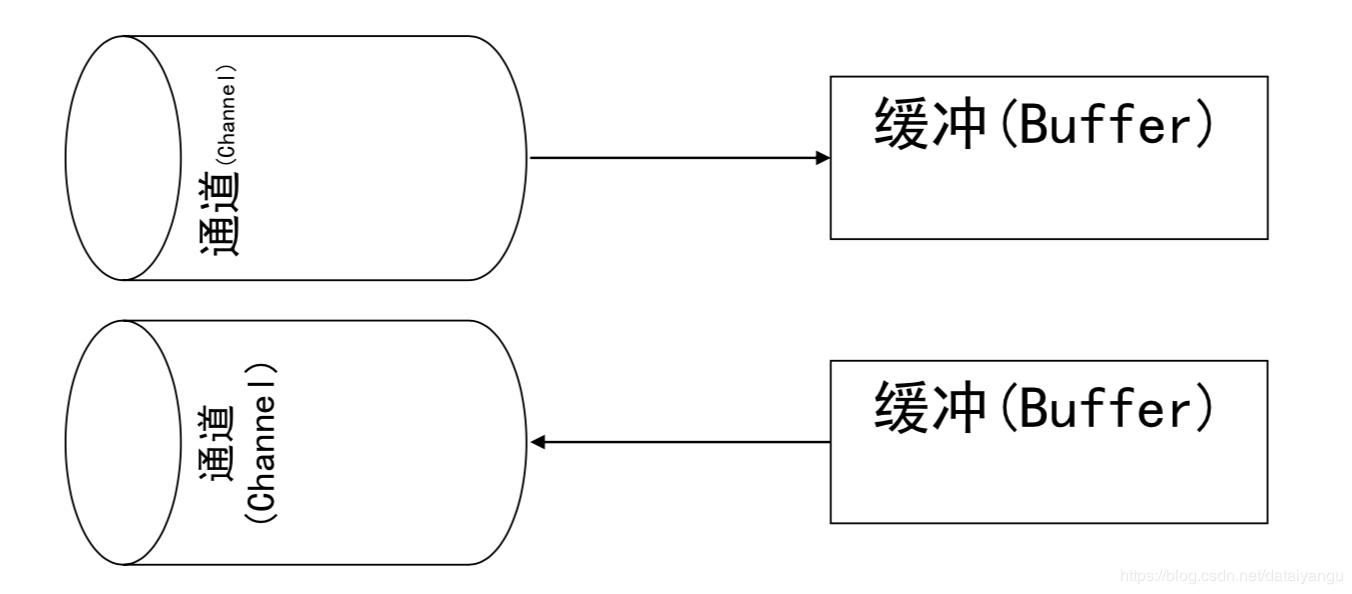
文件的读写都是通过Buffer读写到Channel,然后再到文件。Channel左边就是对应的我们的文件。
Buffer
每个基本类型都有对应的buffer
Object
-Buffer
-ByteBuffer
-CharBuffer
-DoubleBuffer
-FloatBUffer
-IntBuffer
-LongBuffer
-ShortBuffer
1
2
3
4
5
6
7
8
9
举个栗子
FileInputStream fin = new FileInputStream(new File("d:\temp_buffer.tmp"));
//通过InputStream得到channel。
FileChannel fc=fin.getChannel();
//通过ByteBuffer分配1k的大小的buffer
ByteBuffer byteBuffer=ByteBuffer.allocate(1024);
//通过channel将1k大小的数据读到buffer中
fc.read(byteBuffer);
fc.close();
//对buffer中的数据进行读写转换,后面可能要对buffer中的数据进行读取。
byteBuffer.flip();
1
2
3
4
5
6
7
8
9
10
NIO复制文件
public static void nioCopyFile(String resource, String destination) throws IOException {
FileInputStream fis = new FileInputStream(resource);
FileOutputStream fos = new FileOutputStream(destination);
FileChannel readChannel = fis.getChannel();//读文件通道
FileChannel writeChannel = fos.getChannel();//写文件通道
ByteBuffer buffer = ByteBuffer.allocate(1024); //读入数据缓存
while (true) {
buffer.clear();
int len = readChannel.read(buffer); //读入数据
//len读到数据的大小
if (len == -1) {
break;
//读取完毕
}
buffer.flip();
writeChannel.write(buffer);
//写入文件
}
readChannel.close();
writeChannel.close();
}
1
2
3
4
5
6
7
8
9
10
11
12
13
14
15
16
17
18
19
20
21
Buffer中有3个重要的参数:
位置(position)、容量(capactiy)和上限(limit)
参数 写模式 读模式
位置 当前缓冲区的位置,将从position的下一个位置写数据 当前缓冲区读取的位置,将从此位置后,读取数据
容量 缓存区的总容量上限 缓存区的总容量上限
上限 缓冲区的实际上线,他总是小于等于容量。通常情况下和容量相等 代表刻度的总容量,和上次写入的数据量相等
代码展示
ByteBuffer b=ByteBuffer.allocate(15); //15个字节大小的缓冲区
System.out.println("limit="+b.limit()+" capacity="+b.capacity()+" position="+b.position());
for(int i=0;i<10;i++){ //存入10个字节数据
b.put((byte)i);
}
System.out.println("limit="+b.limit()+" capacity="+b.capacity()+" position="+b.position());
b.flip(); //重置position
System.out.println("limit="+b.limit()+" capacity="+b.capacity()+" position="+b.position());
for(int i=0;i<5;i++){
System.out.print(b.get());
}
System.out.println();
System.out.println("limit="+b.limit()+" capacity="+b.capacity()+" position="+b.position()); b.flip();
System.out.println("limit="+b.limit()+" capacity="+b.capacity()+" position="+b.position());
图解
新建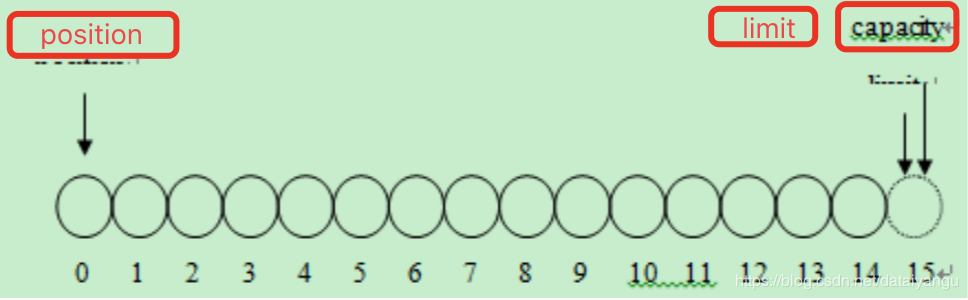
存入10byte

flip
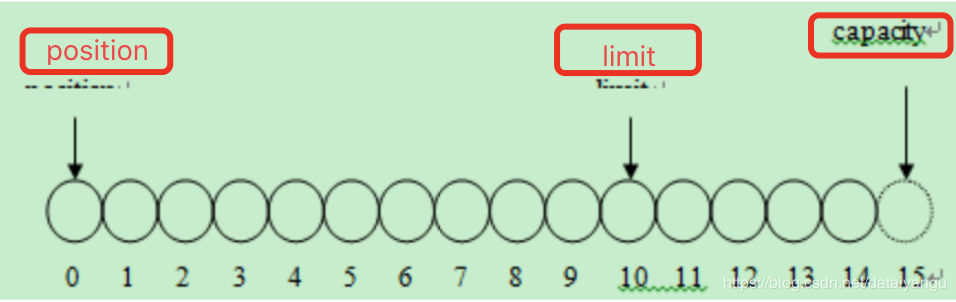
该操作会重置position,通常,将buffer从写模式转换为读 模式时需要执行此方法 flip()操作不仅重置了当前的position为0,还将limit设置到当 前position的位置
五次读操作

flip

几个重要的函数
public final Buffer rewind()
– 将position置零,并清除标志位(mark)
public final Buffer clear()
– 将position置零,同时将limit设置为capacity的大小,并清除了标志mark
public final Buffer flip()
– 先将limit设置到position所在位置,然后将position置零,并清除标志位mark – 通常在读写转换时使用
文件映射到内存
RandomAccessFile raf = new RandomAccessFile("C:\mapfile.txt", "rw");
FileChannel fc = raf.getChannel();
//将文件映射到内存中
MappedByteBuffer mbb = fc.map(FileChannel.MapMode.READ_WRITE, 0, raf.length());
while(mbb.hasRemaining()){
System.out.print((char)mbb.get());
}
mbb.put(0,(byte)98); //修改文件
raf.close();
网络编程
多线程网络服务器的一般结构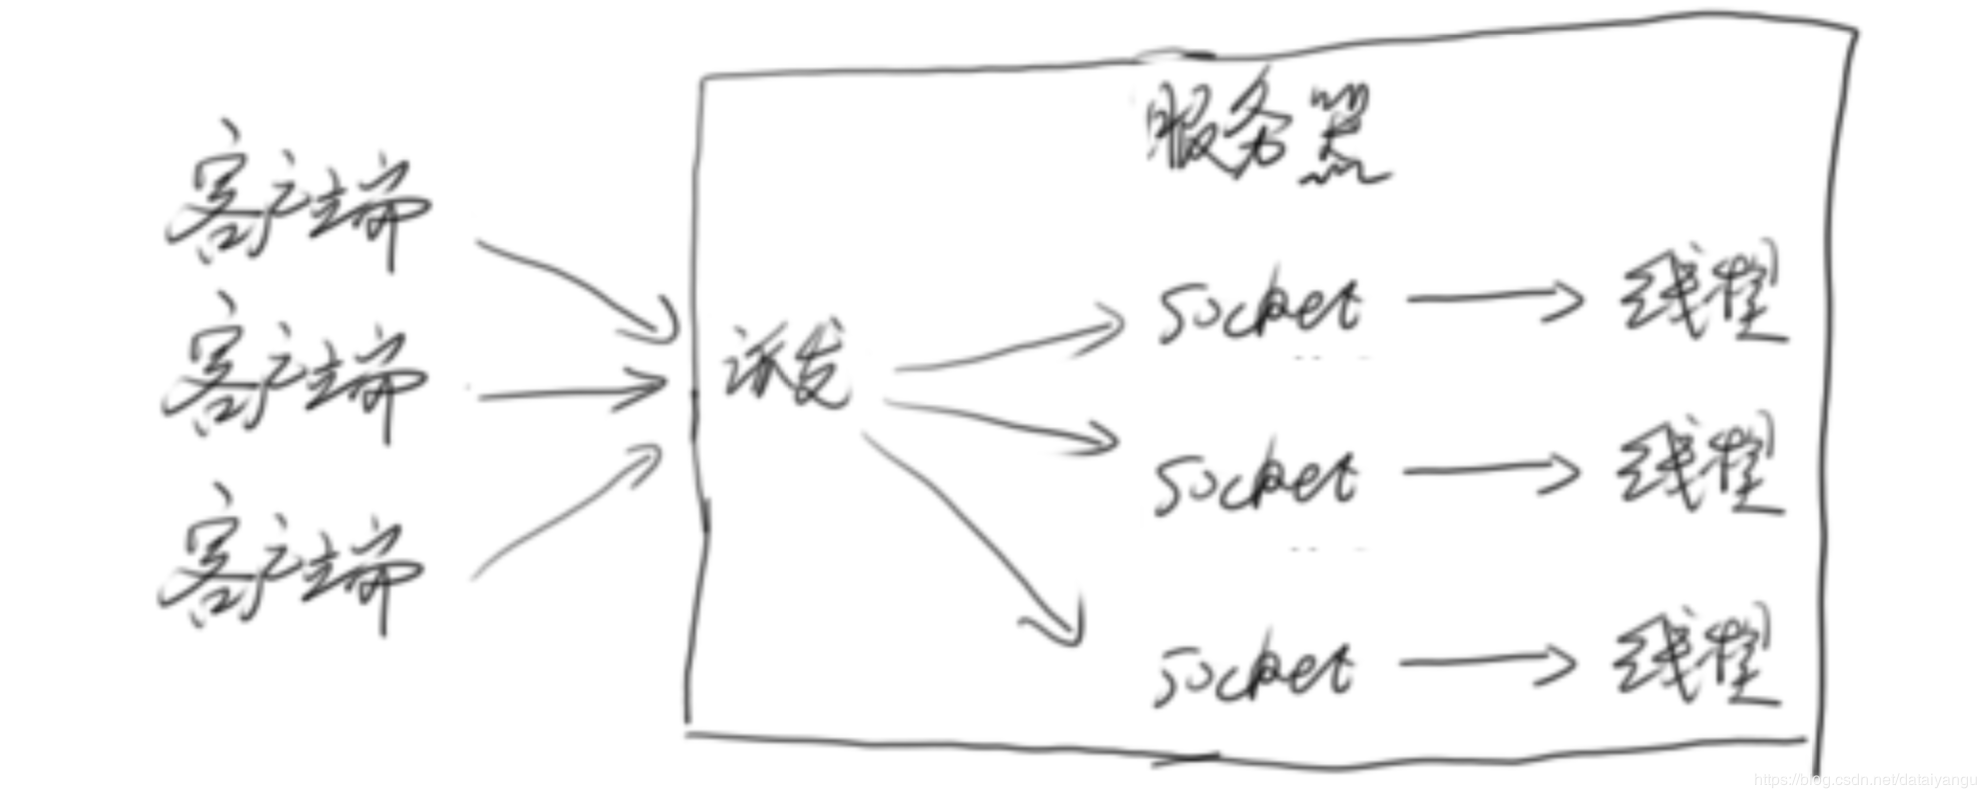
简单案例 EchoServer
EchoServer
public static void main(String args[]) {
ServerSocket echoServer = null;
Socket clientSocket = null;
try {
echoServer = new ServerSocket(8000);
} catch (IOException e) {
System.out.println(e); }
while (true) {
try {
clientSocket = echoServer.accept(); System.out.println(clientSocket.getRemoteSocketAddress() + " connect!");
tp.execute(new HandleMsg(clientSocket));
} catch (IOException e) {
System.out.println(e); }
}
}
1
2
3
4
5
6
7
8
9
10
11
12
13
14
15
主线程在这里制作一个接收accept的功能。
HandleMsg
static class HandleMsg implements Runnable{
//省略部分信息
public void run(){
try {
is = new BufferedReader(new InputStreamReader(clientSocket.getInputStream()));
os = new PrintWriter(clientSocket.getOutputStream(), true);
// 从InputStream当中读取客户端所发送的数据
String inputLine = null;
long b=System.currentTimeMillis();
while ((inputLine = is.readLine()) != null) {
os.println(inputLine);
}
long e=System.currentTimeMillis();
System.out.println("spend:"+(e-b)+"ms");
} catch (IOException e) {
e.printStackTrace(); }finally{
//关闭资源
}
}
1
2
3
4
5
6
7
8
9
10
11
12
13
14
15
16
17
18
19
读到什么就回写什么
EchoServer的客户端
public static void main(String[] args) throws IOException {
Socket client = null;
PrintWriter writer = null;
BufferedReader reader = null;
try {
client = new Socket();
client.connect(new InetSocketAddress("localhost", 8000)); writer = new PrintWriter(client.getOutputStream(), true); writer.println("Hello!");
writer.flush();
reader = new BufferedReader(new InputStreamReader(client.getInputStream()));
System.out.println("from server: " + reader.readLine());
} catch{
} finally {
//省略资源关闭
}
}
1
2
3
4
5
6
7
8
9
10
11
12
13
14
15
问题:
– 为每一个客户端使用一个线程,如果客户端出现延时等异常,线程可能会被占用很长时间。因为数据的准备和读取都在这个线程中。
– 此时,如果客户端数量众多,可能会消耗大量的系统资源
解决
– 非阻塞的NIO
– 数据准备好了在工作
注意:io真正的工作分为准备和读取两个部分。nio就是在准备玩了之后才会分配读取的操作。
模拟低效的客户端
private static ExecutorService tp=Executors.newCachedThreadPool(); private static final int sleep_time=1000*1000*1000;
public static class EchoClient implements Runnable{
public void run(){
try {
client = new Socket();
client.connect(new InetSocketAddress("localhost", 8000));
writer = new PrintWriter(client.getOutputStream(), true); writer.print("H");
LockSupport.parkNanos(sleep_time);
writer.print("e");
LockSupport.parkNanos(sleep_time);
writer.print("l");
LockSupport.parkNanos(sleep_time);
writer.print("l");
LockSupport.parkNanos(sleep_time);
writer.print("o");
LockSupport.parkNanos(sleep_time);
writer.print("!");
LockSupport.parkNanos(sleep_time);
writer.println();
writer.flush();
1
2
3
4
5
6
7
8
9
10
11
12
13
14
15
16
17
18
19
20
服务器输出
spend:6000ms
spend:6000ms
spend:6000ms
spend:6001ms
spend:6002ms
spend:6002ms
spend:6002ms
spend:6002ms
spend:6003ms
spend:6003ms
1
2
3
4
5
6
7
8
9
10
这里的6秒花在了哪里?
注意上面的代码块
long b=System.currentTimeMillis();
while ((inputLine = is.readLine()) != null) {
os.println(inputLine);
}
long e=System.currentTimeMillis();
System.out.println("spend:"+(e-b)+"ms");
1
读和写一共花了六秒,读的时候花了很多时间读不到
网络编程NIO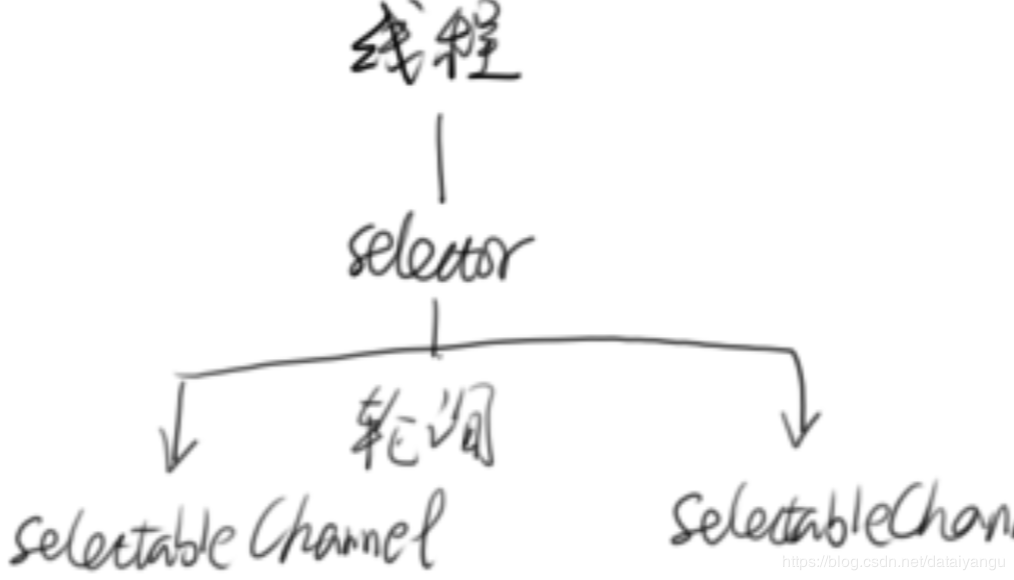
把数据准备好了再通知我 Channel有点类似于流,一个Channel可以和文件或者网络Socket对应
Selector:多路复用选择器 Selector,它是NIO编程的基础,非常重要,多路复用器提供选择已经就绪的任务的能力。简单说,就是Selector会不断地轮询注册在其上的通道(Channel) 假如某个通道发生了读写操作,这个通道就处于就绪状态,会被Selector轮询出来,然后通过SelectionKey可以取得就绪的Channel集合,从而进行后续的IO操作。一个Selector可以负责成千上万Channel通道,没有上线,这也是JDK使用了epoll代替了传统的select实现,获得连接句柄没有限制。这就意味着 我们只需要一个线程负责Selector的轮询,就可以接入成千上万个客户端。
Selector准备好数据后,返回SelectionKey SelectionKey表示一对Selector和Channel的关系, 从SelectionKey中可以得到Channnel(数据已经准备), 并读取数据
select()和selectNow():
select方法如果没有一个channel准备好数据的话,就会出现阻塞,selectNow不论有没有准备好,都会有一个返回值,不会出现阻塞。
参考代码
import java.io.IOException;
import java.net.InetAddress;
import java.net.InetSocketAddress;
import java.nio.ByteBuffer;
import java.nio.channels.*;
import java.nio.channels.spi.SelectorProvider;
import java.util.Iterator;
import java.util.LinkedList;
import java.util.Set;
public class NioTest {
private void StartServer ()throws Exception{
final Selector selector = SelectorProvider.provider().openSelector();
ServerSocketChannel ssc = ServerSocketChannel.open();
//将ServerSocketChannel设置为非阻塞的,accept不会一直等待,即数据准备好了,给个通知。
ssc.configureBlocking(false);
InetSocketAddress isa = new InetSocketAddress(8000);
ssc.socket().bind(isa);
//给channel注册一个感兴趣的事件,即accept事件,如果有人accept,selector就告诉ssc
SelectionKey acceptKey = ssc.register(selector, SelectionKey.OP_ACCEPT);
for (; ; ) {
//已经有数据准备好了(读、写、accept)
selector.select();
// if (selector.selectNow() == 0) {
// continue;
// }
Set readyKeys = selector.selectedKeys();
Iterator i = readyKeys.iterator();
long e = 0;
while (i.hasNext()) {
SelectionKey sk = (SelectionKey) i.next();
//remove掉,是为了防止后面重复处理。
i.remove();
//如果是一个accept的事件
if (sk.isAcceptable()) {
doAccept(sk);
}
//如果是一个读的事件,读已经准备好了
else if(sk.isValid()&&sk.isReadable()){
// 将时间做一个记录
if (!geym_time_stat.containsKey(((SocketChannel) sk.channel()).socket())) {
geym_time_stat.put(((SocketChannel) sk.channel()).socket(),System.currentTimeMillis() );
doRead(sk);
}
}
//如果是一个写的事件
else if (sk.isValid() && sk.isWritable()) {
doWrite(sk);
e = System.currentTimeMillis();
//耗时的统计
long b = geym_time_stat.remove(((SocketChannel) sk.channel()).socket());
System.out.println("spend:"+(e-b)+"ms");
}
}
}
class HandleMsg implements Runnable{
SelectionKey sk;
ByteBuffer bb;
public HandleMsg(SelectionKey sk,ByteBuffer bb){
this.sk= sk;
this.bb = bb;
}
public void run() {
// 将之前添加的附件拿出来
EchoClient echoClient = (EchoClient) sk.attachment();
echoClient.enqueue(bb);
// 将SelectionKey感兴趣的事件修改为OP_READ和OP_WRITE;
sk.interestOps(SelectionKey.OP_READ | SelectionKey.OP_WRITE);
// 强迫Selector立即返回
selector.wakeup();
}
}
}
private void doRead(SelectionKey sk){
SocketChannel channel = (SocketChannel) sk.channel();
ByteBuffer bb = ByteBuffer.allocate(8192);
int len;
try{
len = channel.read(bb);
if (len < 0) {
disconnect(sk);
return;
}
} catch (IOException e) {
System.out.println("Field to read from client");
e.printStackTrace();
disconnect(sk);
return;
}
bb.flip();
tp.excute(new HandleMsg(sk, bb));
}
private void doWrite(SelectionKey sk){
SelectableChannel channel = sk.channel();
EchoClient echoClient = (EchoClient) sk.attachment();
LinkedList<ByteBuffer> outq = echoClient.getOutputQueue();
ByteBuffer bb = outq.getLast();
try {
// 回写到channel中
int len = channel.write(bb);
if (len == -1) {
disconnect(sk);
return;
}
if (bb.remaining() == 0) {
outq.removeLast();
}
} catch (Exception e) {
System.out.println("Faild to write to client .");
e.printStackTrace();
disconnect(sk);
}
//队列中的数据已经回写完毕的话
if (outq.size() == 0) {
// 将对写事件感兴趣去掉。
sk.interestOps(SelectionKey.OP_READ);
}
}
private void doAccept(SelectionKey sk){
ServerSocketChannel server = (ServerSocketChannel) sk.channel();
SocketChannel clientChannel;
try {
clientChannel = server.accept();
clientChannel.configureBlocking(false);
//希望能读数据
SelectionKey clientKey = clientChannel.register(selector, SelectionKey.OP_READ);
EchoClient echoClient = new EchoClient();
// 增加一个附件给Key
clientKey.attach(echoClient);
InetAddress clientAddress = clientChannel.socket().getInetAddress();
System.out.println("Accepted connection from "+clientAddress.getHostAddress());
} catch (Exception e) {
System.out.println("Faild to accept new client");
e.printStackTrace();
}
}
class EchoClient{
LinkedList<ByteBuffer> outq;
EchoClient(){
outq = new LinkedList<ByteBuffer>();
}
// 读到数据就往里面塞
public void enqueue(ByteBuffer bb){
outq.addFirst(bb);
}
}
}
1
2
3
4
5
6
7
8
9
10
11
12
13
14
15
16
17
18
19
20
21
22
23
24
25
26
27
28
29
30
31
32
33
34
35
36
37
38
39
40
41
42
43
44
45
46
47
48
49
50
51
52
53
54
55
56
57
58
59
60
61
62
63
64
65
66
67
68
69
70
71
72
73
74
75
76
77
78
79
80
81
82
83
84
85
86
87
88
89
90
91
92
93
94
95
96
97
98
99
100
101
102
103
104
105
106
107
108
109
110
111
112
113
114
115
116
117
118
119
120
121
122
123
124
125
126
127
128
129
130
131
132
133
134
135
136
137
138
139
140
141
142
143
144
145
146
147
148
149
150
151
以上是通过nio的方式实现上面的功能,从6s多变为了几毫秒,因为只是部分代码,所以没有运行结果。
总结:
– NIO会将数据准备好后,再交由应用进行处理,数据如果没有准备好,是不会进入到应用中的,数据的读取过程依然在应用线程中完成 ,等待的时间剥离到一个独立的线程中去等待(selector.select();)。
– 节省数据准备时间(因为Selector可以复用)
AIO
异步io
上面的NIO只是将等待的时间剥离到少数的线程中,避免大量的线程等待,造成的资源浪费,AIO等你写完了或者读完了再通知我。不需要读,也不需要写,只需要等系统把数据都处理完了之后,把回调函数放进去,就会执行,AIO不会加快io,io本身的速度并没有加快,只是改变了原来的线程对io的处理方式,看起来是变快了。
特点总结:
读完了再通知我
不会加快IO,只是在读完后进行通知
使用回调函数,进行业务处理
基本思想
用到的类
AsynchronousServerSocketChannel
1
server = AsynchronousServerSocketChannel.open().bind(new InetSocketAddress(PORT));
1
使用server上的accept方法
public abstract <A> void accept(A attachment,
CompletionHandler<AsynchronousSocketChannel,? super A>handler);
1
2
因为AIO是异步的,将accept调用了之后立即返回,但是并没有真正拿到客户端的数据,CompletionHandler<AsynchronousSocketChannel,? super A>handler这个接口的作用就是在真正accept的时候,将accept得到的数据传给handler,供后面的相关操作使用。
其他的方法
AsynchronousSocketChannel
因为是异步的,肯定不能读完了之后再返回,所以所有的方法都是立即返回的
– read
TimeUnit是超时时间
第三个函数只有一个参数,但是会返回一个future,告知读到了第几个字节
第四个函数是读到了ByteBuffer数组中,因为网络报文的前二十(举例)个字节是无用的,直接剥离掉,能直接拿到有用的数据。
– write

代码实现
server.accept(null, new CompletionHandler<AsynchronousSocketChannel, Object>() {
final ByteBuffer buffer = ByteBuffer.allocate(1024);
网络编程 AIO
public void completed(AsynchronousSocketChannel result, Object attachment) {
System.out.println(Thread.currentThread().getName()); Future<Integer> writeResult=null;
try {
buffer.clear();
result.read(buffer).get(100, TimeUnit.SECONDS);
buffer.flip();
writeResult=result.write(buffer);
} catch (InterruptedException | ExecutionException e) { e.printStackTrace();
} catch (TimeoutException e) { e.printStackTrace();
} finally { try {
//执行完了之后再次执行accept,防止执行完了没事干了。
server.accept(null, this);
writeResult.get();
result.close();
} catch (Exception e) {
System.out.println(e.toString()); }
}
}
@Override
public void failed(Throwable exc, Object attachment) {
System.out.println("failed: " + exc);
}
});
上面是accept的代码实现,
为什么需要了解NIO和AIO?