1.关闭selinux和firewall
1.1检测selinux是否关闭
[root@localhost ~]# getenforce
Disabled #Disabled 为关闭
1.1.1临时关闭
[root@localhost ~]# setenforce 0 #设置SELinux 成为enforcing模式
1.1.2永久关闭
[root@localhost ~]# vi /etc/selinux/config:
将SELINUX=enforcing改为SELINUX=disabled
设置后需要重启才能生效
1.2查看默认防火墙状态
[root@localhost ~]# firewall-cmd --state
not running #关闭后显示not running,开启后显示running
1.2.1停止firewall
[root@localhost ~]# systemctl stop firewalld.service
1.2.2禁止firewall开机启动
[root@localhost ~]# systemctl disable firewalld.service
2.Zabbix3.4程序安装
2.1配置zabbix的yum源
[root@localhost ~]# rpm -ivh http://repo.zabbix.com/zabbix/3.4/rhel/7/x86_64/zabbix-release-3.4-2.el7.noarch.rpm
2.2安装zabbix程序包,安装mysql、zabbxi-agent
[root@localhost ~]# yum install -y zabbix-server-mysql zabbix-web-mysql zabbix-agent mariadb-server
2.3启动mariadb并设置开机启动,创建数据库实例,授权
[root@localhost ~]# systemctl start mariadb #启动mariadb
[root@localhost ~]# systemctl enable mariadb #设置开机启动
[root@localhost ~]# mysql #登入数据库
MariaDB [(none)]> create database zabbix character set utf8 collate utf8_bin; #创建数据库实例
Query OK, 1 row affected (0.00 sec)
MariaDB [(none)]> grant all privileges on zabbix.* to zabbix@'%' identified by 'zabbix'; #授权所有主机访问数据库实例zabbix,用户名/密码:zabbix/zabbix
Query OK, 0 rows affected (0.00 sec)
MariaDB [(none)]> grant all privileges on zabbix.* to zabbix@localhost identified by 'zabbix'; #授权localhost主机名访问数据库实例zabbix,用户名/密码:zabbix/zabbix
Query OK, 0 rows affected (0.00 sec)
MariaDB [(none)]> grant all privileges on zabbix.* to zabbix@localhost.localdomain identified by 'zabbix'; #授权localhost.localdomain主机访问数据库实例zabbix,用户名/密码:zabbix/zabbix
Query OK, 0 rows affected (0.00 sec)
导入初始模式和数据
[root@localhost ~]# cd /usr/share/doc/zabbix-server-mysql-3.4.4/ #进入create.sql.gz所在目录
[root@localhost zabbix-server-mysql-3.4.4]# zcat create.sql.gz |mysql -uroot zabbix #导入出事模式
2.4启动zabbix-server服务
2.4.1配置zabbix-server的配置文件zabbix_server.conf
[root@localhost zabbix-server-mysql-3.4.4]# vi /etc/zabbix/zabbix_server.conf
DBHost=localhost # 数据主机名
DBName=zabbix # 数据库实例
DBUser=zabbix # 用户名
DBPassword=zabbix # 密码
2.4.2启动zabbix-server服务
[root@localhost zabbix-server-mysql-3.4.4]# systemctl start zabbix-server #启动zabbix-server服务
[root@localhost zabbix-server-mysql-3.4.4]# systemctl enable zabbix-server #设置zabbix-server服务开机自启动
无法启动
# systemctl start zabbix-server
Job for zabbix-server.service failed. See 'systemctl status zabbix-server.service' and 'journalctl -xn' for details.
解决方法:先检查selinux是否关闭,关闭后,并安装trousers软件。再次启动zabbix-server服务便可以启动成功。
# yum install trousers -y
# systemctl start zabbix-server
2.5编辑Apache的配置文件,消注释设置正确的时区
[root@localhost zabbix-server-mysql-3.4.4]# vi /etc/httpd/conf.d/zabbix.conf
php_value max_execution_time 300
php_value memory_limit 128M
php_value post_max_size 16M
php_value upload_max_filesize 2M
php_value max_input_time 300
php_value always_populate_raw_post_data -1
php_value date.timezone Asia/Shanghai
启动httpd服务 ,设置开机启动httpd服务
[root@localhost ~]# systemctl start httpd #启动httpd服务
[root@localhost ~]# systemctl enable httpd #设置开机启动httpd服务
3.启动zabbix-agent并设置开机自启动
[root@localhost ~]# systemctl start zabbix-agent # 启动zabbix-agent服务
[root@localhost ~]# systemctl enable zabbix-agent # 设置zabbix-agent服务开机自启动
4.Zabbix Web网页安装
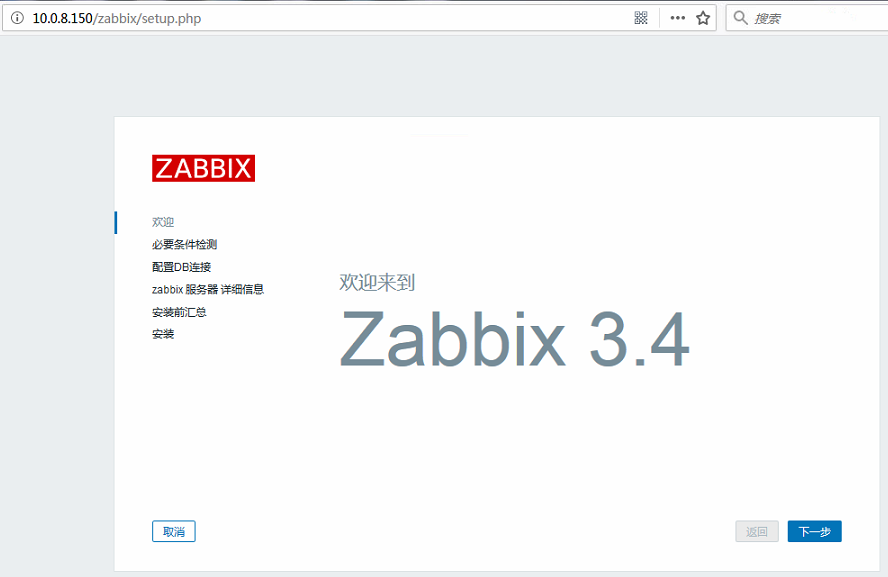
4.1.在浏览器输入地址http://服务器ip/zabbix/setup.php,出现欢迎界面,点击下一步;
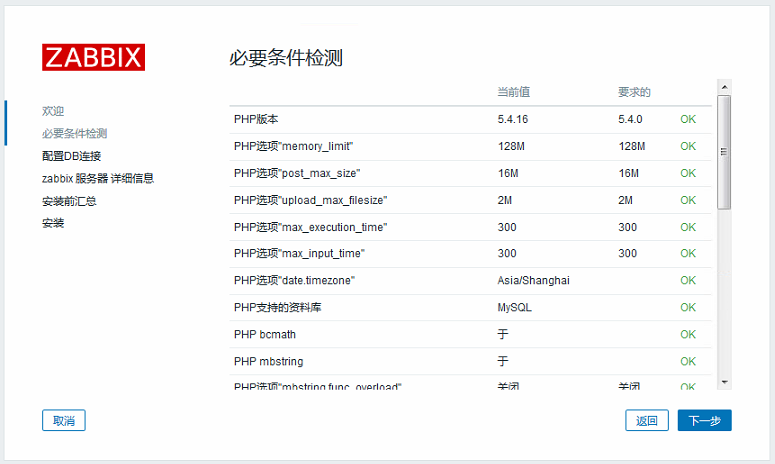
4.2.出现必要条件检测界面,正常都是OK,点击下一步
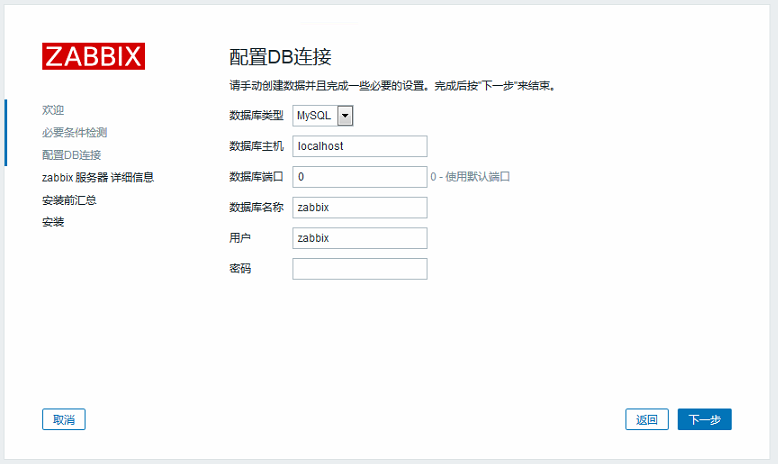
4.3.配置DB连接,与zabbix_server.conf文件中主机、数据库名称、用户名、密码保持一致,点击下一步
4.4.zabbix服务器详细信息,点击下一步

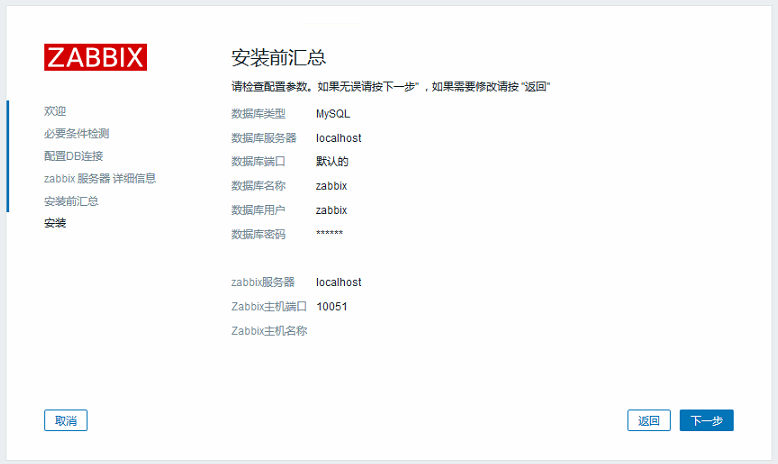
4.5.安装前汇总,检查信息无误,点击下一步安装
4.6.安装成功
Congratulations! You have successfully installed Zabbix frontend.
配置文件目录
Configuration file "/etc/zabbix/web/zabbix.conf.php" created.

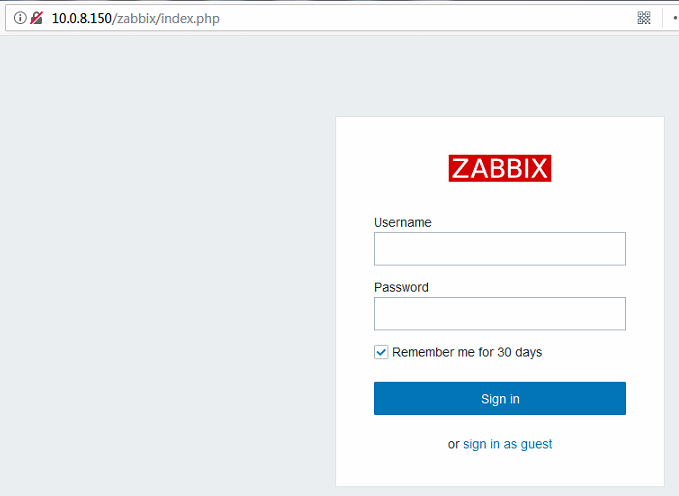
5zabbix网页登录
在浏览器输入http://zabbix服务器ip/zabbix/index.php,输入管理员用户名Admin(区分大小写),默认密码zabbix,点击登入即可。