一、webpack生成项目
1、webpack
在需要建立项目的目录中进行初始化项目
E:vueProject>vue init webpack vuexpj


? Project name vuexpj
? Project description A Vue.js project
? Author bright <bright@live.com>
? Vue build (Use arrow keys)
? Vue build standalone
? Install vue-router? Yes
? Use ESLint to lint your code? No
? Set up unit tests No
? Setup e2e tests with Nightwatch? No
2、项目组件关系图
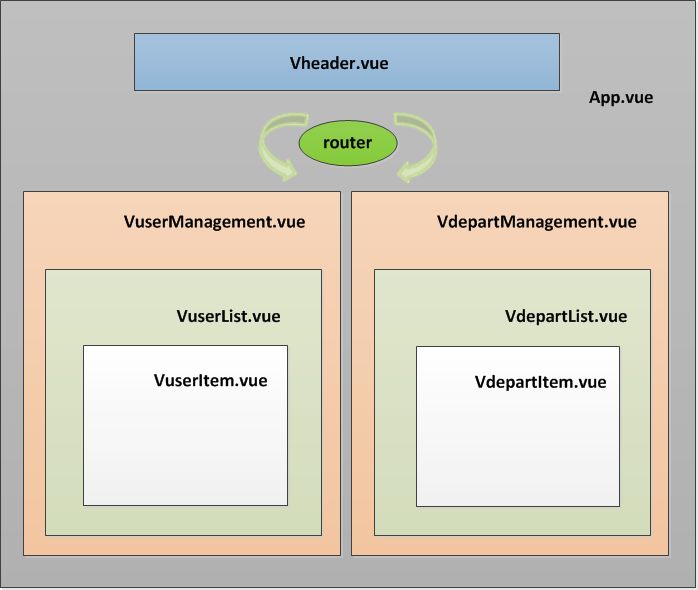
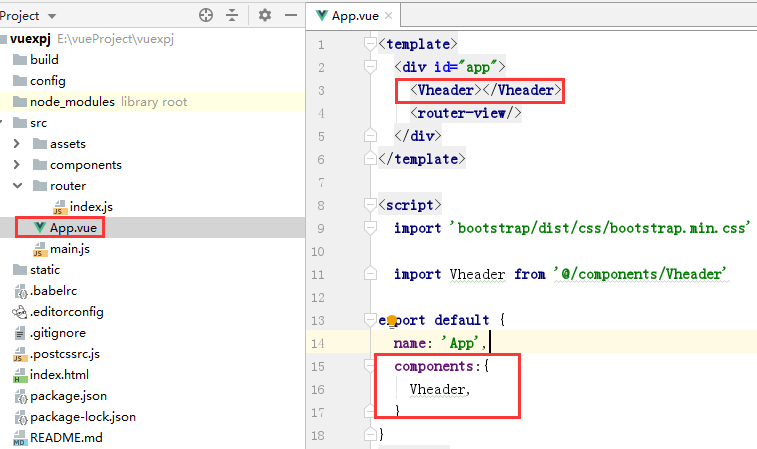
在父组件App.vue中导入Vheader.vue组件:
<template>
  <div id="app">
    <Vheader></Vheader>
    <router-view/>
  </div>
</template>

<script>
  import 'bootstrap/dist/css/bootstrap.min.css'

  import Vheader from '@/components/Vheader'

export default {
  name: 'App',

  components:{
    Vheader,
  }
}
</script>

<style scoped>


</style>
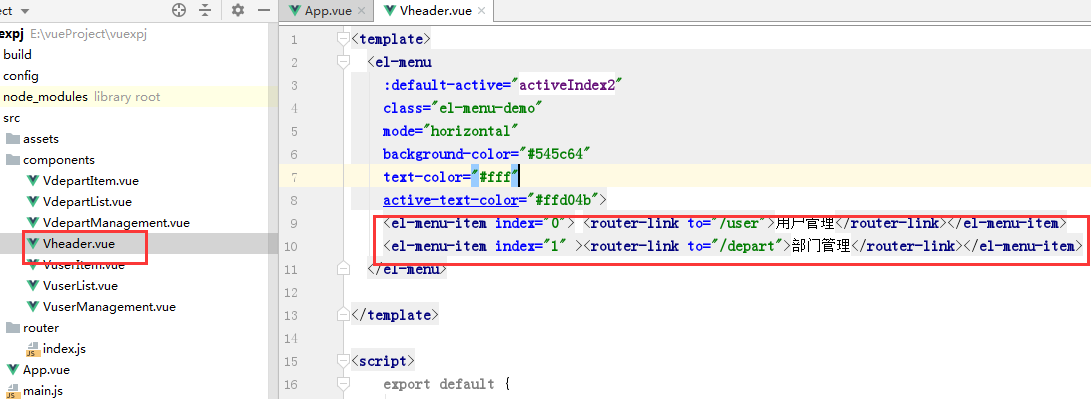
在Vheader.vue组件中渲染路由:
<template>
  <el-menu
    :default-active="activeIndex2"
    class="el-menu-demo"
    mode="horizontal"
    background-color="#545c64"
    text-color="#fff"
    active-text-color="#ffd04b">
    <el-menu-item index="0"> <router-link to="/user">用户管理</router-link></el-menu-item>
    <el-menu-item index="1" ><router-link to="/depart">部门管理</router-link></el-menu-item>
  </el-menu>

</template>

<script>
    export default {
        name: "Vheader",
      data:function () {
        return {
          activeIndex2: '0',
        }
      },
      methods:{
          //在当前组件内调用
      },
      computed:{
        //在在当前组件内调用
      }
    }
</script>

<style scoped>
  /*设置scoped,只对当前组件样式起作用*/

</style>
在父组件App.vue中设置路由出口,路由对应组件的内容在这里输出:
<template>
  <div id="app">
    <Vheader></Vheader>
    <router-view/>
  </div>
</template>
这里对应的VuserList组件就是所有的用户信息,而VuserItem就是每一条的用户信息,假设现在父组件App.vue已经从数据库接收到了用户的数据,那么如何才能在VuserItem上进行渲染呢?这牵扯到父子组件的传值问题,可以利用props进行传值,但是这样一层一层的传递是相当麻烦的,此时可以使用vuex处理复杂传值的问题了。
二、vuex
1、安装vuex
E:vueProjectvuexpj>npm install vuex --save
2、使用vuex
(1)导入模块
在main.js中导入模块
import Vuex from 'vuex'
(2)注册到全局
在main.js文件中进行注册
Vue.use(Vuex);
(3)创建store
const store = new Vuex.Store({
  state: {
    //这里面的状态跟每一个数据属性有关
   UserList:[]
  },
  mutations: {

  }
});
(4)挂载到根实例上
new Vue({
  el: '#app',
  router,
  store, //挂载到根实例中
  components: { App },
  template: '<App/>'
});

3、获取用户数据
Vuex 是一个专为 Vue.js 应用程序开发的状态管理模式。它采用集中式存储管理应用的所有组件的状态。
- State
Vuex使用单一状态树,用一个对象就包含了全部的应用层级状态。这也意味着,每个应用将仅仅包含一个 store 实例。单一状态树让我们能够直接地定位任一特定的状态片段。由于 Vuex 的状态存储是响应式的,从 store 实例中读取状态最简单的方法就是在计算属性中返回某个状态。
当父组件App.vue页面所有的DOM元素加载完成,页面结构加载完成,就可以向后台API请求数据了,此时需要在App.vue组件中利用mounted方法(页面结构加载完成后执行)发送ajax请求数据:
  mounted(){
    var _this=this;  #_this获取的是Vue实例
    //当页面DOM元素即页面结构加载完成后执行此方法
    $.ajax({
      url:'http://127.0.0.1:8000/api/userdata/',
      dataType:'JSON',
      methods:'GET',
      success:function (data) {
        _this.$store.state.UserList=data;  //Json数据自动解析为对象,并且将数据更新为state中的UserList
} }) }
#urls
urlpatterns = [
    path('api/userdata/', views.getAllUser),

]


#views
def getAllUser(request):
    queryset=models.UserInfo.objects.values('username','password')
    UserList=list(queryset)
    print(UserList)
    return HttpResponse(json.dumps(UserList,ensure_ascii=False))
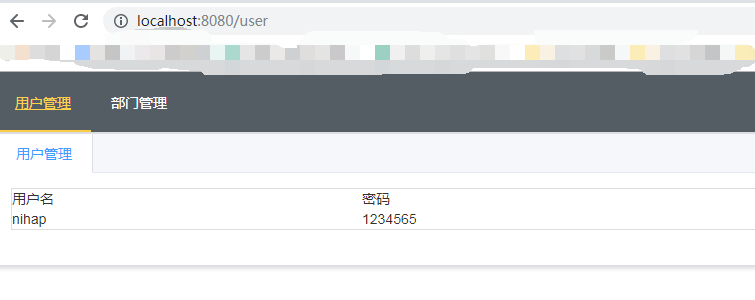
此时store实例的状态中UserList就有数据了,store实例是每一个组件都可以使用其中的状态,现在将数据渲染在VuserList组件中:首先在VuserList组件的计算属性中从store实例中获取state状态的UserList
      computed:{
          getAllUserList(){
            return this.$store.state.UserList
          }

      }
然后,在VuserList组建的模板中进行渲染
      <table class="table table-hover">
        <tr class="active">
          <td>用户名</td>
          <td>密码</td>
        </tr>
        <VuserItem v-for="item in getAllUserList" :userinfo="item"></VuserItem>
      </table>
这里可以看出来,循环每一条用户数据,然后自定义属性userinfo,并且将每一个用户数据传给其子组件VuserItem,在VuserItem中接收每一个用户数据,并且渲染:
<script>
    export default {
        name: "VuserItem",
      data:function () {
        return {

        }
      },
//在VuserItem中验证数据类型,接收数据
      props:{
        userinfo:Object,
      }

    }
</script>

//渲染单条数据
<template>
  <tr>
    <td>{{userinfo.username}}</td>
    <td>{{userinfo.password}}</td>
  </tr>
</template>
4、添加用户数据
- Mutation
更改 Vuex 的 store 中的状态的唯一方法是提交 mutation。Vuex 中的 mutation 非常类似于事件:每个 mutation 都有一个字符串的 事件类型 (type) 和 一个 回调函数 (handler)。这个回调函数就是我们实际进行状态更改的地方,并且它会接受 state 作为第一个参数:
在VuserList组件中,增加添加按钮:

<button type="button" class="btn btn-info" @click="addOneUser">添加</button>
在VuserList组件中,增加addOneUser方法:
 addOneUser() {
        $('#addModal').modal('show')
      },
点击之后弹出模态对话框,用于添加数据:
<div class="modal fade" id="addModal" tabindex="-1" role="dialog" aria-labelledby="myModalLabel"> <div class="modal-dialog" role="document"> <div class="modal-content"> <div class="modal-header"> <button type="button" class="close" data-dismiss="modal" aria-label="Close"><span aria-hidden="true">×</span></button> <h4 class="modal-title" id="myModalLabel">创建用户</h4> </div> <div class="modal-body"> <form id="fm" class="form-horizontal"> <div class="form-group"> <label for="username" class="col-sm-2 control-label">姓名</label> <div class="col-sm-10"> <input type="text" class="form-control" name="username" placeholder="姓名" v-model="getUsername"> </div> </div> <div class="form-group"> <label for="password" class="col-sm-2 control-label">密码</label> <div class="col-sm-10"> <input type="text" class="form-control" name="password" placeholder="密码" v-model="getPassword"> </div> </div> </form> </div> <div class="modal-footer"> <span id="errorMsg" style="color: red;"></span> <button type="button" class="btn btn-default" data-dismiss="modal">取消</button> <button type="button" class="btn btn-primary" @click="isSave">保存</button> <el-button :plain="true" @click="open2"></el-button> <!--保存成功提示--> <el-button :plain="true" @click="open4"></el-button> <!--保存失败提示--> </div> </div> </div> </div>
可以看到使用v-model获取值,相当于v-model给计算属性getUsername,getPassword赋值:
computed: {

      getAllUserList() {
        return this.$store.state.UserList
      },

      getUsername: {
        set(newValue) {
          this.$store.state.UserObject.username = newValue//将获取的username 值保存在store实例的state状态中
        },
        get() {
          return this.$store.state.UserObject.username //返回store实例的state状态中password
        }
      },

      getPassword:{
        set(newValue) {
          this.$store.state.UserObject.password = newValue //将获取的password值保存在store实例的state状态中
        },
        get() {
          return this.$store.state.UserObject.password  //返回store实例的state状态中password
        }
      }
    }
  }
在main.js文件中新建的store实例中保存UserObject状态:
const store = new Vuex.Store({
  state: {
    //这里面的状态跟每一个数据属性有关
    UserList: [],

    UserObject: {
      username: '',
      password: ''
    },
  },
此时,在VuserList组件的方法中写入点击保存按钮向后台API提交数据了:
 //发送数据
      isSave(){
        var _this = this; //获取Vue实例对象,Ajax中的this不是实例本身

        var data={
          //通过计算属性获取数据,实际也是从store实例的状态中拿到数据
          username:this.getUsername,
          password:this.getPassword,
          // csrfmiddlewaretoken: '{{ csrf_token }}'
        };

        $.ajax({
          url:'http://127.0.0.1:8000/api/addUser/',
          method:'post',
          dataType:'JSON',
          contentType: 'application/json', //发送的数据类型为json,所以自己发送的数据必须保证为json
          data:JSON.stringify(data), //发送json数据
          success:function (data) {
              console.log(data);
              if(data.state){
                _this.open2();   //执行保存成功提示函数
                _this.getUsername=''; //添加成功后将input框置空
                _this.getPassword=''
              }else {
                _this.open4(); //执行保存失败提示函数
              }
            _this.$store.state.UserList.push(data.user); //将添加成功的数据添加到状态,用于页面更新
          }

        });

        $('#addModal').modal('hide') //发送成功后模态对话框消失

      }
open2(){
        this.$message({
          message: '恭喜你,创建用户成功!',
          type: 'success'
        });
      },
open4() {
        this.$message.error('对不起,创建用户失败!');
      },
这样在后台接收数据进行处理接可以了:
#urls
urlpatterns = [
    path('api/addUser/', views.addUser),

]

#views
def addUser(request):
    retDict={
        'code':1000,
        'state':False,
        'msg':'存储失败'
    }
    userjson=request.body #json数据存储在request.body中
    userdict=json.loads(str(userjson,encoding='utf8'))
    obj=models.UserInfo.objects.create(username=userdict['username'],password=userdict['password'])
    print(obj)
    if obj:
        retDict['code']=2000
        retDict['state']=True
        retDict['msg']='存储成功'
        retDict['user']={'username':obj.username,'password':obj.password}
    return HttpResponse(json.dumps(retDict,ensure_ascii=False))
截止到这里,我们还是没有使用mutition,但是也完成了对应的功能,但是,可以发现,我们在改变store实例的state状态时,是通过赋值或者其它手段:
_this.$store.state.UserList.push(data.user); //将添加成功的数据添加到状态,用于页面更新
官方文档上说更改 Vuex 的 store 中的状态的唯一方法是提交 mutation,这里就需要做一些改变了,我们将所有与Ajax的操作交给Mutation来做,然后在需要的地方通过store.commit方法唤醒:
(1)获取数据使用mutation
//在App.vue中
//mounted方法页面加载完成后触发该方法
  mounted(){

    //在这个地方触发对应mutation方法,也就是getAllUser,通过ajax获取所有的数据
    this.$store.commit('getAllUser');


  }

//在main.js文件中
  mutations: {

    //在App.vue组件中来提交该方法触发,向后端获取数据
    getAllUser(state){
      //当页面DOM元素即页面结构加载完成后执行此方法
      $.ajax({
        url:'http://127.0.0.1:8000/api/userdata/',
        dataType:'JSON',
        methods:'GET',
        success:function (data) {
         state.UserList=data;
        }
      })
    }
}
(2)添加数据使用mutation
//在VuserList.vue组件中
//发送数据
      isSave(){

        var data={
          //通过计算属性获取数据,实际也是从store实例的状态中拿到数据
          username:this.getUsername,
          password:this.getPassword,
          // csrfmiddlewaretoken: '{{ csrf_token }}'
        };

        //在这个地方触发对应mutation方法,也就是gaddUser,通过ajax提交所有的数据
        this.$store.commit(
          {
            type: 'addUser',
            data:data,
            getUsername:this.getUsername,
            getPassword:this.getPassword,
            successfunc: this.open2,
            failturefunc:this.open4,
          }
        );

        $('#addModal').modal('hide') //发送成功后模态对话框消失

      }

//在main.js文件中
 mutations: {

    //在VuserList组件中提交该方法触发,向后端提交数据
    addUser(state,payload){

      $.ajax({
        url:'http://127.0.0.1:8000/api/addUser/',
        method:'post',
        dataType:'JSON',
        contentType: 'application/json', //发送的数据类型为json,所以自己发送的数据必须保证为json
        data:JSON.stringify(payload.data), //发送json数据
        success:function (data) {
          console.log(data);
          if(data.state){
            payload.successfunc();   //执行保存成功提示函数
            payload.getUsername=''; //添加成功后将input框置空
            payload.getPassword=''
          }else {
            payload.failturefunc(); //执行保存失败提示函数
          }
          state.UserList.push(data.user); //将添加成功的数据添加到状态,用于页面更新
        }

      });

    }
  }
虽然使用mutition了,但是mutation 必须是同步函数,那么如何使用异步操作呢?
- Action
Action 类似于 mutation,不同在于:
(1)Action 提交的是 mutation,而不是直接变更状态。
(2)Action 可以包含任意异步操作。
页面中需要做如下更改:
(1)获取数据
//1、在App.vue组件中分发action,这样触发action函数执行

 mounted(){

    //在这个地方触发对应mutation方法,也就是getAllUser,通过ajax获取所有的数据
    // this.$store.commit('getAllUser');

    //更改为:

    this.$store.dispatch('getAllUser')


  }

//2、在main.js的action中

 //用于执行异步函数操作,并且提交的是mutation
  actions:{

    //context与 store 实例具有相同方法和属性
    getAllUser(context){
      $.ajax({
        url:'http://127.0.0.1:8000/api/userdata/',
        dataType:'JSON',
        methods:'GET',
        success:function (data) {

          //保存返回的数据状态,mutation修改state状态,所以传给mutation处理
          context.commit('GETALLUSER',data) //传递的是后台的数据
        }
      })
    },

});

//3、在main.js的mutations中,因为action不能与state直接交互,它提交mutation
mutations: {

    //在action中提交的mutation方法
    GETALLUSER(state,data){
        state.UserList=data;
    },


  },
(2)添加数据
//1、在VuserList.vue组件中分发action,这样触发action函数执行

   this.$store.dispatch(
          {
            type: 'addUser',
            data:data,
            getUsername:this.getUsername,
            getPassword:this.getPassword,
            successfunc: this.open2,
            failturefunc:this.open4,
          }
        );

//2、在main.js的action中

    //用于执行异步函数操作,并且提交的是mutation
  actions:{

    addUser(context,payload){
      $.ajax({
        url:'http://127.0.0.1:8000/api/addUser/',
        method:'post',
        dataType:'JSON',
        contentType: 'application/json', //发送的数据类型为json,所以自己发送的数据必须保证为json
        data:JSON.stringify(payload.data), //发送json数据
        success:function (data) {
          if(data.state){
            payload.successfunc();   //执行保存成功提示函数
            payload.getUsername=''; //添加成功后将input框置空
            payload.getPassword=''
          }else {
            payload.failturefunc(); //执行保存失败提示函数
          }
          //保存返回的数据状态,mutation修改state状态,所以传给mutation处理
          context.commit('ADDUSER',data); //data是后台数据
        }

      });
    }

  }
//3、在main.js的mutations中,因为action不能与state直接交互,它提交mutation
mutations: {

    //在action中提交的mutation方法
    ADDUSER(state,data){
      state.UserList.push(data.user); //将添加成功的数据添加到状态,用于页面更新

    }

  },
Vue对用户的增删改查完整操作,详见:https://www.cnblogs.com/shenjianping/p/11254442.html