一、Django项目创建
(一)虚拟环境创建
首先创建一个虚拟环境,用于Django项目使用,在CMD窗口中通过下面的命令:
mkvirtualenv celery_test
其中celery_test 为虚拟环境名称,这里使用的python解释器就是默认安装的,你也可以指定python解释器:
mkvirtualenv [--python==d:Python3.5.2python.exe] celery_test
(二)创建项目
最简单的方式是可以通过Pycharm来进行创建,当然也可以命令行的方式创建,但是在创建前需要在虚拟环境中将Django的包安装上:
(celery_test) C:UsersAdministrator>pip install django==2.0
Collecting django==2.0
  Using cached Django-2.0-py3-none-any.whl (7.1 MB)
Collecting pytz
  Using cached pytz-2019.3-py2.py3-none-any.whl (509 kB)
Installing collected packages: pytz, django
Successfully installed django-2.0 pytz-2019.3
此时,再创建项目:
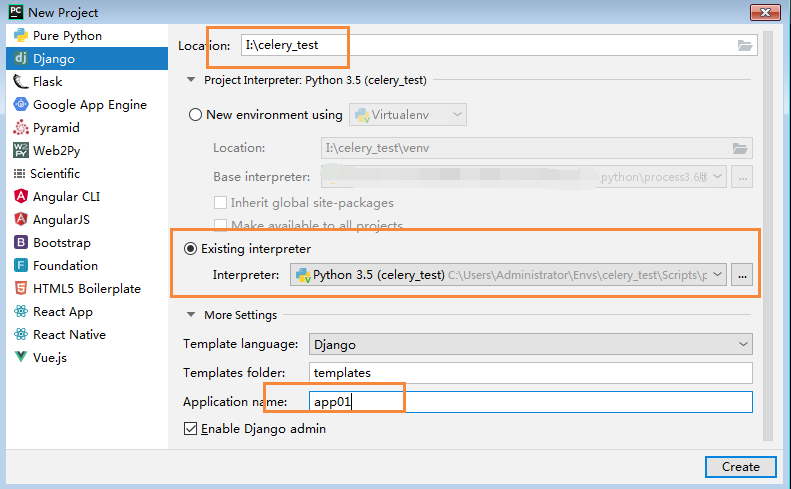
只需要填写上面的部分即可完成django项目的创建。
二、Celery的使用
(一)环境配置
Django与Celery可以配合使用,但是需要安装django-celery的包,这样更利于celery中任务的管理,注意这些包的版本:
1、celery安装
(celery_test) C:UsersAdministrator>pip install celery==3.1.26.post2
Collecting celery==3.1.26.post2
  Downloading celery-3.1.26.post2-py2.py3-none-any.whl (526 kB)
     |███████▌                        | 122 kB 20 kB/s eta 0:00:20
2、django-celery安装
(celery_test) C:UsersAdministrator>pip install django-celery==3.2.2
Collecting django-celery==3.2.2
  Downloading django-celery-3.2.2.tar.gz (90 kB)
     |███████████                     | 30 kB 56 kB/s eta 0:00:02
3、redis安装
(celery_test) C:UsersAdministrator>pip install redis==2.10.6 -i http://pypi.douban.com/simple --trusted-host pypi.douban.com
4、进行注册
在django的settings文件中将djcelery进行注册:
INSTALLED_APPS = [
    'django.contrib.admin',
    'django.contrib.auth',
    'django.contrib.contenttypes',
    'django.contrib.sessions',
    'django.contrib.messages',
    'django.contrib.staticfiles',
    'djcelery',  #注册
    'app01',
]
5、settings中导入celeryconfig
# Internationalization
# https://docs.djangoproject.com/en/2.0/topics/i18n/

LANGUAGE_CODE = 'en-us'

TIME_ZONE = 'UTC'

USE_I18N = True

USE_L10N = True

USE_TZ = True

# Static files (CSS, JavaScript, Images)
# https://docs.djangoproject.com/en/2.0/howto/static-files/

STATIC_URL = '/static/'

#Celery Config
from .celeryconfig import * # celery的相关配置文件
BROKER_BACKEND = 'redis'
BROKER_URL = 'redis://localhost:6379/1'
CELERY_RESULT_BACKEND='redis://localhost:6379/2'
(二)异步任务
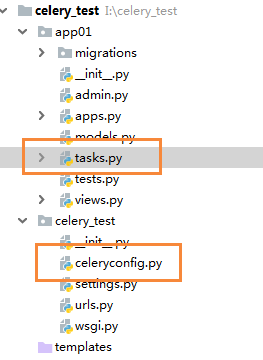
1、新建celery相关的文件
- 在工程的根目录下新建celeryconfig文件,用于存放配置参数
- 在appo1目录下新建tasks.py文件,用于存放与app01相关的异步和定时任务
(1)celeryconfig.py
import djcelery
from datetime import timedelta

djcelery.setup_loader()

CELERY_QUEUES = {

    #定时任务队列
    'beat_tasks':{
        'exchange':'beat_tasks',
        'exchange_type':'direct',
        'binding_key':'beat_tasks'
    },
    #普通任务队列
    'work_tasks': {
        'exchange': 'work_tasks',
        'exchange_type': 'direct',
        'binding_key': 'work_tasks'
    }
}

#设置默认的队列
CELERY_DEFAULT_QUEUE = 'work_tasks'

#将每一个app下的tasks进行导入
CELERY_IMPORTS = (
    'app01.tasks',
)

#有些情况防止死锁
CELERYD_FORCE_EXECV = True

#设置并发的workers数量,根据cpu的数量
CELERYD_CONCURRENCY = 4

#任务失败允许重试
CELERY_ACKS_LATE = True

#每个worker最多执行的任务数,超过这个就将worker进行销毁,防止内存泄漏
CELERYD_MAX_TASKS_PER_CHILD = 100

#单个任务运行的最大时间,超过这个时间,task就会被kill
CELERYD_TASK_TIME_LIMIT = 12 * 30
首先定义了两个任务队列,一个用于存放异步任务,一个用于存放定时任务;其次将每一个app下的tasks导入,tasks.py中定义的都是任务;最后都是一些参数定义。
(2)app01.tasks.py
from celery.task import Task
import time

class Upload(Task):

    name = 'upload-task' #给任务一个名称

    def run(self, *args, **kwargs):
        time.sleep(2)
        print('run upload task')
定义了一个任务并且指定了一个名称,这个名称在定时任务中会用的上。当这个任务执行时会运行run方法,那么如果它是个异步任务,应该怎么触发和执行呢?
我们可以在views.py文件的view函数中进行调用这个任务:
from django.shortcuts import render
from django.http.response import JsonResponse
from app01.tasks import  Upload

# Create your views here.

def doTask(request):
    print('start task!')
    Upload.delay() #异步任务,这里不会卡住,尽管有延时
    print('end task!')
    return JsonResponse({"type":'success'})
这里定义了一个视图函数,在视图只要访问某个url对应的这个视图就会触发,我们在任务中睡了2s但是这里不会停顿,因为它是是异步任务。
(2)运行异步任务
- 启动django项目
python manage.py runserver 0.0.0.0
- 启动celery worker
python manage.py celery worker -l info
- 访问视图,触发任务
http://127.0.0.1:8000/doTask/
(三)定时任务
定时任务也是需要启动worker的,需要在celeryconfig加入定时任务的配置,假设刚刚那个任务时定时任务:
...
...

#单个任务运行的最大时间,超过这个时间,task就会被kill
CELERYD_TASK_TIME_LIMIT = 12 * 30

#定时任务
CELERYBEAT_SCHEDULE = {
    'task1':{
        'task':'upload-task',  #指定任务名称
        'schedule':timedelta(seconds=5), #任务执行时间,每5秒执行一次
        'options':{
            'queue':'beat_tasks'
        }
    }
}
指定了定时任务,其中名称upload-task就是刚刚任务中定义的name属性。同样的在我们添加完定时任务后,需要启动celery worker和celery beat。
#celery worker
python manage.py celery worker -l info

#celery beat
python manage.py celery beat -l info
这样就完成了定时任务。
值得注意的是,如果使用crontab来进行定时任务的话。就会存在时区问题,比如在app01.tasks.py中再加入一个任务:
from celery.task import Task
import time
...
...
class scrawl(Task):
    name = 'spider'

    def run(self, *args, **kwargs):
        time.sleep(3)
        print('执行爬取任务')
然后再进行配置:
import djcelery
from datetime import timedelta
from celery.schedules import crontab
...
...

#定时任务
CELERYBEAT_SCHEDULE = {
    'task1':{
        'task':'upload-task',  #指定任务名称
        'schedule':timedelta(seconds=5), #任务执行时间,每5秒执行一次
        'options':{
            'queue':'beat_tasks'
        }
    },
    'task2': {
        'task': 'spider',  # 指定任务名称
        'schedule':crontab(minute='19', hour='16', day_of_week='*',day_of_month='*', month_of_year='*'),  # 任务执行时间,每5秒执行一次
        'options': {
        'queue': 'beat_tasks'
        }
    },
}
在task2中使用了crontab,那么响应的应该在django的settings.py中将TIME_ZONE 参数进行更改:
...
# TIME_ZONE = 'UTC'
TIME_ZONE = 'Asia/Shanghai'
...
这样就ok了。
(四)版本问题及其它问题
1、安装包版本
(celery_test) C:UsersAdministrator>pip list
Package       Version
------------- ------------
amqp          1.4.9
anyjson       0.3.3
Babel         2.8.0
billiard      3.3.0.23
celery        3.1.26.post2
Django        2.0
django-celery 3.2.2
flower        0.9.3
kombu         3.0.37
pip           20.0.2
pytz          2019.3
redis         2.10.6
setuptools    46.1.1
tornado       5.1.1
wheel         0.34.2
注意的是celkery、django-celery、Django、以及redis的版本,这是很容易出现各种问题的地方。
2、pip问题
另外下载过程中会出现timeout或者其它问题,一般解决通过:
pip install flower -i http://pypi.douban.com/simple --trusted-host pypi.douban.com
就可以解决。如果永久的替换pip源可以在windows下的user目录下新建pip文件夹,然后新建pip.ini文件

写入:
[global]
index-url = https://pypi.tuna.tsinghua.edu.cn/simple
[install]
trusted-host=mirrors.aliyun.com
三、flower任务监控
通过pip命令直接进行安装:
(celery_test) C:UsersAdministrator>pip install flower -i http://pypi.douban.com/simple --trusted-host pypi.douban.com
接下来可以直接启动flower,在django中可以直接这样启动:
(celery_test) I:celery_test>python manage.py celery flower
这样就可以直接启动flower了。当然也可以这样执行命令启动。
celery flower --address=0.0.0.0 --port=5555 --broker='redis://localhost:6379/1' #如果加入认证通过--basic_auth=username:password
四、supervisor进程管理
1、安装
(django3) [root@localhost celery_test]# pip install supervisor -i http://pypi.douban.com/simple --trusted-host pypi.douban.com
2、配置文件管理与启动
进入到项目的根目录下,与settings同级:
(1)创建配置文件夹
(django3) [root@localhost celery_test]# mkdir conf
(django3) [root@localhost celery_test]# ls
conf __init__.py settings.py urls.py wsgi.py
(django3) [root@localhost celery_test]#
(2)生成配置文件
(django3) [root@localhost celery_test]# echo_supervisord_conf > conf/supervisord.conf


; Sample supervisor config file.
;
; For more information on the config file, please see:
; http://supervisord.org/configuration.html
;
; Notes:
;  - Shell expansion ("~" or "$HOME") is not supported.  Environment
;    variables can be expanded using this syntax: "%(ENV_HOME)s".
;  - Quotes around values are not supported, except in the case of
;    the environment= options as shown below.
;  - Comments must have a leading space: "a=b ;comment" not "a=b;comment".
;  - Command will be truncated if it looks like a config file comment, e.g.
;    "command=bash -c 'foo ; bar'" will truncate to "command=bash -c 'foo ".
;
; Warning:
;  Paths throughout this example file use /tmp because it is available on most
;  systems.  You will likely need to change these to locations more appropriate
;  for your system.  Some systems periodically delete older files in /tmp.
;  Notably, if the socket file defined in the [unix_http_server] section below
;  is deleted, supervisorctl will be unable to connect to supervisord.

[unix_http_server]
file=/tmp/supervisor.sock   ; the path to the socket file
;chmod=0700                 ; socket file mode (default 0700)
;chown=nobody:nogroup       ; socket file uid:gid owner
;username=user              ; default is no username (open server)
;password=123               ; default is no password (open server)

; Security Warning:
;  The inet HTTP server is not enabled by default.  The inet HTTP server is
;  enabled by uncommenting the [inet_http_server] section below.  The inet
;  HTTP server is intended for use within a trusted environment only.  It
;  should only be bound to localhost or only accessible from within an
;  isolated, trusted network.  The inet HTTP server does not support any
;  form of encryption.  The inet HTTP server does not use authentication
;  by default (see the username= and password= options to add authentication).
;  Never expose the inet HTTP server to the public internet.

;[inet_http_server]         ; inet (TCP) server disabled by default
;port=127.0.0.1:9001        ; ip_address:port specifier, *:port for all iface
;username=user              ; default is no username (open server)
;password=123               ; default is no password (open server)

[supervisord]
logfile=/tmp/supervisord.log ; main log file; default $CWD/supervisord.log
logfile_maxbytes=50MB        ; max main logfile bytes b4 rotation; default 50MB
logfile_backups=10           ; # of main logfile backups; 0 means none, default 10
loglevel=info                ; log level; default info; others: debug,warn,trace
pidfile=/tmp/supervisord.pid ; supervisord pidfile; default supervisord.pid
nodaemon=false               ; start in foreground if true; default false
minfds=1024                  ; min. avail startup file descriptors; default 1024
minprocs=200                 ; min. avail process descriptors;default 200
;umask=022                   ; process file creation umask; default 022
;user=supervisord            ; setuid to this UNIX account at startup; recommended if root
;identifier=supervisor       ; supervisord identifier, default is 'supervisor'
;directory=/tmp              ; default is not to cd during start
;nocleanup=true              ; don't clean up tempfiles at start; default false
;childlogdir=/tmp            ; 'AUTO' child log dir, default $TEMP
;environment=KEY="value"     ; key value pairs to add to environment
;strip_ansi=false            ; strip ansi escape codes in logs; def. false

; The rpcinterface:supervisor section must remain in the config file for
; RPC (supervisorctl/web interface) to work.  Additional interfaces may be
; added by defining them in separate [rpcinterface:x] sections.

[rpcinterface:supervisor]
supervisor.rpcinterface_factory = supervisor.rpcinterface:make_main_rpcinterface

; The supervisorctl section configures how supervisorctl will connect to
; supervisord.  configure it match the settings in either the unix_http_server
; or inet_http_server section.

[supervisorctl]
serverurl=unix:///tmp/supervisor.sock ; use a unix:// URL  for a unix socket
;serverurl=http://127.0.0.1:9001 ; use an http:// url to specify an inet socket
;username=chris              ; should be same as in [*_http_server] if set
;password=123                ; should be same as in [*_http_server] if set
;prompt=mysupervisor         ; cmd line prompt (default "supervisor")
;history_file=~/.sc_history  ; use readline history if available

; The sample program section below shows all possible program subsection values.
; Create one or more 'real' program: sections to be able to control them under
; supervisor.

;[program:theprogramname]
;command=/bin/cat              ; the program (relative uses PATH, can take args)
;process_name=%(program_name)s ; process_name expr (default %(program_name)s)
;numprocs=1                    ; number of processes copies to start (def 1)
;directory=/tmp                ; directory to cwd to before exec (def no cwd)
;umask=022                     ; umask for process (default None)
;priority=999                  ; the relative start priority (default 999)
;autostart=true                ; start at supervisord start (default: true)
;startsecs=1                   ; # of secs prog must stay up to be running (def. 1)
;startretries=3                ; max # of serial start failures when starting (default 3)
;autorestart=unexpected        ; when to restart if exited after running (def: unexpected)
;exitcodes=0                   ; 'expected' exit codes used with autorestart (default 0)
;stopsignal=QUIT               ; signal used to kill process (default TERM)
;stopwaitsecs=10               ; max num secs to wait b4 SIGKILL (default 10)
;stopasgroup=false             ; send stop signal to the UNIX process group (default false)
;killasgroup=false             ; SIGKILL the UNIX process group (def false)
;user=chrism                   ; setuid to this UNIX account to run the program
;redirect_stderr=true          ; redirect proc stderr to stdout (default false)
;stdout_logfile=/a/path        ; stdout log path, NONE for none; default AUTO
;stdout_logfile_maxbytes=1MB   ; max # logfile bytes b4 rotation (default 50MB)
;stdout_logfile_backups=10     ; # of stdout logfile backups (0 means none, default 10)
;stdout_capture_maxbytes=1MB   ; number of bytes in 'capturemode' (default 0)
;stdout_events_enabled=false   ; emit events on stdout writes (default false)
;stdout_syslog=false           ; send stdout to syslog with process name (default false)
;stderr_logfile=/a/path        ; stderr log path, NONE for none; default AUTO
;stderr_logfile_maxbytes=1MB   ; max # logfile bytes b4 rotation (default 50MB)
;stderr_logfile_backups=10     ; # of stderr logfile backups (0 means none, default 10)
;stderr_capture_maxbytes=1MB   ; number of bytes in 'capturemode' (default 0)
;stderr_events_enabled=false   ; emit events on stderr writes (default false)
;stderr_syslog=false           ; send stderr to syslog with process name (default false)
;environment=A="1",B="2"       ; process environment additions (def no adds)
;serverurl=AUTO                ; override serverurl computation (childutils)

; The sample eventlistener section below shows all possible eventlistener
; subsection values.  Create one or more 'real' eventlistener: sections to be
; able to handle event notifications sent by supervisord.

;[eventlistener:theeventlistenername]
;command=/bin/eventlistener    ; the program (relative uses PATH, can take args)
;process_name=%(program_name)s ; process_name expr (default %(program_name)s)
;numprocs=1                    ; number of processes copies to start (def 1)
;events=EVENT                  ; event notif. types to subscribe to (req'd)
;buffer_size=10                ; event buffer queue size (default 10)
;directory=/tmp                ; directory to cwd to before exec (def no cwd)
;umask=022                     ; umask for process (default None)
;priority=-1                   ; the relative start priority (default -1)
;autostart=true                ; start at supervisord start (default: true)
;startsecs=1                   ; # of secs prog must stay up to be running (def. 1)
;startretries=3                ; max # of serial start failures when starting (default 3)
;autorestart=unexpected        ; autorestart if exited after running (def: unexpected)
;exitcodes=0                   ; 'expected' exit codes used with autorestart (default 0)
;stopsignal=QUIT               ; signal used to kill process (default TERM)
;stopwaitsecs=10               ; max num secs to wait b4 SIGKILL (default 10)
;stopasgroup=false             ; send stop signal to the UNIX process group (default false)
;killasgroup=false             ; SIGKILL the UNIX process group (def false)
;user=chrism                   ; setuid to this UNIX account to run the program
;redirect_stderr=false         ; redirect_stderr=true is not allowed for eventlisteners
;stdout_logfile=/a/path        ; stdout log path, NONE for none; default AUTO
;stdout_logfile_maxbytes=1MB   ; max # logfile bytes b4 rotation (default 50MB)
;stdout_logfile_backups=10     ; # of stdout logfile backups (0 means none, default 10)
;stdout_events_enabled=false   ; emit events on stdout writes (default false)
;stdout_syslog=false           ; send stdout to syslog with process name (default false)
;stderr_logfile=/a/path        ; stderr log path, NONE for none; default AUTO
;stderr_logfile_maxbytes=1MB   ; max # logfile bytes b4 rotation (default 50MB)
;stderr_logfile_backups=10     ; # of stderr logfile backups (0 means none, default 10)
;stderr_events_enabled=false   ; emit events on stderr writes (default false)
;stderr_syslog=false           ; send stderr to syslog with process name (default false)
;environment=A="1",B="2"       ; process environment additions
;serverurl=AUTO                ; override serverurl computation (childutils)

; The sample group section below shows all possible group values.  Create one
; or more 'real' group: sections to create "heterogeneous" process groups.

;[group:thegroupname]
;programs=progname1,progname2  ; each refers to 'x' in [program:x] definitions
;priority=999                  ; the relative start priority (default 999)

; The [include] section can just contain the "files" setting.  This
; setting can list multiple files (separated by whitespace or
; newlines).  It can also contain wildcards.  The filenames are
; interpreted as relative to this file.  Included files *cannot*
; include files themselves.

;[include]
;files = relative/directory/*.ini
(3) 开启web服务
...
[inet_http_server]         ; inet (TCP) server disabled by default
port=127.0.0.1:9001        ; ip_address:port specifier, *:port for all iface
;username=user              ; default is no username (open server)
;password=123               ; default is no password (open server)
...
开启supervisor的web服务,需要将上述配置文件中的注释去掉;另外开启supervisorctl命令行工具的web服务。
...
[supervisorctl]
serverurl=unix:///tmp/supervisor.sock ; use a unix:// URL  for a unix socket
serverurl=http://127.0.0.1:9001 ; use an http:// url to specify an inet socket
...
可以看到这个配置文件最后两行:
;[include]
;files = relative/directory/*.ini
将其打开,并且修改为:
[include]
files = *.ini
也就是说凡是.ini的文件都可以将其当作配置文件包含进来,进行启动。
(4)新建supervisor_celery_worker.ini
(django3) [root@localhost conf]# touch supervisor_celery_worker.ini
写入以下内容:
[program:celery_worker]
command=python manage.py celery worker -l INFO
directory=/root/Envs/celery_test  #项目根目录,否则command找不到manage.py文件
environment=PATH="/root/Envs/django3/bin" #虚拟环境目录
stdout_logfile=/root/Envs/celery_test/logs/celery_worker.log
stderr_logfile=/root/Envs/celery_test/logs/celery_worker.log
autostart=true
autorestart=true
startsecs=10
stopwatisecs=60
priority=998
启动supervisor:
(django3) [root@localhost conf]# supervisord -c supervisord.conf
可以通过:
(django3) [root@localhost conf]# ps -ef | grep supervisor
查看进程,另外通过supervisorctl命令查看具体的服务,比如celery_worker服务。
(5)新建supervisor_celery_beat.ini
[program:celery_beat]
command=python manage.py celery beat -l INFO
directory=/root/Envs/celery_test
environment=PATH="/root/Envs/django3/bin"
stdout_logfile=/root/Envs/celery_test/logs/celery_beat.log
stderr_logfile=/root/Envs/celery_test/logs/celery_beat.log
autostart=true
autorestart=true
startsecs=10
stopwatisecs=60
priority=997  #数字越大越优先
这里通过supervisorctl中的update进行添加即可:
(django3) [root@localhost conf]# supervisorctl

supervisor> help

default commands (type help <topic>):
=====================================
add    exit      open  reload  restart   start   tail
avail  fg        pid   remove  shutdown  status  update
clear  maintail  quit  reread  signal    stop    version

supervisor> update
(6)新建supervisor_celery_flower.ini
[program:celery_flower]
command=python manage.py celery flower  #这个命令进行了更改
directory=/root/Envs/celery_test
environment=PATH="/root/Envs/django3/bin"
stdout_logfile=/root/Envs/celery_test/logs/celery_flower.log
stderr_logfile=/root/Envs/celery_test/logs/celery_flower.log
autostart=true
autorestart=true
startsecs=10
stopwatisecs=60
priority=996  #注意优先级,它是最后启动
3、总结
supervisor配置文件中将web界面进行开启,另外将最后的include进行开启,然后分别创建不同的ini文件,里面的文件基本上就是命令、日志文件路径、优先级进行了更改,另外如果添加了服务通过supervisorctl中的update进行添加,你也可以通过本地9001端口的web服务进行访问。