一、为什么要升级
公司的项目都是采用vue-cli2.9构建的,随着业务的复杂和项目的庞大,很多优化项无法达到预期的要求。在尝试各种方法之后,最终决定升级到cli4.0版本。
4.0版本带来的变化有以下几点:
- 采用webpack 4.x构建,提升启动和打包效率;
- webpack 4.x 使用的 splitChunks,更好的拆分代码,减小文件体积;
- 自带的tree-shaking,减少不必要的引入;
- 拥抱社区,与时俱进。
二、安装,创建项目
1. 安装
这一步按照 vue-cli官方文档 安装即可
Vue CLI 的包名称由 vue-cli 改成了 @vue/cli。 如果你已经全局安装了旧版本的 vue-cli (1.x 或 2.x),你需要先通过 npm uninstall vue-cli -g 或 yarn global remove vue-cli 卸载它。
Vue CLI 4.x 需要 Node.js v8.9 或更高版本 (推荐 v10 以上)。你可以使用 n,nvm 或 nvm-windows 在同一台电脑中管理多个 Node 版本。
可以使用下面的命令进行安装:
  npm install -g @vue/cli
  # OR
  yarn global add @vue/cli
安装之后,你就可以在命令行中访问 vue 命令。你可以通过简单运行 vue,看看是否展示出了一份所有可用命令的帮助信息,来验证它是否安装成功。
你还可以用这个命令来检查其版本是否正确(4.x):
  vue --version
  # OR
  vue -V
2. 创建项目
参考 官方文档 创建一个新项目
运行以下命令进行创建:
vue create my-project
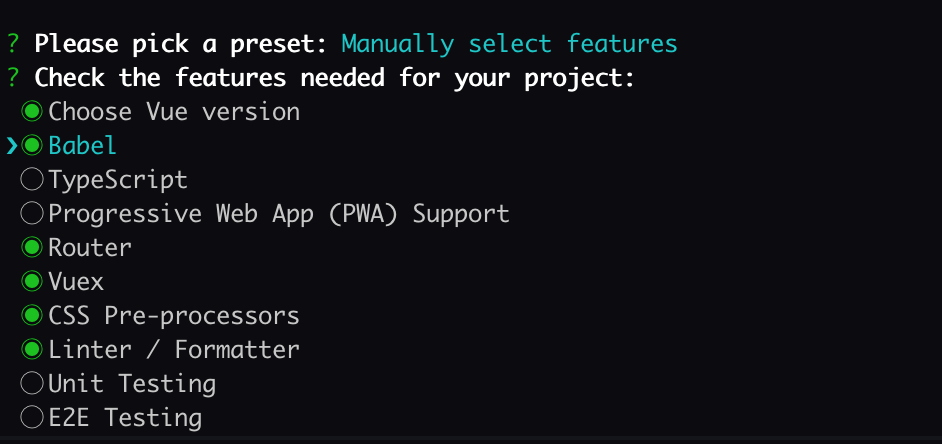
这里采用自定义创建,把我们项目需要的都勾选上

三、配置eslint
eslint 是每个项目必不可少的,可以尽早发现在编写过程中出现的错误,统一团队编写规范。如果使用vscode,可以配置插件,保存时按照eslint规则自动格式化
在上一步创建的过程中已经添加了eslint了,接下来就是配置规则,下面是我的一些规则,供参考:
在 .eslintrc.js中配置,参考 vscode里面怎么根据eslint来格式化代码?
module.exports = {
  root: true,
  env: {
    node: true
  },
  extends: ['plugin:vue/essential', 'eslint:recommended', 'plugin:vue/strongly-recommended'],
  parserOptions: {
    parser: 'babel-eslint'
  },
  plugins: [
    'vue'
  ],
  rules: {
    // "no-console": process.env.NODE_ENV === "production" ? "error" : "off",
    'no-debugger': process.env.NODE_ENV === 'production' ? 'error' : 'off',

    'vue/no-side-effects-in-computed-properties': 'off',
    // 要求构造函数首字母大写 (要求调用 new 操作符时有首字母大小的函数,允许调用首字母大写的函数时没有 new 操作符。)
    'new-cap': [2, { 'newIsCap': true, 'capIsNew': false }],
    // 不能有声明后未被使用的变量或参数
    'no-unused-vars': 0,
    // 强制 generator 函数中 * 号周围使用一致的空格
    'generator-star-spacing': [2, { 'before': true, 'after': true }],
    // 允许在开发环境使用debugger
    'no-debugger': process.env.NODE_ENV === 'production' ? 2 : 0,
    // 允许在开发环境使用console
    'no-console': 'off',
    // 关闭语句强制分号结尾
    'semi': [2, 'always'],
    // 空行最多不能超过100行
    // "no-multiple-empty-lines": [0, {"max": 100}],
    // 关闭禁止混用tab和空格
    // 'no-mixed-spaces-and-tabs': 2,
    //   "indent": [2, 4], //缩进风格
    //   "vue/script-indent": [2, 4, {
    //     baseIndent: 1
    //   }],
    // 强制在 function的左括号之前使用一致的空格
    'space-before-function-paren': [2, 'always'],
    'quotes': [1, 'single'],
    // 'comma-dangle': [1, 'always-multiline']
    'import/no-unresolved': [0],
    // 'indent': 0,
    // 禁用不必要的转义字符
    'no-useless-escape': 2,
    // prop 的默认值必须匹配它的类型
    'vue/require-valid-default-prop': 'off',
    'vue/html-closing-bracket-newline': 'off',
    'vue/no-dupe-keys': 'off',
    'vue/no-template-shadow': 'off'
  }
}
再添加一个忽略选项,让插件和node_modules中的代码不需要eslint检查
添加 .eslintignore 文件
/config/
/dist/
/src/plugin/
/node_modules/
/public/
四、项目迁移
1. 迁移 package.json
项目创建好之后,接下来就是把原来项目中package.json 中的 dependencies 下的依赖迁移到新项目,这里建议直接拷贝过来,再执行 npm install 下载即可。如果下载最新的版本,可能导致项目中某些功能异常。
2. 迁移 static 到 public 目录下
老项目的 static 全部迁移到 public 文件夹中,index.html 迁移到 public
在 vue-cli3以上的版本中,public 文件夹不会被 webpack 处理,并部署在网站根目录。
对于publick的一些说明,参考 官方文档
3. 复制老项目的 src 目录替换新项目的 src
将老项目的src目录整体迁移过来,这时可能路径暂时还对应不上,接下来就需要配置一些快捷路径
4. 创建 vue.config.js 文件
这里面的配置非常多,参考 官网 的全部配置项
我们只配置一些项目启动的必须项
const path = require('path');

const resolve = (dir) => {
  return path.join(__dirname, dir);
}
module.exports = {
  publicPath: '/', // 项目基本路径,对应 BASE_URL
  // lintOnSave: false,
  outputDir: 'news', // 打包后的文件夹名,默认 dist
  productionSourceMap: false, // 是否开启sourceMap
  devServer: { // 本地启动项
    proxy: {} // 接口代理
  },
  css: {
    extract: true,
    sourceMap: false,
    requireModuleExtension: true,
    loaderOptions: {
      sass: { // 全局引入sass变量和函数
        prependData: `
          @import "~@/assets/style/vars.sass"
          @import "~@/assets/style/mixin.sass"
        `
      },
      scss: { // 全局引入scss变量
        prependData: `
          @import "~@/assets/style/vars.sass";
          @import "~@/assets/style/mixin.sass";
        `
      }
    }
  },
  chainWebpack: config => {
    config
      .resolve.alias // 快捷访问路径
      .set('@', resolve('src'))
      .set('http', resolve('src/http/axios.js'))
      .set('@common', resolve('src/common'))
      .set('@util', resolve('src/assets/js/util.js'));
    config // 设置url-loader
      .module
      .rule('images')
      .use('url-loader')
      .loader('url-loader')
      .tap(options => Object.assign(options, { limit: 1000 }));
    return config;
  }
};
此时执行 npm run serve 就可以正常启动项目了
项目优化
1. 开启gzip
gzip 可以减少文件的大小,且兼容性也好,参考:探索HTTP传输中gzip压缩的秘密
安装插件:
npm install -D compression-webpack-plugin
安装之后在vue-config.js 中引入插件
module.exports = {
// ...
  configureWebpack: (webpackConfig) => {
    if (process.env.NODE_ENV === 'production') {
      return {
        plugins: [
          new CompressionPlugin({
            test:  /.js$|.html$|.css$|.jpg$|.jpeg$|.png/, // 需要压缩的文件类型
            threshold: 10240, // 归档需要进行压缩的文件大小最小值,当前设置10K
            deleteOriginalAssets: false // 是否删除原文件
          })
        ]
      };
    }
  }
//...
2. 拆分代码
webpack-cli4 基于webpack 4 进行构建,因此可以利用webpack的splitChunks进行代码拆分
module.exports = {
  optimization: {
    splitChunks: {
      chunks: 'async',//表示将选择哪些块进行优化。提供字符串时,有效值为all、async和initial,默认是仅对异步加载的块进行分割。
      minSize: 30000,//模块大于minSize时才会被分割出来。
      maxSize: 0,//生成的块的最大大小,如果超过了这个限制,大块会被拆分成多个小块。
      minChunks: 1,//拆分前必须共享模块的最小块数。
      maxAsyncRequests: 5,//按需加载时并行请求的最大数目。
      maxInitialRequests: 4,//入口点的最大并行请求数
      automaticNameDelimiter: '~',//默认情况下,webpack将使用块的来源和名称(例如vendors~main.js)生成名称。此选项允许您指定要用于生成的名称的分隔符。
      automaticNameMaxLength: 30,//允许为SplitChunksPlugin生成的块名称的最大长度
      cacheGroups: {
        cacheGroups: {
         swiper: {
            name: 'chunk-swiper',
            test: /[\/]node_modules[\/]swiper[\/]/,  //控制此缓存组选择的模块。省略它将选择所有模块。它可以匹配绝对模块资源路径或块名称。匹配块名称时,将选择块中的所有模块。
            chunks: 'all',
            priority: 5,
            reuseExistingChunk: true,
            enforce: true
          },
          vant: {
            name: 'chunk-vant',
            test: /[\/]node_modules[\/]vant[\/]/,
            chunks: 'all',
            priority: 5,
            reuseExistingChunk: true,
            enforce: true
          },
          videojs: {
            name: 'chunk-videojs',
            test: /[\/]node_modules[\/](video.js)|(videojs-contrib-hls)[\/]/,
            chunks: 'all',
            priority: 5,
            reuseExistingChunk: true,
            enforce: true
          },
          utils: {
            name: 'chunk-utils',
            test: /[\/]node_modules[\/](crypto-js)|(md5.js)|(core-js)|(axios)[\/]/,
            chunks: 'all',
            priority: 5,
            reuseExistingChunk: true,
            enforce: true
          }
        },
        default: {
          minChunks: 2,
          priority: -20,
          reuseExistingChunk: true//如果当前块包含已经从主包中分离出来的模块,那么该模块将被重用,而不是生成新的模块
        }
      }
    }
  }
};
splitChunks 常用参数:
- name 打包的 chunks 的名字
- test 匹配到的模块奖杯打进这个缓存组
- chunks 代码块类型 必须三选一: “initial”(初始化) | “all”(默认就是 all) | “async”(动态加载)默认 Webpack 4 只会对按需加载的代码做分割。如果我们需要配置初始加载的代码也加入到代码分割中,可以设置为 ‘all’
- priority :缓存组打包的先后优先级,数值大的优先
- minSize (默认是30000)形成一个新代码块最小的体积
- minChunks (默认是1)在分割之前,这个代码块最小应该被引用的次数
- maxInitialRequests (默认是3)一个入口最大的并行请求数
- maxAsyncRequests(默认是5)按需加载时候最大的并行请求数
- reuseExistingChunk 如果当前的 chunk 已被从 split 出来,那么将会直接复用这个 chunk 而不是重新创建一个
- enforce 告诉 webpack 忽略 splitChunks.minSize, splitChunks.minChunks, splitChunks.maxAsyncRequests and splitChunks.maxInitialRequests,总是为这个缓存组创建 chunks
3. 配置 analyzer,分析打包后的文件
下载插件:
npm install -D webpack-bundle-analyzer
在vue.config.js中引入插件
const BundleAnalyzerPlugin = require('webpack-bundle-analyzer').BundleAnalyzerPlugin;

module.exports = {
  configureWebpack: (webpackConfig) => {
    if (process.env.NODE_ENV === 'production') {
        return {
          plugins: [
            new BundleAnalyzerPlugin()
          ],
        }
    }
  }
}
在package.json 中配置script
{
  "scripts": {
    "analyz": "npm_config_report=true npm run build"
  }
}
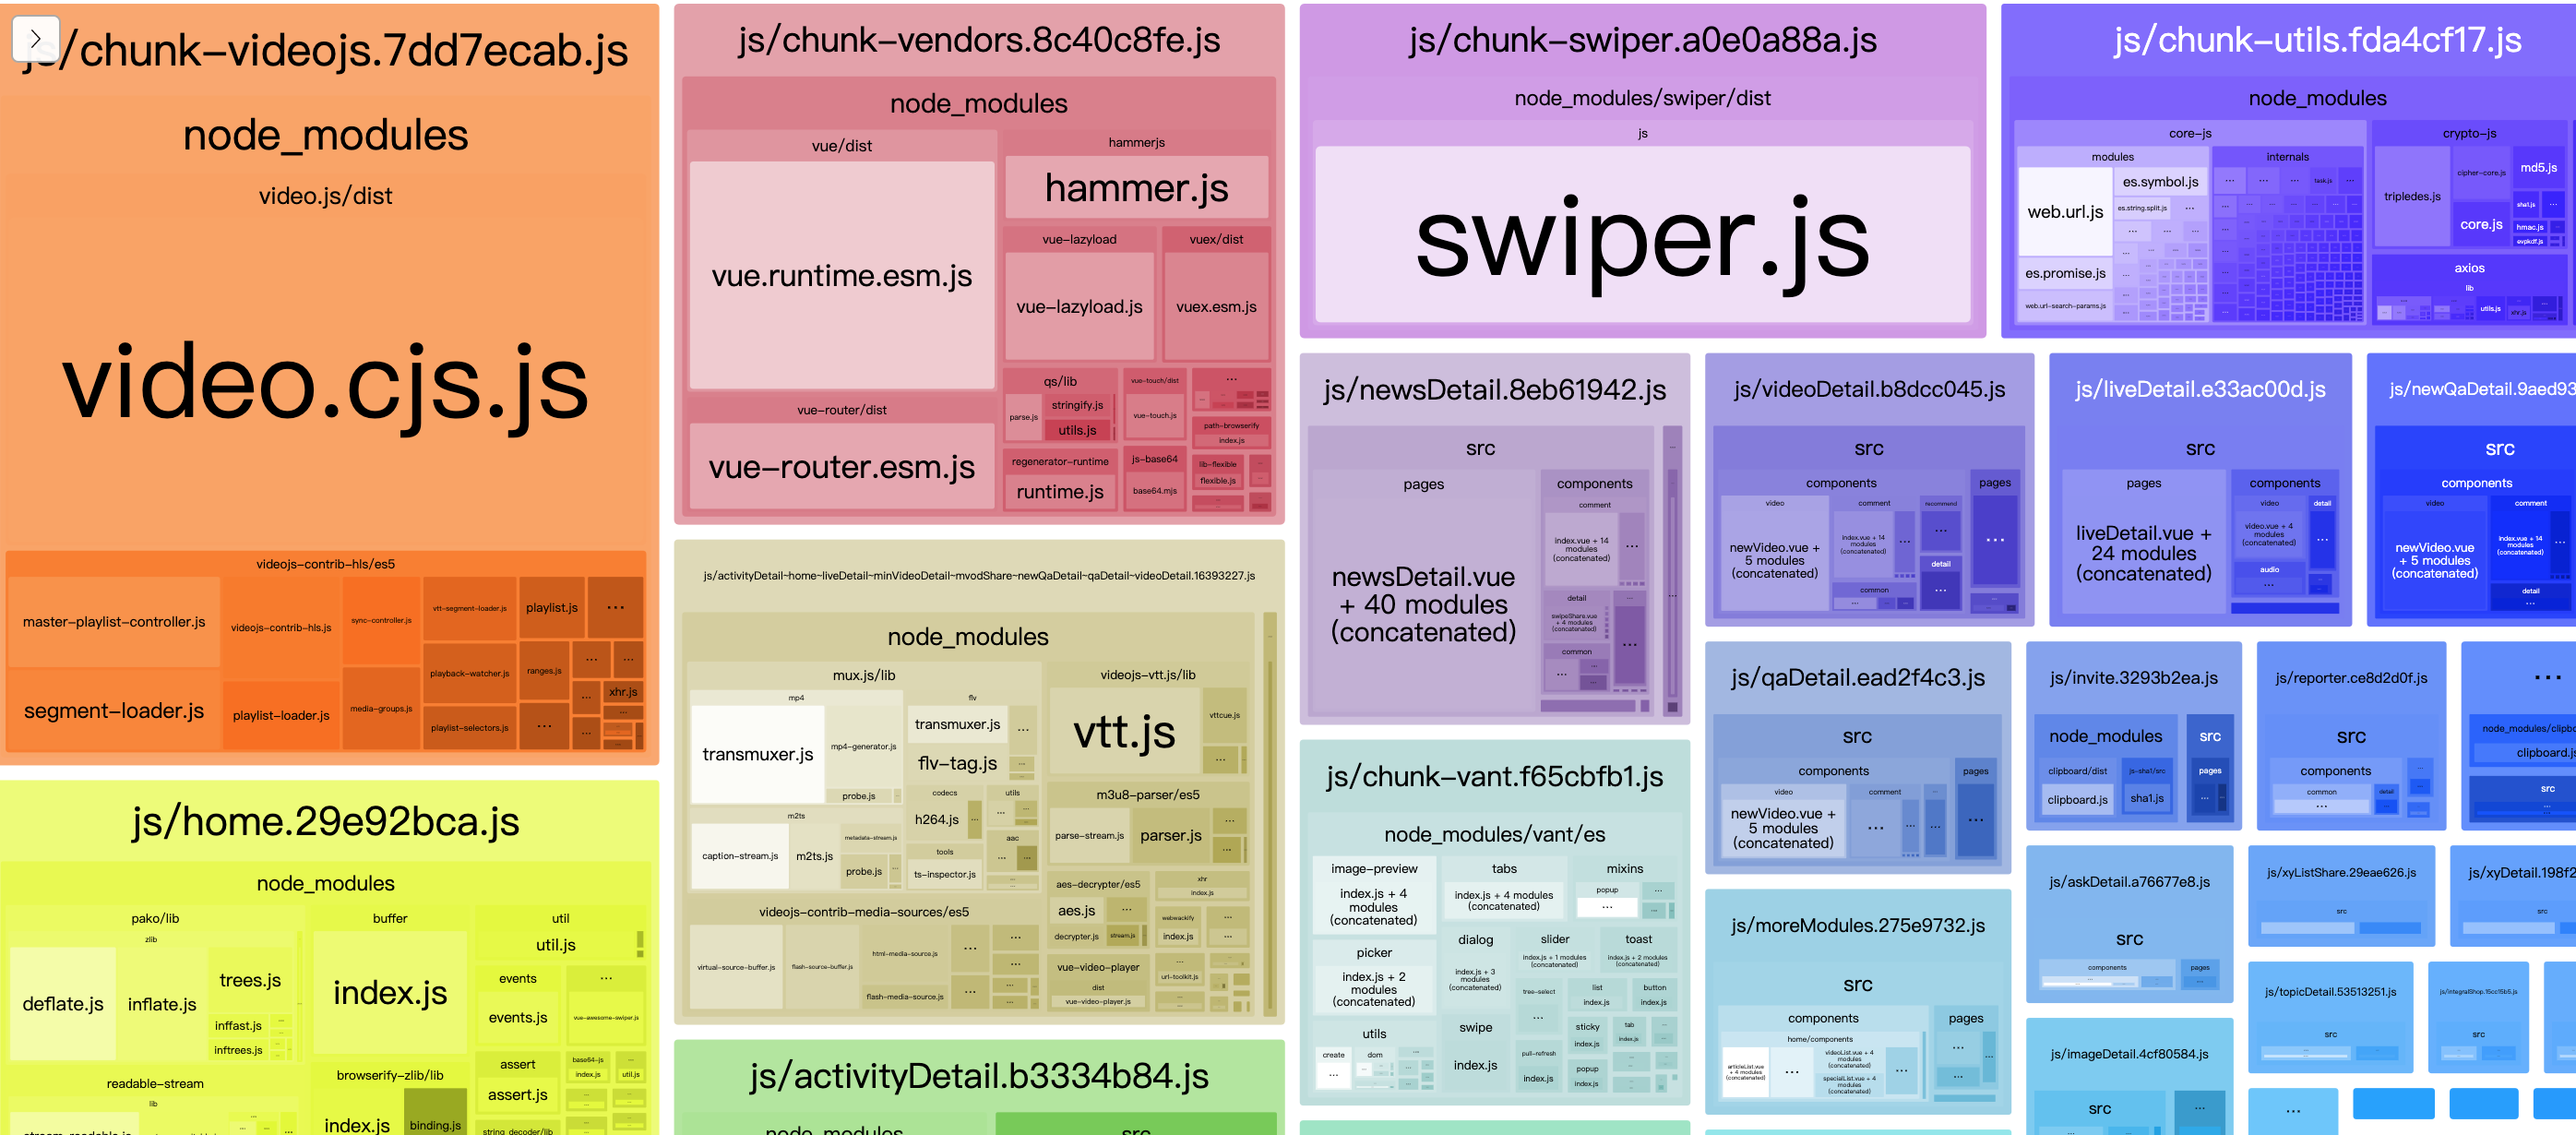
执行 npm run analyz 就能帮我们分析包的大小了

4. 将一些配置抽成可配项,单独存放一个文件,类似于 cli2.9 中的config
在根目录下新建 config/index.js
module.exports = {
  publicPath: `/`,
  outputDir: 'news',
  htmlTitle: '方正翔宇',
  dev: {
    proxyTable: {
      '/app_if': {
        target: 'http://api-xiangyu.test1.fzyun.cn/',
        changeOrigin: true,
        pathRewrite: {
          // '^/app_if': ''
        }
      },
    }
  },
  build: {
    // 是否开启sourceMap
    productionSourceMap: false,
    // 是否开启gzip压缩
    productionGzip: false,
    productionGzipExtensions: ['js', 'css'],
    // npm run build --report
    // Set to `true` or `false` to always turn it on or off
    bundleAnalyzerReport: process.env.npm_config_report
  }
};
vue.config.js 完整配置
const path = require('path');
const config = require('./config');
const CompressionPlugin = require('compression-webpack-plugin');
const BundleAnalyzerPlugin = require('webpack-bundle-analyzer').BundleAnalyzerPlugin;

const resolve = (dir) => {
  return path.join(__dirname, dir);
}

const htmlTitle = config.htmlTitle;
module.exports = {
  publicPath: config.publicPath,
  // lintOnSave: false,
  outputDir: config.outputDir,
  productionSourceMap: config.build.productionSourceMap,
  devServer: {
    proxy: config.dev.proxyTable || {}
  },
  lintOnSave: 'default',
  configureWebpack: (webpackConfig) => {
    if (process.env.NODE_ENV === 'production') {
      if (config.build.productionGzip) {
        webpackConfig.plugins.push(
          new CompressionPlugin({
            test:  new RegExp(
                '\.(' +
                config.build.productionGzipExtensions.join('|') +
                ')$'
              ), // 需要压缩的文件类型
            threshold: 10240, // 归档需要进行压缩的文件大小最小值,当前设置10K
            deleteOriginalAssets: false // 是否删除原文件
          })
        )
      }
      if (config.build.bundleAnalyzerReport) {
        webpackConfig.plugins.push(new BundleAnalyzerPlugin())
      }
      return {
        plugins: [],
        optimization: {
          splitChunks: {
            maxInitialRequests: 4,
            cacheGroups: {
              swiper: {
                name: 'chunk-swiper',
                test: /[\/]node_modules[\/]swiper[\/]/,
                chunks: 'all',
                priority: 5,
                reuseExistingChunk: true,
                enforce: true
              },
              vant: {
                name: 'chunk-vant',
                test: /[\/]node_modules[\/]vant[\/]/,
                chunks: 'all',
                priority: 5,
                reuseExistingChunk: true,
                enforce: true
              },
              videojs: {
                name: 'chunk-videojs',
                test: /[\/]node_modules[\/](video.js)|(videojs-contrib-hls)[\/]/,
                chunks: 'all',
                priority: 5,
                reuseExistingChunk: true,
                enforce: true
              },
              utils: {
                name: 'chunk-utils',
                test: /[\/]node_modules[\/](crypto-js)|(md5.js)|(core-js)|(axios)[\/]/,
                chunks: 'all',
                priority: 5,
                reuseExistingChunk: true,
                enforce: true
              }
            }
          }
        }
      };
    }
  },
  css: {
    extract: true,
    sourceMap: false,
    requireModuleExtension: true,
    loaderOptions: {
      sass: {
        prependData: `
          @import "~@/assets/style/vars.sass"
          @import "~@/assets/style/mixin.sass"
        `
      },
      scss: {
        prependData: `
          @import "~@/assets/style/vars.sass";
          @import "~@/assets/style/mixin.sass";
        `
      }
    }
  },
  chainWebpack: config => {
    config
      .resolve.alias
      .set('@', resolve('src'))
      .set('http', resolve('src/http/axios.js'))
      .set('@common', resolve('src/common'))
      .set('@util', resolve('src/assets/js/util.js'));
    config
      .module
      .rule('images')
      .use('url-loader')
      .loader('url-loader')
      .tap(options => Object.assign(options, { limit: 1000 }));
    config
      .plugin('html')
      .tap(args => {
        args[0].title = htmlTitle || '';
        return args;
      });
    return config;
  }
};