pytest是一个非常成熟的全功能的Python测试框架,主要特点有以下几点:
1、简单灵活,容易上手,文档丰富;
2、支持参数化,可以细粒度地控制要测试的测试用例;
3、能够支持简单的单元测试和复杂的功能测试,还可以用来做selenium/appnium等自动化测试、接口自动化测试(pytest+requests);
4、pytest具有很多第三方插件,并且可以自定义扩展,比较好用的如pytest-selenium(集成selenium)、pytest-html(完美html测试报告生成)、pytest-rerunfailures(失败case重复执行)、pytest-xdist(多CPU分发)等;
5、测试用例的skip和xfail处理;
6、可以很好的和CI工具结合,例如jenkins
关于--html=./report.html生成测试报告问题:
pycharm 在运行测试用例的时候 默认是以pytest 框架来运行的,所以不能生成测试报告
1、步骤:手动注释掉pytest代码,运行(此时就不是以pytest框架运行了)
2、再去掉注释运行
pytest-html测试报告
import pytest
"""
 使用pytest编写用例,必须遵守以下规则:
    (1)测试文件名必须以“test_”开头或者"_test"结尾(如:test_ab.py)
  (2)测试方法必须以“test_”开头。
  (3)测试类命名以"Test"开头。
"""


"""
@pytest.fixture(scope='')
    function:每个test都运行,默认是function的scope
    class:每个class的所有test只运行一次
    module:每个module的所有test只运行一次
    session:每个session只运行一次
"""


@pytest.fixture(scope='function')
def setup_function(request):
    def teardown_function():
        print("teardown_function called.")
    request.addfinalizer(teardown_function)  # 此内嵌函数做teardown工作
    print('setup_function called.')

@pytest.mark.website
def test_1(setup_function):
    print('Test_1 called.')


@pytest.fixture(scope='module')
def setup_module(request):
    def teardown_module():
        print("teardown_module called.")
    request.addfinalizer(teardown_module)
    print('setup_module called.')

def test_2(setup_module):
    print('Test_2 called.')

def test_3(setup_module):
    print('Test_3 called.')
    assert 2==1+1
if __name__ == '__main__':

    """
    Console参数介绍
        -v 用于显示每个测试函数的执行结果
        -q 只显示整体测试结果
        -s 用于显示测试函数中print()函数输出
        -x, --exitfirst, exit instantly on first error or failed test
        -h 帮助
    """
    """
    报告参数 _report.html   ./_report.html   ./report/_report.html    ../report/_report.html    #./当前文件夹,../上个文件夹
        --resultlog=./log.txt
        --junitxml=./log.xml
        --pastebin=all
        --html=./report.html
    """

    """
    生成allure报告(路径/严格按找下面)
    os.system('pytest testCase/demo1.py --alluredir=/report/htmlallure')   #生成allure文件
    os.system('allure serve htmlallure/')  #生成在线报告
    os.system('allure generate htmlallure/ -o htmlallure/html') #生成离线报告
    """

    #命令行
    #指定文件执行pytest -s demo1
    #普通执行,cd到测试用例目录下,输入pytest执行
    #分布执行,cd到测试用例目录下,输入pytest -n 3执行   (3线程)


    #三者方法相同,执行该目录下所有的test文件
    #pytest.main()  #项目目录
    #pytest.main(["./testCase"])   #pytest目录
    #pytest.main(["D:codeBookpyhtonshuzf_pytest\testCase"])  #pytest目录

    # pytest.main(['testCase/demo1.py'])
    # pytest.main(['-q', 'testCase/demo1.py'])         #只显示整体测试结果
    # pytest.main(['-s', 'testCase/demo1.py'])         #以print信息显示
    # pytest.main(['-s', 'testCase/demo1.py', '--html=./report_pytets_report.html'])  #生成html报告
    # pytest.main(['-sq', 'testCase/demo1.py', '--html=./report/_pytest_report_html.html', '--alluredir=./htmlallure/'])
    # os.system('pytest -sq testCase/demo1.py --html=./report/_pytest_report_html.html --alluredir=./htmlallure/')

    #os.system('pytest -sq testCase/demo1.py --html=./report/_pytest_report_html.html --alluredir=./htmlallure/')
    #os.system('allure generate htmlallure/ -o htmlallure/html')


    # 失败重新跑
    #pytest.main(['-s','--ff','testCase/demo1.py'])   #自动重跑  lf只执行失败的,ff会全部执行优先执行失败的
    pytest.main(['-s', '--count = 2', 'testCase/demo1.py'])
pytest-cov代码覆盖率
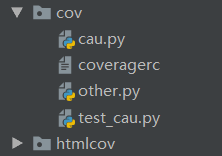
cov测试文件目录,cau.py被测试文件,test_cau.py测试文件,other.py不想被测试文件,coveragerc配置不想被测试文件,htmlcov自动生成的报告目录

# ./当前文件夹,../上个文件夹
# 输出,测试文件目录,报告样式, 配置筛选文件路径
import pytest
if __name__=='__main__':
    pytest.main(['-s','--cov=./cov/','--cov-report=html','--cov-config=./cov/coveragerc'])
pytest-xdist分布式执行

# ./当前文件夹,../上个文件夹
# 输出,用例目录,报告路径, 线程数
import pytest
if __name__ == '__main__':
    #pytest.main(['-s','./xdist/','--html=_report.html']) #普通执行
    pytest.main(['-s','./xdist/','--html=_report.html','-n 3']) #分布式执行