Gis Data Line 个人经验之谈:
环境配置清单:(都可在官网给的链接下下载)
1-[VS2008]
2-[PSDK-x86].exe
3-[cmake-2.8.4-win32-x86].exe
4-[flex-2.5.4a-1].exe
5-[bison-2.4.1-setup].exe
6-[osgeo4w-setup].exe
(具体安装哪些lib请参照官方博客http://hub.qgis.org/projects/quantum-gis/wiki/Building_QGIS_from_Source#Building_on_Windows)
7-[Git-1.7.4-preview20110204].exe
8-[cmd].bat
(此为获取源码的dos命令框,具体命令参照官方博客http://hub.qgis.org/projects/quantum-gis/wiki/Building_QGIS_from_Source#Building_on_Windows)
9-[Qt_SDK_Win_offline_v1_1_4_en].exe
10-[postgresql-9.1.1-1-windows].exe
---------------------------------------------------------------------------------
除软件6需选择外,其他的软件都可以默认安装。另外,6在线安装的时候会在本地保存有安装文件,保存在一个乱码的文件夹里,我的电脑文件件名称是“http%3a%2f%2fdownload.osgeo.org%2fosgeo4w”,下次如果您需要在另外一台电脑上配置,只需将这些安装文件拷其电脑,并选择Advanced Install/Install
from local directory,并找到相应路径即可安装。避免再次下载。
/* ------------------------------------ 以下大致是官网原文编译方法(仅限Windows,其他系统自行参考) --------------------------------------- */
// 官方编译指南:http://www.qgis.org/wiki/Building_QGIS_from_Source
Building on Windows
Building with Microsoft Visual Studio
This section describes how to build QGIS using Visual Studio on Windows. This
is currently also who the binary QGIS packages are made (earlier versions used
MinGW).
This section describes the setup required to allow Visual Studio to be used to
build QGIS.
Visual C++ Express Edition
The free (as in free beer) Express Edition installer is available under:
http://download.microsoft.com/download/d/c/3/dc3439e7-5533-4f4c-9ba0-8577685b6e7e/vcsetup.exe
The optional products are not necessary. In the process the Windows SDKs for
Visual Studio 2008 will also be downloaded and installed.
You also need the Microsoft Windows Server\AE 2003 R2 Platform SDK (for setupapi):
http://download.microsoft.com/download/f/a/d/fad9efde-8627-4e7a-8812-c351ba099151/PSDK-x86.exe
You only need Microsoft Windows Core SDK / Build Environment (x86 32-Bit).
Other tools and dependencies
Download and install following packages:
OSGeo4W does not only provide ready packages for the current QGIS release and
nightly builds of the trunk, but also offers most of the dependencies needs to
build it.
For the QGIS build you need to install following packages from OSGeo4W (select
Advanced Installation):
- expat
- fcgi
- gdal17
- grass
- gsl-devel
- iconv
- pyqt4
- qt4-devel
- qwt5-devel-qt4
- sip
This will also select packages the above packages depend on.
Additionally QGIS also needs the include file unistd.h, which normally
doesn't exist on Windows. It's shipped with Flex/Bison in GnuWin32\include
and needs to be copied into the VC\include directory of your Visual C++
installation.
Earlier versions of this document also covered how to build all above
dependencies. If you're interested in that, check the history of this page in the Wiki
or the SVN repository.
Setting up the Visual Studio project with CMake
To start a command prompt with an environment that both has the VC++ and the OSGeo4W
variables create the following batch file (assuming the above packages were
installed in the default locations):
@echo off
path %SYSTEMROOT%\system32;%SYSTEMROOT%;%SYSTEMROOT%\System32\Wbem;%PROGRAMFILES%\CMake 2.8\bin;%PROGRAMFILES%\subversion\bin;%PROGRAMFILES%\GnuWin32\bin
set PYTHONPATH=

set VS90COMNTOOLS=%PROGRAMFILES%\Microsoft Visual Studio 9.0\Common7\Tools\
call "%PROGRAMFILES%\Microsoft Visual Studio 9.0\VC\vcvarsall.bat" x86

set INCLUDE=%INCLUDE%;%PROGRAMFILES%\Microsoft Platform SDK for Windows Server 2003 R2\include
set LIB=%LIB%;%PROGRAMFILES%\Microsoft Platform SDK for Windows Server 2003 R2\lib

set OSGEO4W_ROOT=C:\OSGeo4W
call "%OSGEO4W_ROOT%\bin\o4w_env.bat"

@set GRASS_PREFIX=c:/OSGeo4W/apps/grass/grass-6.4.0
@set INCLUDE=%INCLUDE%;%OSGEO4W_ROOT%\include
@set LIB=%LIB%;%OSGEO4W_ROOT%\lib;%OSGEO4W_ROOT%\lib

@cmd
Note: If running on Windows 7, insure that the command prompt is run in Administrator mode! Failure to do this will result in some strange errors while building and installing the application.
Start the batch file and on the command prompt checkout the QGIS source
<!-- not updated anymore!
from
svn to the source directory qgis-trunk:
svn co https://svn.osgeo.org/qgis/trunk/qgis qgis-trunk
or
-->using git-svn (from the git shell):
git svn clone --username $USER --revision 15611:HEAD https://svn.osgeo.org/qgis/trunk/qgis
Create a 'build' directory somewhere. This will be where all the build output
will be generated.
Now run cmake-gui and in the Where is the source code: box, browse to
the top level QGIS directory.
In the Where to build the binaries: box, browse to the 'build' directory you
created.
Adjust the path to bison and flex so that the shortened C:/Progra~1 is used
rather than C:/Program Files.
Note: on Windows 7, you may need to specify C:/Progra~2 if programs were installed in C:/Program Files (x86). Use dir /X to see what the short name is.
Verify that the 'BINDINGS_GLOBAL_INSTALL' option is not checked, so that python
bindings are placed into the output directory when you run the INSTALL target.
Hit Configure to start the configuration and select Visual Studio 9 2008
and keep native compilers and click Finish.
The configuration should complete without any further questions and allow you to
click Generate.
Now close cmake-gui and continue on the command prompt by starting
vcexpress. Use File / Open / Project/Solutions and open the
qgis-x.y.z.sln File in your project directory.
Change Solution Configuration from Debug to RelWithDebInfo (Release
with Debug Info) or Release before you build QGIS using the ALL_BUILD
target (otherwise you need debug libraries that are not included).
After the build completed you should install QGIS using the INSTALL target.
Install QGIS by building the INSTALL project. By default this will install to
c:\Program Files\qgis<version> (this can be changed by changing the
CMAKE_INSTALL_PREFIX variable in cmake-gui).
You will also either need to add all the dependency DLLs to the QGIS install
directory or add their respective directories to your PATH.
Packaging
To create a windows 'all in one' standalone package under ubuntu (yes you
read correctly) do the following:
sudo apt-get install nsis
Now
cd qgis/ms-windows/osgeo4w
And run the nsis creation script:
./creatensis.pl
When the script completes, it should have created a QGIS installer executable {QGIS-OSGeo4W-1.7.0-14615-Setup) in the ms-windows directory (using the QGIS binaries from OSGEO4W).
Packaging your own build of QGIS
Assuming you have completed the above packaging step, if you want to include
your own hand built QGIS executables, you need to copy them in from your
windows installation into the ms-windows file tree created by the creatensis
script.
cd ms-windows/
rm -rf osgeo4w/unpacked/apps/qgis/*
cp -r /tmp/qgis1.7.0/* osgeo4w/unpacked/apps/qgis/
Note: '/tmp/qgis1.7.0/' will be the location where vcexpress installed your QGIS executables.
Note: At this point if you need to add any projections to the database files (srs.db, pcs.csv and projop_wparm.csv} change the files in ms-windows/osgeo4w/unpacked/apps/qgis/resources/srs.db, ms-windows/osgeo4w/unpacked/share/epsg_csv/pcs.csv, ms-windows/osgeo4w/unpacked/share/epsg_csv/projop_wparm.csv, ms-windows/osgeo4w/unpacked/share/gdal/pcs.csv and ms-windows/osgeo4w/unpacked/share/gdal/projop_wparm.csv.
Now create a package.
./quickpackage.sh
After this you should now have a nsis installer (QGIS-1-7-0-Setup) containing your own build
of QGIS and all dependencies needed to run it on a windows machine.
Osgeo4w packaging
The actual packaging process is currently not documented, for now please take a
look at:
ms-windows/osgeo4w/package.cmd
/* ------------------------------------ 以上大致是官网原文编译方法(仅限Windows,其他系统自行参考) --------------------------------------- */
/* ---------------------------------------------------- 以下大致是官网的中文翻译版本 -------------------------------------------------------- */
// 本文原网址:http://blog.csdn.net/ryanzll/article/details/6217142
-------
QGIS不断推陈出新,1.6早已是过去式,目前正在开发1.7. 在1.6的版本中有一个亮点(没有仔细调研,是1.5中还是1.6中添加的),就是对wfs-t的支持。如果你恰好通过QGIS访问了GeoServer的wfs,那么你可以试试修改(添加、删除、锁定等等)GeoServer发布的矢量图层。我也是出于了解QGIS如何通过wfs-t修改wfs的矢量图层的考虑,下载了1.6版本的QGIS,忙活了半天,老天有眼让我折腾出来了。总的来说,与1.4相比,按照官方的编译说明文档编译过程更加简单了,但终究还有一些地方没有覆盖到,要让人摸索很久。
软硬件环境
1. 联想台式机
2. winxp
3. vs2008专业版
编译步骤
1.安装相关软件
官方指南中提到的软件基本上都(svn无所谓的)需要安装,具体如下:
Microsoft Windows Server® 2003 R2 Platform SDK:http://download.microsoft.com/download/f/a/d/fad9efde-8627-4e7a-8812-c351ba099151/PSDK-x86.exe
CMake :http://www.cmake.org/files/v2.8/cmake-2.8.2-win32-x86.exe
Flex:http://gnuwin32.sourceforge.net/downlinks/flex.php
Bison:http://gnuwin32.sourceforge.net/downlinks/bison.php
OSGeo4W:http://download.osgeo.org/osgeo4w/osgeo4w-setup.exe
1.1) OSGeo4W的安装, 请选择安装下列的lib
expat
fcgi
gdal17
grass
gsl-devel
iconv
pyqt4
qt4-devel
qwt5-devel-qt4
sip
1.2) 拷贝../GnuWin32/include/unistd.h到vs2008安装目录下../VC/include
2. 设置VS参数
新建bat文件,并添加如下命令
@echo off
path %SYSTEMROOT%/system32;%SYSTEMROOT%;%SYSTEMROOT%/System32/Wbem;%PROGRAMFILES%/CMake 2.8/bin;%PROGRAMFILES%/subversion/bin;%PROGRAMFILES%/GnuWin32/bin
set PYTHONPATH=
set VS90COMNTOOLS=%PROGRAMFILES%/Microsoft Visual Studio 9.0/Common7/Tools/
call "%PROGRAMFILES%/Microsoft Visual Studio 9.0/VC/vcvarsall.bat" x86
set INCLUDE=%INCLUDE%;%PROGRAMFILES%/Microsoft Platform SDK for Windows Server 2003 R2/include
set LIB=%LIB%;%PROGRAMFILES%/Microsoft Platform SDK for Windows Server 2003 R2/lib
set OSGEO4W_ROOT=C:/OSGeo4W
call "%OSGEO4W_ROOT%/bin/o4w_env.bat"
@set GRASS_PREFIX=c:/OSGeo4W/apps/grass/grass-6.4.0
@set INCLUDE=%INCLUDE%;%OSGEO4W_ROOT%/apps/gdal-17/include;%OSGEO4W_ROOT%/include
@set LIB=%LIB%;%OSGEO4W_ROOT%/apps/gdal-17/lib;%OSGEO4W_ROOT%/lib
@cmd
3. 下载QGIS源代码
http://qgis.org/downloads/qgis-1.6.0.tar.bz2
或者通过svn,地址如下(参考自http://www.qgis.org/wiki/Download#Source_Code)
https://svn.osgeo.org/qgis/branches/Release-1_6_0
4.CMake生成vs工程文件
这一步很关键,设置不对后面会出很多问题
我的设置如下 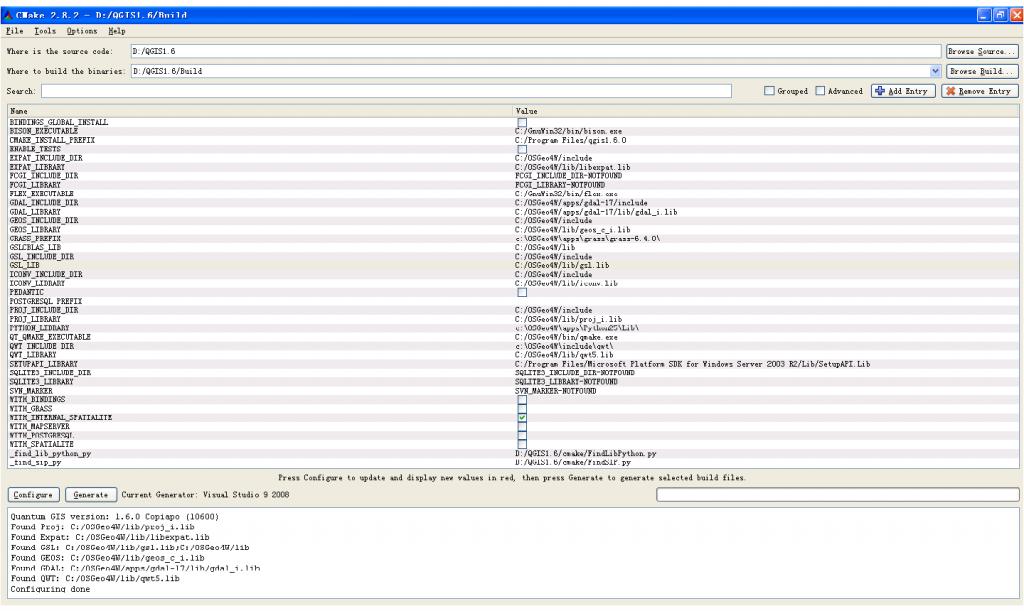
或者你可以查看cmake的缓存文件
http://blog.csdn.net/ryanzll/archive/2011/03/02/6217209.aspx
需要注意的是
1.XXX_LIBRARY或者XXX_LIB:要求的是一个具体的lib文件,而非文件夹。
2.XXX_LIBRARY_DIR:这里才是要求的一个lib文件夹。
3.SETUPAPI_LIBRARY:指的是Microsoft Windows Server® 2003 R2 Platform SDK中的setupapi.lib, 即C:/Program Files/Microsoft Platform SDK for Windows Server 2003 R2/Lib/SetupAPI.Lib
4.这里为了configure通过,我只勾选了WITH_INTERNAL_SPATIALITE(最快,最简单)。如果要编译其他的,不在本文叙述范围之内,请自行研究。:(
跟着,就点按钮configure,如果configuring done并且没有错误和警告,就点按钮Generate生成vs2008工程文件。
5.用vs2008打开工程文件并编译。
打开QGIS1.6.0.sln,修改编译设置为RelWithDebInfo,这是因为
1.安装的OSGeo4W都是release版的;
2. 而为了调试qgis,又需要debug信息。
选择ALL_BUILD,右键生成即可。这当中有两个地方要注意
1. 对于qgis_core工程,需要手动生成qgssearchstringparser.cpp,方法如下
C:/GnuWin32/bin/bison.exe -oD:/QGIS1.6/Build/src/core/qgssearchstringparser.cpp -d -v -t D:/QGIS1.6/src/core/qgssearchstringparser.yy
2. 对于qgis_analysis工程,需要手动生成qgsrastercalcparser.cpp,方法如下
C:/GnuWin32/bin/bison.exe -p raster -oD:/QGIS1.6/Build/src/analysis/qgsrastercalcparser.cpp -d -v -t D:/QGIS1.6/src/analysis/raster/qgsrastercalcparser.yy
注意哦,上面两个命令,有一点点差别,就是第二个命令多了“-p raster”这样的参数,如果不添加这样的参数,也会导致后面的编译错误哦(经验之谈啊,汗。。。。。。)。
6.到这里,编译工作该成功了。下面就是拷贝相应dll,pdb等等到qgis.exe的同级目录了。为啥?你懂的。
最后,编译好的qgis1.6的压缩包链接如下:
http://dl.dbank.com/c03a0bffu8
/* --------------------------------------------------------------- 以上大致是官网的中文翻译版本 ------------------------------------------------------------------ */