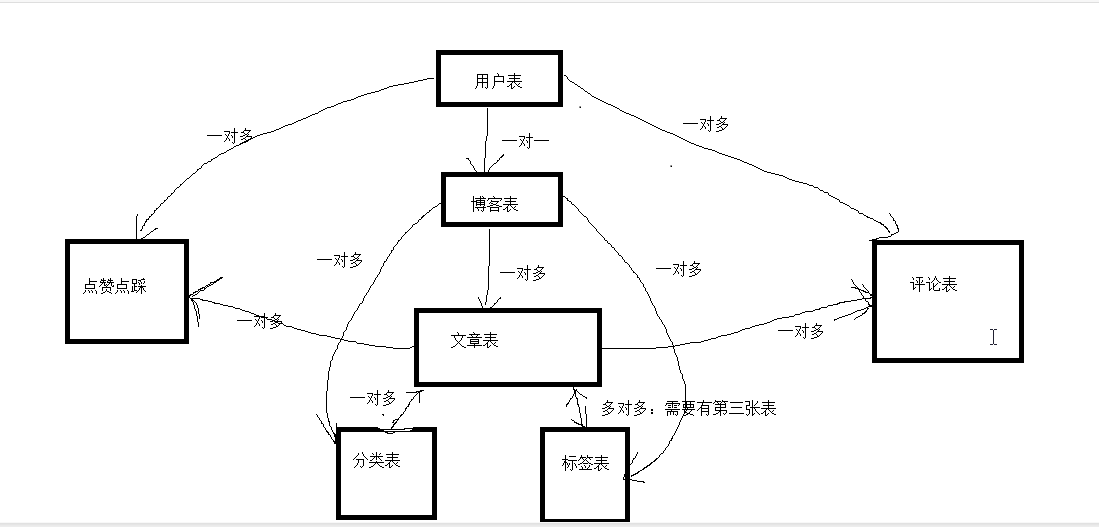
一.BBS建表
其中包含七张真表,一张虚拟中间表
models.py文件:
from django.db import models

# Create your models here.
from django.db import models
from django.contrib.auth.models import AbstractUser


class UserInfo(AbstractUser):
    nid = models.AutoField(primary_key=True)
    # 头像:FileField文件(varchar类型),default:默认值,upload_to上传的路径
    avatar = models.FileField(upload_to='avatar/', default='avatar/default.png')
    #跟blog表一对一
    #OneToOneField本质就是ForeignKey,只不过有个唯一性约束
    blog = models.OneToOneField(to='Blog', to_field='nid',null=True)
    # blog = models.ForeignKey(to='Blog', to_field='nid',null=True,unique=True)

    class Meta:
        # db_table='xxxx'
        # 在admin中显示的表名
        verbose_name='用户表'
        #去掉  用户表  后的s
        verbose_name_plural = verbose_name

class Blog(models.Model):
    nid = models.AutoField(primary_key=True)
    #站点名称
    title = models.CharField(max_length=64)
    #站点副标题
    site_name = models.CharField(max_length=32)
    #不同人不同主题
    theme = models.CharField(max_length=64)
    def __str__(self):
        return self.site_name
#分类表
class Category(models.Model):
    nid = models.AutoField(primary_key=True)
    #分类名称
    title = models.CharField(max_length=64)
    #跟博客是一对多的关系,关联字段写在多的一方
    #to  是跟哪个表关联   to_field跟表中的哪个字段做关联, null=True 表示可以为空
    blog = models.ForeignKey(to='Blog', to_field='nid', null=True)
    def __str__(self):
        return self.title

class Tag(models.Model):
    nid = models.AutoField(primary_key=True)
    #标签名字
    title = models.CharField(max_length=64)
    # 跟博客是一对多的关系,关联字段写在多的一方
    blog = models.ForeignKey(to='Blog', to_field='nid', null=True)
    def __str__(self):
        return self.title

class Article(models.Model):
    nid = models.AutoField(primary_key=True)
    #verbose_name在admin中显示该字段的中文
    title = models.CharField(max_length=64,verbose_name='文章标题')
    #文章摘要
    desc = models.CharField(max_length=255)
    #文章内容  大文本
    content = models.TextField()
    #DateTimeField 年月日时分秒(注意跟datafield的区别)
    #auto_now_add=True:插入数据会存入当前时间
    #auto_now=True  修改数据会存入当前时间
    create_time = models.DateTimeField(auto_now_add=True)
    # commit_num=models.IntegerField(default=0)
    # up_num=models.IntegerField(default=0)
    # down_num=models.IntegerField(default=0)
#一对多的关系
    blog = models.ForeignKey(to='Blog', to_field='nid', null=True)
    # 一对多的关系
    category = models.ForeignKey(to='Category', to_field='nid', null=True)
    #多对多关系  through_fields  不能写反了:
    tag = models.ManyToManyField(to='Tag', through='ArticleTOTag', through_fields=('article', 'tag'))
    def __str__(self):
        return self.title+'----'+self.blog.userinfo.username

class ArticleTOTag(models.Model):
    nid = models.AutoField(primary_key=True)
    article = models.ForeignKey(to='Article', to_field='nid')
    tag = models.ForeignKey(to='Tag', to_field='nid')

class Commit(models.Model):
    #谁对那篇文章评论了什么内容
    nid = models.AutoField(primary_key=True)
    user = models.ForeignKey(to='UserInfo', to_field='nid')
    article = models.ForeignKey(to='Article', to_field='nid')
    content = models.CharField(max_length=255)
    #评论时间
    create_time = models.DateTimeField(auto_now_add=True)
    #自关联()
    parent = models.ForeignKey(to='self', to_field='nid',null=True,blank=True)

class UpAndDown(models.Model):
    #谁对那篇文章点赞或点踩
    nid = models.AutoField(primary_key=True)
    user = models.ForeignKey(to='UserInfo', to_field='nid')
    article = models.ForeignKey(to='Article', to_field='nid')
    #布尔类型,本质也还是0和1
    is_up = models.BooleanField()

    class Meta:
        #联合唯一,一个用户只能给一片文章点赞或点踩
        unique_together = (('user', 'article'),)
注:
在settings.py文件中需要配置:
# 引用Django自带的User表,继承使用时需要设置
AUTH_USER_MODEL = "app01.UserInfo"
利用admin超级用户登录查看创建的表及字段:
在run manage.py task 工具中createsuperuser即可登录
from django.contrib import admin
from app01 import models
# Register your models here.
admin.site.register(models.UserInfo)
admin.site.register(models.Tag)
admin.site.register(models.Category)
admin.site.register(models.Commit)
admin.site.register(models.Article)
admin.site.register(models.Blog)
admin.site.register(models.UpAndDown)
admin.site.register(models.ArticleTOTag)
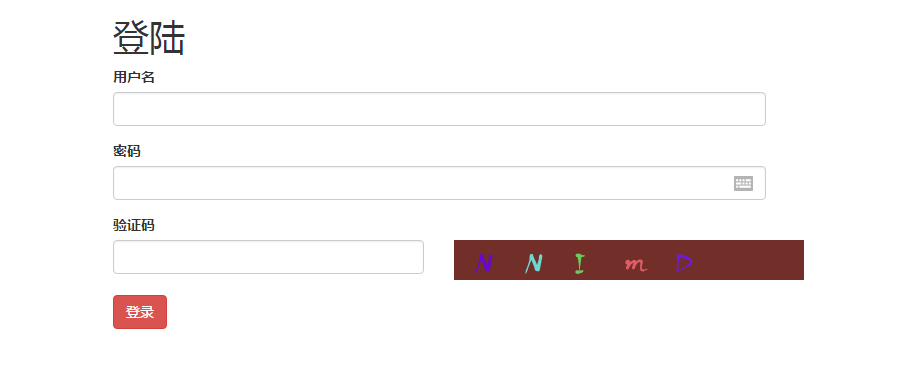
二.登录form表单及验证码的形成方式
引入静态文件
login.html
<!DOCTYPE html>
<html>
<head>
    <meta charset="utf-8">
    <title>登录</title>
    <link rel="stylesheet" href="/static/bootstrap-3.3.7-dist/css/bootstrap.css">

</head>
<body>
<div class="container-fluid">
    <div class="row">
        <div class="col-md-6 col-md-offset-3">
            <h1>登录</h1>
            <form action="">
                <div class="form-group">
                    <label for="id_name">用户名</label>
                    <input type="text" name="name" id="id_name" class="form-control">
                </div>
                <div class="form-group">
                    <label for="id_pwd">密码</label>
                    <input type="password" name="pwd" id="id_pwd" class="form-control">
                </div>
                <div class="form-group">
                    <label for="id_code">验证码</label>
                    <div class="row">
                        <div class="col-md-6">
                            <input type="text" name="code" id="id_code" class="form-control">
                        </div>
                        <div class="col-md-6">
                            <a href="/login/"> <img src="/get_code/" height="40" width="350"></a>

                        </div>
                    </div>

                </div>
                <input type="submit" value="提交" class="btn-success">
            </form>


        </div>
    </div>
</div>
</body>
</html>
views.py
from django.shortcuts import render,HttpResponse,redirect
from django.http import JsonResponse
#Image导入
#ImageDraw在图片上写字
#ImageFont 写字的格式
from PIL import Image,ImageDraw,ImageFont
import random
# 相当于把文件以byte格式存到内存中
from io import BytesIO
# Create your views here.
def login(request):
    if request.method=='GET':
        return render(request,'login.html')

def get_random_color():
    return (random.randint(0,255),random.randint(0,255),random.randint(0,255))
def get_code(request):
    #方式一,返回固定图片
    # with open('static/img/code.png','rb') as f:
    #     data=f.read()
    # return HttpResponse(data)


    #方式二,自动生成图片(需要借助第三方模块pillow)图像处理的模块
    #新生成一张图片
    # img=Image.new('RGB',(350,40),get_random_color())
    # #把图片保存起来
    # with open('static/img/code.png','wb') as f:
    #     #把图片保存起来(注意,用img对象的save方法,把f传入)
    #     img.save(f)
    # #打开返回
    # with open('static/img/code.png','rb') as f:
    #     data=f.read()
    # return HttpResponse(data)


    #方式三(不把文件保存在硬盘上,保存在内存中)
    #新生成一张图片
    # img=Image.new('RGB',(350,40),get_random_color())
    # #生成一个Byteio对象
    # f=BytesIO()
    # #把文件保存到对象中
    # img.save(f,'png')
    # #f.getvalue() 把文件从对象中取出来
    # return HttpResponse(f.getvalue())


     #方式四:在图片上写文件,并且保存到内存中
    # img = Image.new('RGB', (350, 40), get_random_color())
    # #写文字
    # #生成一个字体对象
    # font=ImageFont.truetype('static/font/kumo.ttf',34)
    # #调用方法,返回一个画板对象
    # draw=ImageDraw.Draw(img)
    # draw.text((0,10),'python',font=font)
    #
    # f=BytesIO()
    # img.save(f,'png')
    # return HttpResponse(f.getvalue())

    #最终版本
    img = Image.new('RGB', (350, 40), get_random_color())
    font=ImageFont.truetype('static/font/kumo.ttf',34)
    draw=ImageDraw.Draw(img)
    #动态生成大写,小写,数字  5个
    # draw.text((0,10),'python',font=font)
    for i in range(5):
        num=str(random.randint(0,9))
        up_chr=str(chr(random.randint(65,90)))
        lower_chr=str(chr(random.randint(97,122)))
        #从三个字符中选一个字符
        ss=random.choice([num,up_chr,lower_chr])
        draw.text((20+i*50, 5), ss, font=font,fill=get_random_color())
    #画点和线
    # width = 320
    # height = 35
    # for i in range(10):
    #     x1 = random.randint(0, width)
    #     x2 = random.randint(0, width)
    #     y1 = random.randint(0, height)
    #     y2 = random.randint(0, height)
    #     # 在图片上画线
    #     draw.line((x1, y1, x2, y2), fill=get_random_color())
    #
    # for i in range(100):
    #     # 画点
    #     draw.point([random.randint(0, width), random.randint(0, height)], fill=get_random_color())
    #     x = random.randint(0, width)
    #     y = random.randint(0, height)
    #     # 画弧形
    #     draw.arc((x, y, x + 4, y + 4), 0, 90, fill=get_random_color())
    f=BytesIO()
    img.save(f,'png')
    return HttpResponse(f.getvalue())
登录html的完善(ajax请求):
<!DOCTYPE html>
<html>
<head>
    <meta charset="utf-8">
    <title>登录</title>
    <link rel="stylesheet" href="/static/bootstrap-3.3.7-dist/css/bootstrap.css">
     <script src="/static/jquery-3.3.1.js"></script>

</head>
<body>
<div class="container-fluid">
    <div class="row">
        <div class="col-md-6 col-md-offset-3">
            <h1>登录</h1>

                 {% csrf_token %}
                <div class="form-group">
                    <label for="id_name">用户名</label>
                    <input type="text" name="name" id="id_name" class="form-control">
                </div>
                <div class="form-group">
                    <label for="id_pwd">密码</label>
                    <input type="password" name="pwd" id="id_pwd" class="form-control">
                </div>
                <div class="form-group">
                    <label for="id_code">验证码</label>
                    <div class="row">
                        <div class="col-md-6">
                            <input type="text" name="code" id="id_code" class="form-control">
                        </div>
                        <div class="col-md-6" >
                             <img src="/get_code/" height="40" width="350" id="id_imgcode">

                        </div>
                    </div>

                </div>
                           <button class="btn btn-danger" id="id_login">登录</button><span class="error" style="color: red; margin-left: 10px"></span>


        </div>
    </div>
</div>
</body>

<script>
    $("#id_imgcode").click(function () {
        //改变图片路径,重新请求,加载图片
        //$("#id_imgcode")[0].src += '?'
        //var aa='/getcode/?random='+Math.random()
        //console.log(aa)
        //$("#id_imgcode")[0].src=aa
        // $("#id_imgcode").attr('src',aa)
        var aa=$("#id_imgcode").attr('src')+'?'
        console.log(aa)
        $("#id_imgcode").attr('src',aa)

    })
    $("#id_login").click(function () {

        $.ajax({
            url: '/login/',
            type: 'post',
            data: {
                'name': $("#id_name").val(),
                'pwd': $("#id_pwd").val(),
                'auth_code': $("#id_code").val(),
                // 'csrfmiddlewaretoken':'{{ csrf_token }}',
                'csrfmiddlewaretoken': $("[name='csrfmiddlewaretoken']").val(),
            },
            success:function (data) {
                if(data.status==100){
                    location.href='/index/'
                }else{
                    $(".error").text(data.msg)
                    setTimeout(function () {
                        $(".error").text("")
                    },3000)
                }

            }
        })
    })

</script>
</html>
登录视图函数的完善:
from django.contrib import auth
def login(request):
    if request.method == 'GET':
        return render(request, 'login.html')
    else:
        response_dic={'status':100,'msg':None}
        name=request.POST.get('name')
        pwd=request.POST.get('pwd')
        auth_code=request.POST.get('auth_code')
        # 不区分大小写
        # request.session.get('auth_code') 把存在session中的验证码取出来,跟前台传入的验证码做对比
        if request.session.get('auth_code').upper()==auth_code.upper():
            # 校验用户
            user=auth.authenticate(username=name,password=pwd)
            if user:
                # 如果有值,登陆成功,要login一下
                auth.login(request,user)
                response_dic['msg']='登陆成功'
            else:
                response_dic['msg'] = '用户名或密码错误'
                response_dic['status'] = 101
        else:
            response_dic['msg'] = '验证码错误'
            response_dic['status'] = 102
        return JsonResponse(response_dic)
效果图: