------------------------siwuxie095
整合 Spring 框架和 MyBatis 框架
1、导入相关 jar 包(共 22 个)
(1)导入 Spring 的核心 jar 包和日志相关的 jar 包(6 个)

Commons Logging 下载链接:
http://commons.apache.org/proper/commons-logging/download_logging.cgi
LOG4J 下载链接:
https://www.apache.org/dist/logging/log4j/
(2)导入 Spring 的 AOP 开发的 jar 包(4 个)

AOP Alliance 下载链接:
http://mvnrepository.com/artifact/aopalliance/aopalliance
AspectJ Weaver 下载链接:
http://mvnrepository.com/artifact/org.aspectj/aspectjweaver
(3)导入 Spring 的 JDBC 开发的 jar 包(2 个)

(4)导入 Spring 整合 Web 项目的 jar 包(1 个)

(5)导入 MyBatis 的 jar 包(1 个)

(6)导入 MyBatis 所需的日志相关的 jar 包(2 个)

「MyBatis 也需要 LOG4J,但前面 Spring 已导入,不再重复导入」
(7)导入 MyBatis 分页相关的 jar 包(2 个)
PageHelper 下载链接:
http://repo1.maven.org/maven2/com/github/pagehelper/pagehelper/
JSqlParser 下载链接:
http://repo1.maven.org/maven2/com/github/jsqlparser/jsqlparser/0.9.5/
(8)导入 MySQL 的 JDBC 驱动的 jar 包(1 个)

MySQL Connector/J 下载链接:
https://dev.mysql.com/downloads/connector/j/
(9)导入 Spring 整合 MyBatis 的 jar 包(1 个)

MyBatis-Spring 下载链接:
https://github.com/mybatis/spring/releases
(10)导入 BoneCP 的 jar 包和其依赖的 Guava 的 jar 包(2 个)

BoneCP 下载链接:
http://repo1.maven.org/maven2/com/jolbox/bonecp/
Guava 下载链接:
http://repo1.maven.org/maven2/com/google/guava/guava/
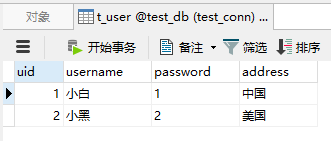
2、创建数据库和表
创建数据库 test_db, 再创建表 t_user,并插入若干数据,
其中:uid 为主键,且为自动增长
3、测试
(1)编写一个实体类
User.java:
package com.siwuxie095.entity;
// 实体类 public class User {
private Integer uid; private String username; private String password; private String address;
public Integer getUid() { return uid; } public void setUid(Integer uid) { this.uid = uid; }
public String getUsername() { return username; } public void setUsername(String username) { this.username = username; }
public String getPassword() { return password; } public void setPassword(String password) { this.password = password; }
public String getAddress() { return address; } public void setAddress(String address) { this.address = address; }
@Override public String toString() { return "User [uid=" + uid + ", username=" + username + ", password=" + password + ", address=" + address + "]"; }
} |
(2)编写一个映射器接口
UserMapper.java:
package com.siwuxie095.mapper;
import org.apache.ibatis.annotations.Param;
import com.siwuxie095.entity.User;
// 映射器接口 public interface UserMapper {
User getUser(@Param("uid") Integer uid);
} |
(3)在 MyBatis 映射配置文件中进行配置
<?xml version="1.0" encoding="UTF-8" ?> <!DOCTYPE mapper PUBLIC "-//mybatis.org//DTD Mapper 3.0//EN" "http://mybatis.org/dtd/mybatis-3-mapper.dtd">
<mapper namespace="com.siwuxie095.mapper.UserMapper">
<select id="getUser" resultType="User"> select * from t_user where uid = #{uid} </select>
</mapper> |
(4)在 MyBatis 核心配置文件中进行配置
<?xml version="1.0" encoding="UTF-8" ?> <!DOCTYPE configuration PUBLIC "-//mybatis.org//DTD Config 3.0//EN" "http://mybatis.org/dtd/mybatis-3-config.dtd">
<configuration>
<settings> <!-- 开启自动驼峰命名规则映射 --> <setting name="mapUnderscoreToCamelCase" value="true"/> </settings>
<!-- 配置类型别名 --> <typeAliases> <typeAlias type="com.siwuxie095.entity.User" alias="User"/> </typeAliases>
<!-- 引入映射配置文件 --> <mappers> <package name="com.siwuxie095.mapper"/> </mappers>
</configuration> |
(5)在数据库连接信息的属性文件中进行配置
jdbc.properties:
jdbc.driverClassName=com.mysql.jdbc.Driver
jdbc.url=jdbc:mysql:///test_db
jdbc.username=root
jdbc.password=8888 |
其中:
jdbc:mysql:///test_db 是 jdbc:mysql://localhost:3306/test_db 的简写
(6)在 Spring 核心配置文件中进行配置
applicationContext.xml:
<?xml version="1.0" encoding="UTF-8"?> <beans xmlns="http://www.springframework.org/schema/beans" xmlns:xsi="http://www.w3.org/2001/XMLSchema-instance" xmlns:aop="http://www.springframework.org/schema/aop" xmlns:context="http://www.springframework.org/schema/context" xmlns:tx="http://www.springframework.org/schema/tx" xsi:schemaLocation=" http://www.springframework.org/schema/beans http://www.springframework.org/schema/beans/spring-beans.xsd http://www.springframework.org/schema/aop http://www.springframework.org/schema/aop/spring-aop.xsd http://www.springframework.org/schema/context http://www.springframework.org/schema/context/spring-context.xsd http://www.springframework.org/schema/tx http://www.springframework.org/schema/tx/spring-tx.xsd">
<!-- 使用spring自带的占位符替换功能 --> <bean class="org.springframework.beans.factory.config.PropertyPlaceholderConfigurer">
<!-- 允许JVM参数覆盖 --> <property name="systemPropertiesModeName" value="SYSTEM_PROPERTIES_MODE_OVERRIDE"/>
<!-- 忽略没有找到的资源文件 --> <property name="ignoreResourceNotFound" value="true"/>
<!-- 配置资源文件(也称 外部属性文件) --> <property name="locations"> <list> <value>classpath:jdbc.properties</value> </list> </property>
</bean>
<!-- 配置 BoneCP 连接池 --> <bean id="dataSource" class="com.jolbox.bonecp.BoneCPDataSource" destroy-method="close">
<!-- 数据库驱动 --> <property name="driverClass" value="${jdbc.driverClassName}" />
<!-- 相应驱动的jdbcUrl --> <property name="jdbcUrl" value="${jdbc.url}" />
<!-- 数据库的用户名 --> <property name="username" value="${jdbc.username}" />
<!-- 数据库的密码 --> <property name="password" value="${jdbc.password}" />
<!-- 检查数据库连接池中空闲连接的间隔时间,单位是分,默认值:240,如果要取消则设置为0 --> <property name="idleConnectionTestPeriod" value="60" />
<!-- 连接池中未使用的链接最大存活时间,单位是分,默认值:60,如果要永远存活设置为0 --> <property name="idleMaxAge" value="30" />
<!-- 每个分区最大的连接数 --> <property name="maxConnectionsPerPartition" value="150" />
<!-- 每个分区最小的连接数 --> <property name="minConnectionsPerPartition" value="5" />
</bean>
<!-- 将 SqlSessionFactory 对象的创建交给 Spring 进行管理 --> <bean id="sqlSessionFactory" class="org.mybatis.spring.SqlSessionFactoryBean"> <!-- 指定数据源 --> <property name="dataSource" ref="dataSource" /> <!-- 指定 MyBatis 核心配置文件的位置(路径) --> <property name="configLocation" value="classpath:mybatis-config.xml"></property> </bean>
<!-- 配置映射器接口(Mapper 接口)的扫描包 --> <bean class="org.mybatis.spring.mapper.MapperScannerConfigurer"> <!-- 如有多个包,以逗号 或 分号隔开即可 --> <property name="basePackage" value="com.siwuxie095.mapper"/> </bean>
<!-- 配置映射器接口(以下方法二选一即可,这里选择法二):
法一:逐个配置:配置映射器接口(Mapper 接口)的对象
<bean id="userMapper" class="org.mybatis.spring.mapper.MapperFactoryBean"> <property name="mapperInterface" value="com.siwuxie095.mapper.UserMapper"/> <property name="sqlSessionFactory" ref="sqlSessionFactory"/> </bean>
法二:统一配置:配置映射器接口(Mapper 接口)的扫描包
<bean class="org.mybatis.spring.mapper.MapperScannerConfigurer"> <property name="basePackage" value="com.siwuxie095.mapper"/> </bean>
-->
</beans> |
(7)编写一个单元测试类
UserMapperTest.java:
package com.siwuxie095.test;
import org.junit.Test; import org.springframework.context.ApplicationContext; import org.springframework.context.support.ClassPathXmlApplicationContext;
import com.siwuxie095.entity.User; import com.siwuxie095.mapper.UserMapper;
public class UserMapperTest {
/** * 手动加上 @Test 以进行单元测试(将自动导入 JUnit 4 的 jar 包) * * 选中方法名,右键->Run As->JUint Test */ @Test public void testGetUser() { ApplicationContext applicationContext = new ClassPathXmlApplicationContext("applicationContext.xml");
UserMapper userMapper = (UserMapper) applicationContext.getBean(UserMapper.class);
User user = userMapper.getUser(1); System.out.println(user); }
} |
【made by siwuxie095】