一: 下载MySQL安装包
下载地址为:https://dev.mysql.com/downloads/mysql/
如果遇到下载失败的问题,可以尝试从清华大学的开源镜像站下载地址: https://mirrors.tuna.tsinghua.edu.cn/mysql/downloads/MySQL-8.0/
这里我们建议使用Linux-Generic版本。然后选择64位版本。如下图所示:
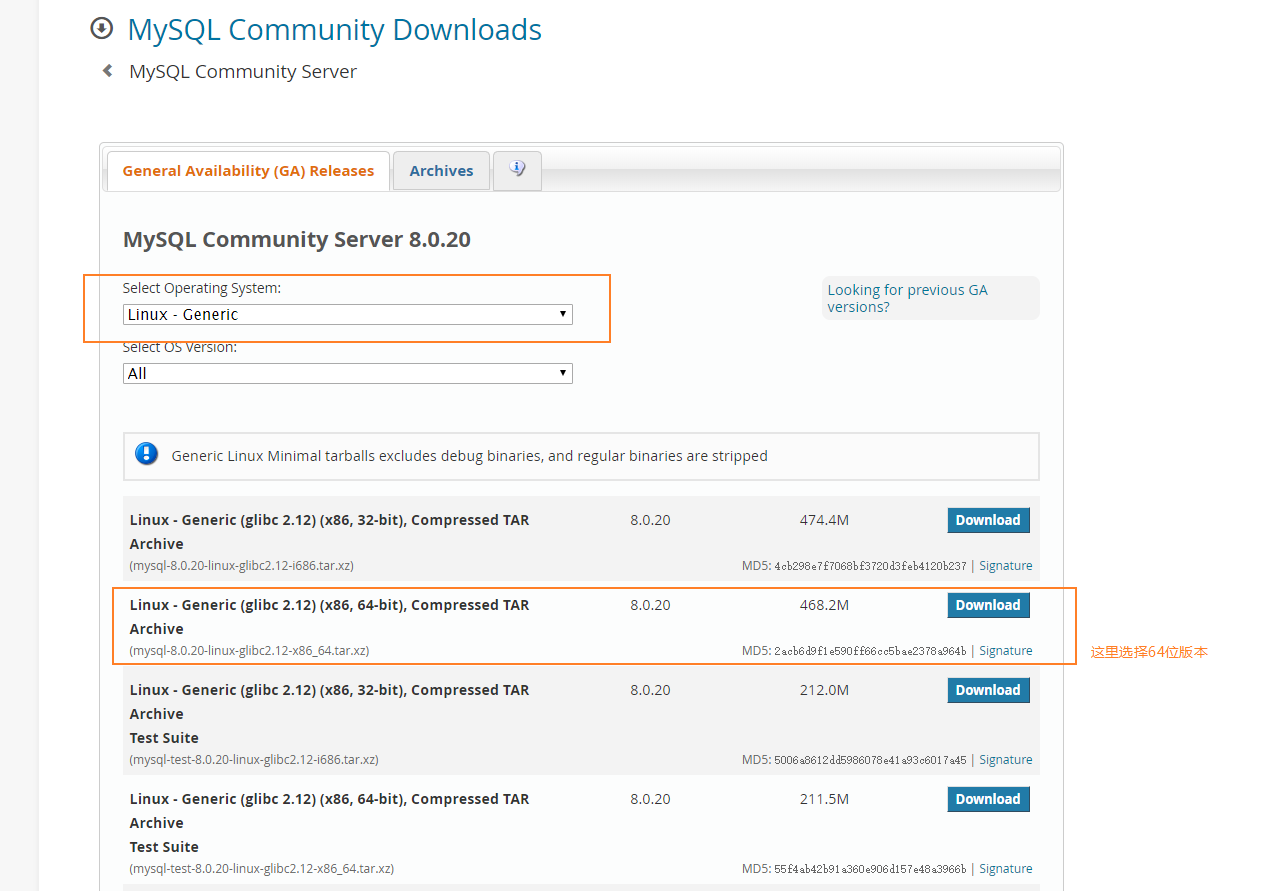
Linux下载:
wget https://cdn.mysql.com//Downloads/MySQL-8.0/mysql-8.0.20-linux-glibc2.12-x86_64.tar.xz
PS:这里解释一下为何不通过编译安装呢??
因为编译安装步骤繁琐,对于新手来说很不友好。而且不要相信编译安装性能更好的鬼话。这里我相信编译安装可能会有性能的提升。但是我想说的是,难道官方编译之后的性能不好吗?通用安装包就是官方编译之后放出的版本,相当于绿色版。
二:安装部署
1. 创建MySQL用户
shell> groupadd mysql
shell> useradd -r -g mysql mysql
2.指定MySQL安装路径
shell> xz -d mysql-8.0.20-linux-glibc2.12-x86_64.tar.xz
shell> tar xvf mysql-8.0.20-linux-glibc2.12-x86_64.tar
#这里我们使用软链接的方式 要保留原来的安装包以及文件
shell> ln -s mysql-8.0.20-linux-glibc2.12-x86_64 mysql
shell> cd mysql
shell> mkdir mysql-files
shell> chmod 700 mysql-files
shell> chown -R mysql .
shell> chgrp -R mysql .
shell> bin/mysqld --initialize --user=mysql #MySQL 5.7.6 and UP
2020-05-09T03:16:30.314616Z 0 [System] [MY-013169] [Server] /usr/local/mysql-8.0.20-linux-glibc2.12-x86_64/bin/mysqld (mysqld 8.0.20) initializing of server in progress as process 1496
2020-05-09T03:16:30.337183Z 1 [System] [MY-013576] [InnoDB] InnoDB initialization has started.
2020-05-09T03:16:31.451464Z 1 [System] [MY-013577] [InnoDB] InnoDB initialization has ended.
2020-05-09T03:16:32.534992Z 6 [Note] [MY-010454] [Server] A temporary password is generated for root@localhost: %*jr<?Xf9qDc
shell> bin/mysql_ssl_rsa_setup #MySQL 5.7.6 and UP
shell> chown -R root .
shell> chown -R mysql data mysql-files
#命令行启动
shell> bin/mysqld_safe --user=mysql &
#脚本启动
shell> cp support-files/mysql.server /etc/init.d/mysql.server
shell>  /etc/init.d/mysql.server start
#至此MySQL已经成功安装了
3. 配置MySQL环境变量
vim /etc/profile
# 添加如下两行
PATH=/usr/local/mysql/bin:$PATH
export PATH
#使其生效
source /etc/profile
执行MySQL命令时,会报错,错误如下:
shell> mysql
mysql: error while loading shared libraries: libtinfo.so.5: cannot open shared object file: No such file or directory
解决方法:
shell> ln -s /usr/lib64/libtinfo.so.6.1 /usr/lib64/libtinfo.so.5
4. 登录进行验证
[root@c8-node2 mysql]# mysql -uroot -p'%*jr<?Xf9qDc'
mysql: [Warning] Using a password on the command line interface can be insecure.
Welcome to the MySQL monitor.  Commands end with ; or g.
Your MySQL connection id is 10
Server version: 8.0.20

Copyright (c) 2000, 2020, Oracle and/or its affiliates. All rights reserved.

Oracle is a registered trademark of Oracle Corporation and/or its
affiliates. Other names may be trademarks of their respective
owners.

Type 'help;' or 'h' for help. Type 'c' to clear the current input statement.

mysql> show databases;
ERROR 1820 (HY000): You must reset your password using ALTER USER statement before executing this statement.
mysql>
此时会告诉你,必须修改密码。
5. 接下来进行安全设置
[root@c8-node2 mysql]# mysql_secure_installation

Securing the MySQL server deployment.

Enter password for user root:   #这里输入临时生成的密码

The existing password for the user account root has expired. Please set a new password.

New password:

Re-enter new password:

VALIDATE PASSWORD COMPONENT can be used to test passwords
and improve security. It checks the strength of password
and allows the users to set only those passwords which are
secure enough. Would you like to setup VALIDATE PASSWORD component?

Press y|Y for Yes, any other key for No: y  #是否启用验证密码组件,这里选择启用

There are three levels of password validation policy:

LOW    Length >= 8
MEDIUM Length >= 8, numeric, mixed case, and special characters
STRONG Length >= 8, numeric, mixed case, special characters and dictionary                  file

Please enter 0 = LOW, 1 = MEDIUM and 2 = STRONG: 2     #这里选择密码的安全策略,强壮的
Using existing password for root.

Estimated strength of the password: 100
Change the password for root ? ((Press y|Y for Yes, any other key for No) : Y

New password:

Re-enter new password:

Estimated strength of the password: 100
Do you wish to continue with the password provided?(Press y|Y for Yes, any other key for No) : y
By default, a MySQL installation has an anonymous user,
allowing anyone to log into MySQL without having to have
a user account created for them. This is intended only for
testing, and to make the installation go a bit smoother.
You should remove them before moving into a production
environment.

Remove anonymous users? (Press y|Y for Yes, any other key for No) : y #删除匿名用户
Success.


Normally, root should only be allowed to connect from
'localhost'. This ensures that someone cannot guess at
the root password from the network.

Disallow root login remotely? (Press y|Y for Yes, any other key for No) : y  #拒绝root用户远程连接
Success.

By default, MySQL comes with a database named 'test' that
anyone can access. This is also intended only for testing,
and should be removed before moving into a production
environment.


Remove test database and access to it? (Press y|Y for Yes, any other key for No) : y  #删除test数据库
 - Dropping test database...
Success.

 - Removing privileges on test database...
Success.

Reloading the privilege tables will ensure that all changes
made so far will take effect immediately.

Reload privilege tables now? (Press y|Y for Yes, any other key for No) : y  #权限重载
Success.

All done!
此时使用新密码登录,进行验证。MySQL安装基本已经完成了。
三:关于配置
我们查看一下MySQL8.0的配置文件读取顺序,应该跟之前的版本是一致的。
[root@c8-node2 mysql]# /usr/local/mysql/bin/mysqld --verbose --help|grep -A 1 'Default options'
Default options are read from the following files in the given order:
/etc/my.cnf /etc/mysql/my.cnf /usr/local/mysql/etc/my.cnf ~/.my.cnf
关于字符集,MySQL8.0的默认字符集已经改为了uf8mb4了,这是福音,也是潮流吧。这里我们没有更改配置文件,我们这样安装之后,根本也没有配置文件。
[root@c8-node2 mysql]# mysql -uroot -p
Enter password:
Welcome to the MySQL monitor.  Commands end with ; or g.
Your MySQL connection id is 19
Server version: 8.0.20 MySQL Community Server - GPL

Copyright (c) 2000, 2020, Oracle and/or its affiliates. All rights reserved.

Oracle is a registered trademark of Oracle Corporation and/or its
affiliates. Other names may be trademarks of their respective
owners.

Type 'help;' or 'h' for help. Type 'c' to clear the current input statement.

mysql> show variables like 'character%';
+--------------------------+----------------------------------------------------------------+
| Variable_name            | Value                                                          |
+--------------------------+----------------------------------------------------------------+
| character_set_client     | utf8mb4                                                        |
| character_set_connection | utf8mb4                                                        |
| character_set_database   | utf8mb4                                                        |
| character_set_filesystem | binary                                                         |
| character_set_results    | utf8mb4                                                        |
| character_set_server     | utf8mb4                                                        |
| character_set_system     | utf8                                                           |
| character_sets_dir       | /usr/local/mysql-8.0.20-linux-glibc2.12-x86_64/share/charsets/ |
+--------------------------+----------------------------------------------------------------+
8 rows in set (0.00 sec)
未完待续~~~