Android控件之CheckBox
1 CheckBox实现方式
在介绍CheckBox的实现方式之前,先看看CheckBox类的父类。
java.lang.Object
↳ android.view.View
↳ android.widget.TextView
↳ android.widget.Button
↳ android.widget.CompoundButton
↳ android.widget.CheckBox
从中我们可以看出CheckBox继承与Button。所以,Button的实现方式都适用于CheckBox。
另外,CheckBox的直接父类是CompoundButton;所以,它也可以通过实现CompoundButton.OnCheckedChangeListener来实现CheckBox功能。参考如下:
public class CheckBoxTest extends Activity {
    ...
    private CheckBox mCheck;
    ...


    @Override
    protected void onCreate(Bundle savedInstanceState) {

        ...
        // CheckBox实现方式
        mCheck.setOnCheckedChangeListener(new CompoundButton.OnCheckedChangeListener() {
            @Override
            public void onCheckedChanged(CompoundButton buttonView, boolean isChecked) {
                // 按键处理...
            }
        });
        ...
    }
}
2 应用实例
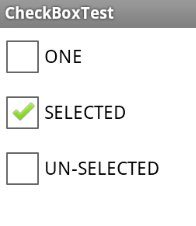
新建一个activity,有3个CheckBox。
第一个CheckBox显示为“ONE”。
第二个CheckBox显示为“TWO”。点击选中的话,显示“SELECTED”;未选中的话,显示“UN-SELECTED”。实现方式为通过实现OnCheckedChangeListener。
第三个CheckBox显示为“THREE”。点击选中的话,显示“SELECTED”;未选中的话,显示“UN-SELECTED”。实现方式为通过实现OnClickListener。
应用程序源码
package com.skywang.control;

import android.os.Bundle;
import android.app.Activity;
import android.view.Menu;
import android.view.View;
import android.widget.CheckBox;
import android.widget.CompoundButton;
import android.view.View.OnClickListener;
import android.util.Log;

public class CheckBoxTest extends Activity implements View.OnClickListener{

    private static final String TAG = "SKYWANG";

    private CheckBox mCheckTwo;
    private CheckBox mCheckThree;
    @Override
    protected void onCreate(Bundle savedInstanceState) {
        super.onCreate(savedInstanceState);
        setContentView(R.layout.check_box_test);

        // 设置CheckBox
        mCheckTwo = (CheckBox) findViewById(R.id.check_two);
        // 设置CheckBox监听函数
        mCheckTwo.setOnClickListener(this);

        // 设置CheckBox
        mCheckThree = (CheckBox) findViewById(R.id.check_three);
        // 设置CheckBox的check监听函数
        mCheckThree.setOnCheckedChangeListener(new CompoundButton.OnCheckedChangeListener(){
            public void onCheckedChanged(CompoundButton buttonView, boolean isChecked){
                if (isChecked) {
                    // 若按钮是选中状态;则设置按钮的文本为“SELECTED”
                    buttonView.setText(getString(R.string.text_sel));
                } else {
                    // 若按钮是未选中状态;则设置按钮的文本为“UN-SELECTED”
                    buttonView.setText(getString(R.string.text_unsel));
                }
            }
        });
    }

    @Override
    public void onClick(View v) {
        switch (v.getId()) {
            case R.id.check_two: {
                if (mCheckTwo.isChecked()) {
                    // 若按钮是选中状态;则设置按钮的文本为“SELECTED”
                    mCheckTwo.setText(getString(R.string.text_sel));
                } else {
                    // 若按钮是未选中状态;则设置按钮的文本为“UN-SELECTED”
                    mCheckTwo.setText(getString(R.string.text_unsel));
                }
                break;
            }
            default:
                break;
        }
    }
}
layout文件
<LinearLayout xmlns:android="http://schemas.android.com/apk/res/android"
    xmlns:tools="http://schemas.android.com/tools"
    android:layout_width="match_parent"
    android:layout_height="match_parent"
    android:orientation="vertical">

    <CheckBox
        android:id="@+id/check_one"
        android:layout_width="wrap_content"
        android:layout_height="wrap_content"
        android:text="@string/text_one" />

    <CheckBox
        android:id="@+id/check_two"
        android:layout_width="wrap_content"
        android:layout_height="wrap_content"
        android:text="@string/text_two" />

    <CheckBox
        android:id="@+id/check_three"
        android:layout_width="wrap_content"
        android:layout_height="wrap_content"
        android:text="@string/text_three" />

</LinearLayout>
manifest文件
<?xml version="1.0" encoding="utf-8"?>
<manifest xmlns:android="http://schemas.android.com/apk/res/android"
    package="com.skywang.control"
    android:versionCode="1"
    android:versionName="1.0" >

    <uses-sdk
        android:minSdkVersion="8"
        android:targetSdkVersion="17" />

    <application
        android:allowBackup="true"
        android:icon="@drawable/ic_launcher"
        android:label="@string/app_name"
        android:theme="@style/AppTheme" >
        <activity
            android:name="com.skywang.control.CheckBoxTest"
            android:label="@string/app_name" >
            <intent-filter>
                <action android:name="android.intent.action.MAIN" />

                <category android:name="android.intent.category.LAUNCHER" />
            </intent-filter>
        </activity>
    </application>

</manifest>
点击下载:源代码
程序效果截图