功能:使用TableLayout来管理组件的布局
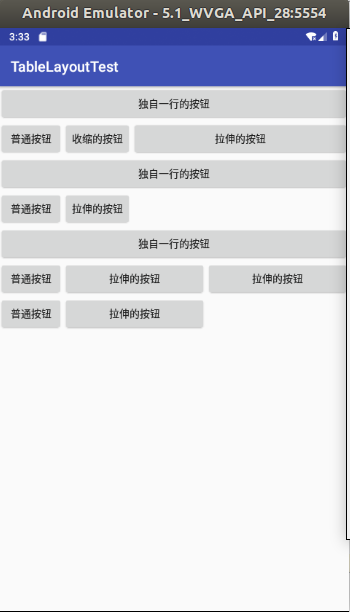
效果图:
activity_main.xml
<?xml version="1.0" encoding="utf-8"?>
<LinearLayout xmlns:android="http://schemas.android.com/apk/res/android"
    xmlns:app="http://schemas.android.com/apk/res-auto"
    xmlns:tools="http://schemas.android.com/tools"
    android:layout_width="match_parent"
    android:layout_height="match_parent"
    tools:context=".MainActivity"
    android:orientation="vertical">
    <!--定义死一个表格布局,指定第二列允许收缩,第三列允许拉伸-->
    <TableLayout android:id="@+id/TableLayout01"
        android:layout_width="match_parent"
        android:layout_height="wrap_content"
        android:shrinkColumns="1"
        android:stretchColumns="2">
        <!--表格内容接下来详细讲解-->
        <!--直接添加按钮,它自己会占一行-->
        <Button android:id="@+id/ok1"
            android:layout_width="wrap_content"
            android:layout_height="wrap_content"
            android:text="独自一行的按钮"/>
        <!--添加一个表格行-->
        <TableRow>
            <Button android:id="@+id/ok2"
                android:layout_width="wrap_content"
                android:layout_height="wrap_content"
                android:text="普通按钮"/>
            <Button android:id="@+id/ok3"
                android:layout_width="wrap_content"
                android:layout_height="wrap_content"
                android:text="收缩的按钮"/>
            <Button android:id="@+id/ok4"
                android:layout_width="wrap_content"
                android:layout_height="wrap_content"
                android:text="拉伸的按钮"/>
        </TableRow>

    </TableLayout>

    <!--定义第二个表格布局,指定第二列隐藏-->
    <TableLayout android:id="@+id/TableLayout02"
        android:layout_width="match_parent"
        android:layout_height="wrap_content"
        android:collapseColumns="1">
        <!--表格内容接下来详解-->
        <Button android:id="@+id/ok5"
            android:layout_width="wrap_content"
            android:layout_height="wrap_content"
            android:text="独自一行的按钮"/>
        <!--添加一个表格行-->
        <TableRow>
            <Button android:id="@+id/ok6"
                android:layout_width="wrap_content"
                android:layout_height="wrap_content"
                android:text="普通按钮"/>
            <Button android:id="@+id/ok7"
                android:layout_width="wrap_content"
                android:layout_height="wrap_content"
                android:text="隐藏按钮"/>
            <Button android:id="@+id/ok8"
                android:layout_width="wrap_content"
                android:layout_height="wrap_content"
                android:text="拉伸的按钮"/>
        </TableRow>

    </TableLayout>

    <!--定义第三个表格布局,指定第二列和第三列可以被拉伸-->
    <TableLayout android:id="@+id/TableLayout03"
        android:layout_width="match_parent"
        android:layout_height="wrap_content"
        android:stretchColumns="1,2">
        <!--表格内容接下来详细讲解-->
        <Button android:id="@+id/ok9"
            android:layout_width="wrap_content"
            android:layout_height="wrap_content"
            android:text="独自一行的按钮"/>
        <!--添加一个表格行-->
        <TableRow>
            <Button android:id="@+id/ok10"
                android:layout_width="wrap_content"
                android:layout_height="wrap_content"
                android:text="普通按钮"/>
            <Button android:id="@+id/ok11"
                android:layout_width="wrap_content"
                android:layout_height="wrap_content"
                android:text="拉伸的按钮"/>
            <Button android:id="@+id/ok12"
                android:layout_width="wrap_content"
                android:layout_height="wrap_content"
                android:text="拉伸的按钮"/>
        </TableRow>
        <!--定义一个表格行-->
        <TableRow>
            <Button android:id="@+id/ok13"
                android:layout_width="wrap_content"
                android:layout_height="wrap_content"
                android:text="普通按钮"/>
            <Button android:id="@+id/ok14"
                android:layout_width="wrap_content"
                android:layout_height="wrap_content"
                android:text="拉伸的按钮"/>
        </TableRow>

    </TableLayout>

</LinearLayout>
上面页面中定义了3个TableLayout,3个TableLayout中粗体字代码指定了它们对各列的控制行为。
- 第1个TableLayout,指定第2列允许收缩,第3列允许拉伸。
- 第2个TableLayout,指定第二列被隐藏。
- 第3个TableLayout,指定第2列和第3列允许拉伸
注意:在上面的界面布局文件中我们直接把按钮上的文本写在布局文件中,这不是一种好的做法,因为Android推荐将这些字符串集中放到XML文件中管理。但此处为了编程简单,所以直接在XML布局文件中给出了按钮文本的字符串。
帧布局
效果图:

帧布局由FrameLayout所代表,FrameLayout直接继承了ViewGroup组件。
帧布局容器为每个加入其中的组件创建一个空白的区域(称为一帧),每个子组件占据一帧,这些帧都会根据gravity属性执行自动对齐。
FrameLayout常用的XML属性及相关方法说明:
XML属性&相关方法
android:foreground——setForeground(Drawable)
设置该帧布局的前景图像
android:foregroundGravity——setForegroundGravity(int)
定义绘制前景图像的gravity属性
FrameLayout包含的子元素也受FrameLayout.LayoutParams控制。因此它所包含的子元素也可指定android:layout_gravity属性,该属性控制该子元素在FrameLayout中的对齐方式。
下面示范了帧布局的用法,可以看到6个TextView叠加在一起,上面的TextView遮住下面的TextView。下面是帧布局页面定义代码:
<?xml version="1.0" encoding="utf-8"?>
<FrameLayout xmlns:android="http://schemas.android.com/apk/res/android"
    android:layout_width="match_parent"
    android:layout_height="match_parent">

    <!--依次定义6个TextView,先定义的TextView位于底层,后定义的TextView位于上层-->
    <TextView
        android:id="@+id/view01"
        android:layout_width="wrap_content"
        android:layout_height="wrap_content"
        android:layout_gravity="center"
        android:width="160pt"
        android:height="160pt"
        android:background="#f00"/>
    <TextView
        android:id="@+id/view02"
        android:layout_width="wrap_content"
        android:layout_height="wrap_content"
        android:layout_gravity="center"
        android:width="130pt"
        android:height="130pt"
        android:background="#0f0"/>
    <TextView
        android:id="@+id/view03"
        android:layout_width="wrap_content"
        android:layout_height="wrap_content"
        android:layout_gravity="center"
        android:width="100pt"
        android:height="100pt"
        android:background="#00f"/>
    <TextView
        android:id="@+id/view04"
        android:layout_width="wrap_content"
        android:layout_height="wrap_content"
        android:layout_gravity="center"
        android:width="70pt"
        android:height="70pt"
        android:background="#ff0"/>
    <TextView
        android:id="@+id/view05"
        android:layout_width="wrap_content"
        android:layout_height="wrap_content"
        android:layout_gravity="center"
        android:width="40pt"
        android:height="40pt"
        android:background="#f0f"/>
    <TextView
        android:id="@+id/view06"
        android:layout_width="wrap_content"
        android:layout_height="wrap_content"
        android:layout_gravity="center"
        android:width="10pt"
        android:height="10pt"
        android:background="#0ff"/>

</FrameLayout>
这6个TextView的高度、宽度逐渐减少——这样可以保证最先添加的TextView的背景色渐变。