1.前言
本文主要对Linux下的input子系统进行介绍
2. 软件架构

图 input子系统结构图
input子系统主要包括三个部分:设备驱动层、核心层和事件层。我们可以分别理解为:具体的输入设备、过度设备和逻辑设备。对于用户空间来说与之直接交互的只有逻辑设备也就是事件层。
Input子系统主要包含两条路径(主要讲述第一条路径):
- 第一条路径
设备驱动层捕获事件并向核心层报告->核心层将事件交由事件层处理->用户空间读取事件层处理的数据
- 第二条路径
用户空间写入事件数据->事件层生成事件->调用核心层传递事件信息给驱动层->设备驱动层驱动硬件设备
3.系统组件之间的关联
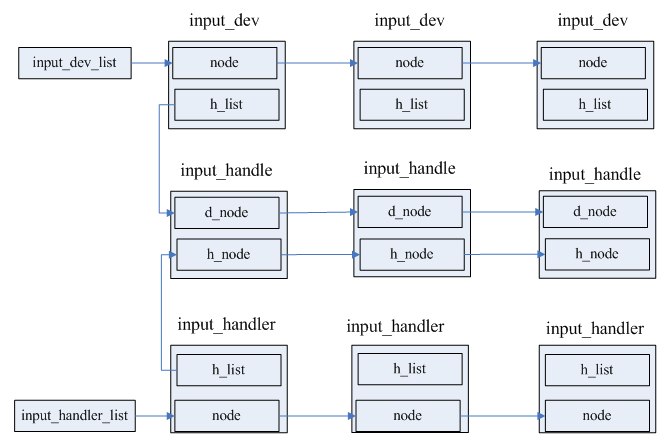
图 input_dev input_handle input_handler之间的关联
通常input_dev、 input_handle、input_handler三者的关系如上图所示。
- input_dev
input_dev通过node链接进全局链表input_dev_list中;通过h_list将与其关联的所有input_handle链接起来,这说明每个input_dev可能会有多个handle与其连接
- input_handler
input_handler通过node节点链接进全局链表input_handler_list中;通过h_list将与其关联的所有input_handle链接起来,这说明每个input_handler可能会有多个handle与其连接
4. 系统组件
4.1 input_handle
| Elemete Name | input_handle |
| Path | include/linux/input.h |
| Responsiblities |
用于连接input_dev和input_handler,由input_handler创建 |
| Attributions |
|
| Operations |
4.2 input_dev
| Elemete Name | input_dev |
| Path | include/linux/input.h |
| Responsiblities |
代表一个input设备,如按键设备、触摸屏设备等 |
| Attributions |
|
| Operations |
4.3 input_handler
| Elemete Name | input_handler |
| Path | include/linux/input.h |
| Responsiblities |
input_dev的逻辑表示,用于和用户空间交互,为input_dev实现一堆接口 |
| Attributions |
|
| Operations |
4.4 evdev
| Elemete Name | evdev |
| Path | drivers/input/evdev.c |
| Responsiblities |
Evdev是最上层代表 input设备的结构体,它代表一个字符设备,用户可以open ,close等等fop操作 |
| Attributions |
|
| Operations |
4.5 evdev_client
| Elemete Name | evdev_client |
| Path | drivers/input/evdev.c |
| Responsiblities |
Evdev_client代表打开evdev设备的用户,用来管理input event buffer |
| Attributions |
|
| Operations |
5.关键流程
5.1 input_init
input_init->
class_register(&input_class)
input_proc_init()
register_chrdev_region->
__register_chrdev_region
主要完成了input子系统的注册(通过注册subsys->kobject),同时创建字符设备char_device_struct,并将指针插入到全局哈希表chrdevs中
- class_register
class_register实际上是分配struct subsys_private并放到全局的kobject层级结构中。
我们知道内核中任何一个设备或类的实体的元模型就是kobject,任何一个设备或类都将其kobject放入到全局kobject层级结构中。
而kset可以理解为是kobject的容器,一个子系统与一个kset是对应的。
subsys_private是对kset的进一步封装,其中的成员变量struct kset subsys就代表子系统,
class_register实际完成的工作就是将subsys->kobject放入到全局的kobject层级结构中,从而完成了子系统的注册。
- input_proc_init
创建/proc/bus/input/devices和/proc/bus/input/handlers两个目录。

  cat /proc/bus/input/devices可以看到当前系统注册了哪些input设备;

  cat /proc/bus/input/handlers可以看到当前系统注册了哪些handlers
- register_chrdev_region(MKDEV(INPUT_MAJOR, 0),INPUT_MAX_CHAR_DEVICES, "input")
主要用来分配次设备号。从主设备号INPUT_MAJOR(13),次设备号0开始,注册INPUT_MAX_CHAR_DEVICES(1024)个设备,所有设备有一个共同的名字”input”。
核心是调用__register_chrdev_region,后者会对每一个字符设备分配一个char_device_struct结构体,并将结构体指针插入到全局chrdevs哈希表中。
5.2 input_register_device
input_register_device->
devres_alloc
__set_bit(EV_SYN, dev->evbit)
__clear_bit(KEY_RESERVED, dev->keybit)
input_cleanse_bitmasks(dev)
input_estimate_events_per_packet
init_timer(&dev->timer)
dev_set_name
device_add
kobject_get_path
list_add_tail
input_attach_handler->
input_match_device
input_wakeup_procfs_readers
input_register_device首先设置了相关的属性支持事件等,然后调用device_add将input_dev注册进设备驱动模型,同时连接进全局链表input_dev_list中,注册过程中会匹配handler,调用handler->connect,实际上handle的创建就是在connect 中完成的,后文会提到。
- devres_alloc
如果采用设备资源框架来分配则调用此函数分配input_dev,用此种方法分配的input_dev无需ungegister 或 free;
- __set_bit(EV_SYN, dev->evbit)
每个设备都支持EV_SYN事件;
- __clear_bit(KEY_RESERVED, dev->keybit)
KEY_RESERVED不支持发送给用户空间;
- input_cleanse_bitmasks(dev)
确保除了设置显示支持的事件以外,其它事件都被清空;
- input_estimate_events_per_packet
估算每个packet包含的事件长度,主要鼠标和触摸屏用到;
dev->max_vals = max(dev->hint_events_per_packet, packet_size) + 2;
dev->vals = kcalloc(dev->max_vals, sizeof(*dev->vals), GFP_KERNEL);
- init_timer(&dev->timer)
初始化自动重复发送定时器,定时器处理函数为input_repeat_key,默认按下超过250ms开启自动开启重复发送按键,每33ms发送一次;
- dev_set_name(&dev->dev, "input%ld", (unsigned long) atomic_inc_return(&input_no) - 1);
设置input设备的名字
- device_add
这个是 input设备注册的核心语句,完成向设备驱动模型的注册。
- kobject_get_path(&dev->dev.kobj, GFP_KERNEL)
获取sysfs中设备的节点路径
- list_add_tail(&dev->node, &input_dev_list)
向全局input_dev_list加入此节点
- list_for_each_entry(handler, &input_handler_list, node)
- input_attach_handler(dev, handler);
从全局的input_handler_list遍历每个handler执行input_attach_handler,完成input_device和input_handler的连接,一旦匹配成功,将调用handler->connect函数
- wait_wakeup_procfs_readers
5.3 input_register_handler
input_register_handler->
list_add_tail
input_attach_handler->
evdev_connect->
kzalloc(sizeof(struct evdev), GFP_KERNEL)
init_waitqueue_head
dev_set_name(&evdev->dev, "event%d", dev_no)
device_initialize(&evdev->dev)
input_register_handle(&evdev->handle)
cdev_init
cdev_add
device_add
以evdev handler为例,在注册input_handler过程中一旦与input_dev匹配将通过handler->connect创建handle并注册之,同时connect将完成evdev的初始化,并为整个input子系统添加一个字符设备,evdev作为一个device还将通过devcie_add注册进设备驱动模型
- list_add_tail
将handler加入到全局input_handler_list链表中,便于遍历;
- list_for_each_entry(dev, &input_dev_list, node)
- input_attach_handler(dev, handler);
对input_dev_list全局input_dev链表遍历,建立input_dev与input_handler的关联。实际上input_match_device匹配成功,会handler->connect来创建对应的handle
- evdev_connect
(1)kzalloc(sizeof(struct evdev), GFP_KERNEL)分配一个evdev结构体;

(2)init_waitqueue_head(&evdev->wait);初始化等待队列;

(3)dev_set_name(&evdev->dev, "event%d", dev_no);设置evdev的名字

(4)初始化evdev->handle成员变量;

(5)device_initialize(&evdev->dev),evdev是一个device,需要加入设备驱动模型,此处初始化device;

(6)input_register_handle(&evdev->handle)注册input_handle,见下文

(7)cdev_init(&evdev->cdev, &evdev_fops)初始化evdev->cdev字符设备的fos为evdev_fops

(8)cdev_add(&evdev->cdev, evdev->dev.devt, 1)将cdev设备注册进系统,此处可以看出整个input子系统只注册一个字符设备。
5.4 input_handle_register
input_handle注册,主要将handle->d_node连入对应的input_dev->h_list链表;主要将handle->d_node连入对应的input_handler->h_list链表;
5.5 evdev_open
evdev_open->
evdev_compute_buffer_size
kzalloc(size, GFP_KERNEL | __GFP_NOWARN)
evdev_attach_client
evdev_open_device
- evdev_compute_buffer_size
计算需要分配的存放事件的buffer大小
- kzalloc(size, GFP_KERNEL | __GFP_NOWARN)
创建evdev_client代表有一个用户打开了此设备。
- evdev_attach_client
建立evdev_client与evdev的关联
- evdev_open_device(evdev)
增加open的引用计数,调用input_open_device (&evdev->handle),后者最终会调用input_dev->open函数
5.6 evdev_read
evdev_read->
evdev_fetch_next_event
input_event_to_user
wait_event_interruptible
- evdev_fetch_next_event
for循环中通过此函数来从evdev_client->buffer取出一个input_event
- input_event_to_user
将input event解析完后发送给user buffer;
- wait_event_interruptible
如果file->f_flags定义为非O_NONBLOCK则代表是阻塞,如果buffer里面没有数据则会在此处阻塞等待,直到有数据将其唤醒(可参照后面的解释)
5.7 input_event
input_event->
input_handle_event->
input_pass_values->
input_to_handler->
handler->event, evdev_event->
evdev_events->
evdev_pass_values->
__pass_event
wake_up_interruptible
input_event会在input_report_key等被调用,不同的事件会进行不同的封装。此函数最终将input event上报存放在evdev_client的buffer里面供用户层取用,如果定义为阻塞,则此处需要唤醒阻塞的读。
5.8. evdev_write
evdev_write->
input_event_from_user
input_inject_event->
input_handle_event
- input_event_from_user
将用户空间数据拷贝到evdev_client->buffer中;
- input_inject_event
将根据事件方向调用input_handle_event进行写入,应用场景可以是震动马达,LED灯点亮等