一、Cacti安装说明
一般性的安装说明,详细的操作系统具体的安装说明可用于Linux.
2.服务器安装要求
- RRDTool 1.2.x或更高版本
- MySQL 4.1.x或5.x更高版本
- PHP 4.3.6,5.x或更高版本
- Apache 2.2或者更高版本
- Perl 5.10.1 或者更高版本
二、安装在Unix/Linux下
验证httpd和mysqld是在系统启动时启动,确保yum源是原始的源。
2.需要包基于yum的操作系统
- php
- httpd
- php-mysql
- php-snmp
- php-ldap (when using LDAP authentication)
- php-xml
- mysql
- mysql-server
- mysql-devel
- net-snmp (depending on the distro, net-snmp-utils may be required)
- Spine (depending on the net-snmp-devel openssl-devel may be required)
- crond (cron, cronie or the like)
- gcc
- gcc-c++
- Perl
- Perl-libwww-perl
- Python
- Python easy_install
3 。对于安装官方补丁,您将需要一些工具
1.1 php安装步骤
- 使用root用户登录服务器
#yum makecache#yum install php-xml php-mysql php-snmp php-ldap php-pdo php-devel php
- 安装成功
- 参考php配置文件修改
1.2 RRDTool安装步骤
- 使用root用户登录服务器
#yum install rrdtool- 安装成功
1.3 httpd安装步骤
- 使用root用户登录服务器
#yum install httpd httpd-tools- 安装成功
- 参考Apache配置文件修改
1.4 net-snmp安装步骤
- 使用root用户登录服务器
#yum install net-snmp net-snmp-libs net-snmp-utils- 安装成功
- 参考snmp配置文件修改
1.5 Perl安装步骤
- 使用root用户登录服务器,安装perl
#yum install perl perl-libwww-perl- 安装成功
1.6 Mysql安装步骤
- 使用root用户登录服务器,安装mysql
#yum install mysql mysql-server mysql-devel mysql-libs- 安装成功
1.7 Python安装步骤
- 使用root用户登录服务器,安装python
#yum install python
- 安装python easy_install模块
#wget https://pypi.python.org/packages/source/s/setuptools/setuptools-12.0.5.tar.gz#md5=066e16290f8edcbc8b4b67808b2cbdb2#tar –xvf setuptools-12.0.5.tar.gz#cd setuptools-12.0.5#python setup.py install- 安装boto模块
#easy_install python boto1.8 Cacti安装步骤
- 使用root用户登录服务器,安装cacti
#yum wget#wget http://www.cacti.net/downloads/cacti-0.8.8c.tar.gz
#tar –xvf cacti-0.8.8c.tar.gz#mv cacti-0.8.8c cacti#mv cacti /var/www/html#chmod –R 755 /var/www/html/cacti- 安装成功
- 参考Cacti配置文件修改
1.9 Cacti基础插件Spine安装步骤
- 使用root用户登录服务器
- 安装依赖包
#yum install -y net-snmp-devel openssl-devel#wget http://www.cacti.net/downloads/spine/cacti-spine-0.8.8c.tar.gz #tar -xvf cacti-spine-0.8.8c.tar.gz#cd cacti-spine-0.8.8c#mkdir /usr/local/spine#chmod +x /usr/local/spine#./configure --prefix=/usr/local/spine#make && make install- 参考Cacti基础插件Spine配置文件修改
1.10 Cacti基础插件Monitor、settings、thold安装步骤
- 使用root用户登录服务器
#wget http://docs.cacti.net/_media/plugin:monitor-v1.3-1.tgz #mv plugin:monitor-v1.3-1.tgz monitor-v1.3-1.tgz#tar -xvf monitor-v1.3-1.tgz#cp -R monitor /var/www/html/cacti/plugins/#wget http://docs.cacti.net/_media/plugin:settings-v0.71-1.tgz
#mv plugin:settings-v0.71-1.tgz settings-v0.71-1.tgz#tar –xvf settings-v0.71-1.tgz#cp –R settings /var/www/html/cacti/plugins/#wget http://docs.cacti.net/_media/plugin:thold-v0.5.0.tgz
#mv plugin: thold-v0.5.0.tgz thold-v0.5.0.tgz#tar –xvf thold-v0.5.0.tgz#cp –R thold /var/www/html/cacti/plugins/- 参考Cacti基础插件monitor、settings、thold配置文件修改
2.1 基础监控插件安装步骤
- 使用root用户登录监控服务器,安装监控基础模板
#wget http://www.percona.com/downloads/percona-monitoring-plugins/1.1.4/percona-monitoring-plugins-1.1.4.tar.gz#tar –xvf percona-monitoring-plugins-1.1.4.tar.gz#cd percona-monitoring-plugins-1.1.4cactiscripts#cp * /var/www/html/cacti/scripts/#mkdir /var/www/html/cacti/resource/percona#cd percona-monitoring-plugins-1.1.4cacti#cp –R * /var/www/html/cacti/resource/percona#chmod –Rf 755 /var/www/html/cacti/resource/percona2.2 net-snmp安装步骤
- 使用root用户登录受控服务器
#yum install net-snmp net-snmp-libs net-snmp-utils- 安装成功
- 参考snmp配置文件修改
2.3 编译安装nginx
- 使用root用户登录监控服务器
#wget http://nginx.org/download/nginx-1.6.2.tar.gz#cp *.pl /var/www/html/cacti/scripts/- 使用root用户登录受控服务器,重新编译安装nginx
#mkdir /usr/local/nginx/#chmod +x /usr/local/nginx/#./configure --prefix=/usr/local/nginx --with-http_stub_status_module#make && make install- 参考监控nginx配置文件修改
四、修改各个配置文件
1.PHP配置文件修改
1.1 配置php.ini
- 使用root 用户登陆系统
#vi /etc/php.ini safe_mode=Offdata.timezone=”Asia/manila”file_uploads=Onextension_dir="/usr/lib64/php/modules/"或者extension_dir=/etc/php.d
注:如果是php是4.3.6以上版本。请注释掉seesion.save_path=/tmp
2.Apache配置文件修改
2.1 配置httpd.conf
- 使用root用户登录监控服务器
#vi /etc/httpd/conf/httpd.conf incldue conf.d/*.conf2.2 配置cacti.conf
- 使用root用户登录监控服务器
#cp /etc/httpd/conf.d/welcome.conf /etc/httpd/conf.d/cacti.conf- 按照这个信息配置cacti.conf
#vi /etc/httpd/conf.d/cacti.conf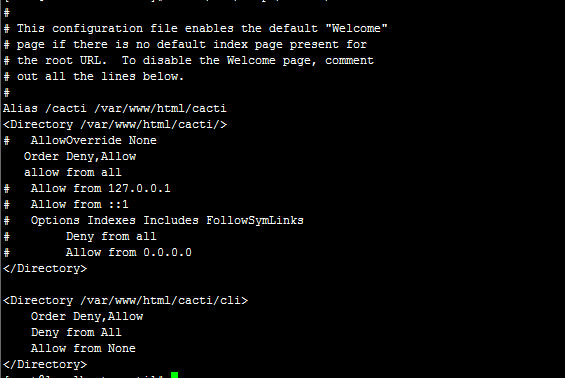
2.3 配置php.conf
- 使用root用户登录服务器
- 检查php.conf是否有这些信息
#more /etc/httpd/conf.d/php.conf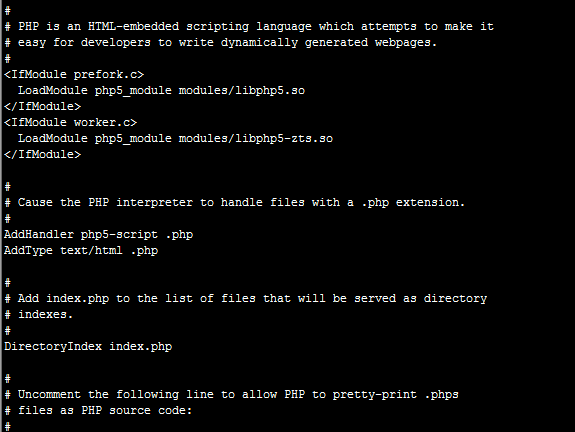
3.snmp配置文件修改
3.1 配置snmpd.conf
- 使用root用户登录监控或受控服务器
#vi /etc/snmp/snmpd.conf 原:view systemview included .1.3.6.1.2.1.1改:view systemview included .1.3.6.1.2.1 原:com2sec notConfigUser default public改:com2sec notConfigUser 监控端IP public
原:access notConfigGroup "" any noauth exact systemview none none改:access notConfigGroup "" any noauth exact all none none 将 #view all included .1 80 前面的 # 注释去掉添加监控服务器iprocommunity serverIP- 保存退出
- 重启snmpd服务
#service snmpd restart3.2 设置snmpd开机启动
#chkconfig snmpd on4.Cacti配置文件修改
4.1 设置目录权限
#useradd cactiuser#chown -R cactiuser rra/ log/4.2 创建一个mysqls数据库
mysqladmin -user=root create cacticd /var/www/html/cacti- 导入cacti数据库
mysql cacti<cacti.sql
mysql> GRANT ALL ON cacti.* TO cactiuser@localhost IDENTIFIED BY 'somepassword';mysql> flush privileges;4.3 配置计划任务
- 使用root用户登录监控服务器
#vi /etc/crontab
*/1 * * * * cactiuser php /var/www/html/cacti/poller.php > /dev/null 2>&1- 退出保存
4.4 配置global.php
- 使用root用户登录监控服务器
#vi /var/www/html/cacti/include/global.php
$database_type = "mysql";

$database_default = "cacti";

$database_hostname = "127.0.0.1";

$database_username = "cacti";

$database_password = "cacti";

$database_port = "3306";- 退出保存
4.5 设置开机启动服务
- 使用root用户登录监控服务器
#chkconfig snmpd on#chkconfig httpd on#chkconfig mysqld on#chkconfig crond on4.6 配置IPTABLES
- 使用root用户登录监控服务器
#iptables -A INPUT -i eth0 -p tcp --dport 80 -j ACCEPT4.7 配置SELINUX
- 使用root用户登录监控服务器
#vi /etc/sysconfig/selinux原:# This file controls the state of SELinux on the system.# SELINUX= can take one of these three values:# enforcing - SELinux security policy is enforced.# permissive - SELinux prints warnings instead of enforcing.# disabled - No SELinux policy is loaded.SELINUX=enforcing# SELINUXTYPE= can take one of these two values:# targeted - Targeted processes are protected,# mls - Multi Level Security protection.SELINUXTYPE=targeted改:# This file controls the state of SELinux on the system.# SELINUX= can take one of these three values:# enforcing - SELinux security policy is enforced.# permissive - SELinux prints warnings instead of enforcing.# disabled - No SELinux policy is loaded.SELINUX= disabled# SELINUXTYPE= can take one of these two values:# targeted - Targeted processes are protected,# mls - Multi Level Security protection.#SELINUXTYPE=targeted4.8 页面配置
- 在浏览器中输入:http://www.yourdomain.com/cacti/
默认用户名:admin 密码:admin
- 更改密码
- 安装指南
- 提示这个直接next
- new install 然后next
- 直接点完成
- 登陆界面,登陆之后会提示你重置下密码
5.Cacti基础插件Spine配置文件修改
5.1 配置spine.conf
- 使用root用户登录监控服务器
#cp /usr/local/spine/etc/spine.conf.dist /usr/local/spine/etc/spine.conf
# vi /usr/local/spine/etc/spine.conf DB_Host localhostDB_Database cactiDB_User cactiuserDB_Pass 123456DB_Port 3306DB_PreG 05.2 修改Cacti使用的Poller Type
- 以admin用户登录到Cacti
- Console -> Cacti Settings->Poller->Poller Type
在”Poller Type”下拉框设置中,选择”spine”
5.3 在cacti里设置spine路径
- 以admin用户登录到Cacti
- Console -> Configuration -> Settings -> Paths -> Alternate Poller Path -> Spine Poller File Path
输入Spine可执行程序的完整路径,我的是/usr/local/spine/bin/spine,保存设置。

6.Cacti基础插件monitor、settings、thold配置文件修改
6.1 导入基础数据
#mysql -uroot -p cacti </home/www/cacti/plugins/monitor/monitor.sql6.2 配置config.php
- 使用root用户登录监控服务器
#vi /var/www/html/cacti/include/config.php $database_type = "mysql";$database_default = "cacti";$database_hostname = "localhost";$database_username = "cactiuser";$database_password = "somepassword";
/* load up old style plugins here */$plugins = array();$plugins[] = 'thold';$plugins[] = 'monitor';$plugins[] = 'settings';$plugins[] = 'discovery';/* Edit this to point to the default URL of your Cacti install ex: if your cacti install as at http://serverip/cacti/ this would be set to /cacti/*/$url_path = "/cacti/"; /* Default session name - Session name must contain alpha characters */#$cacti_session_name = "Cacti";- 退出保存
6.3 页面配置
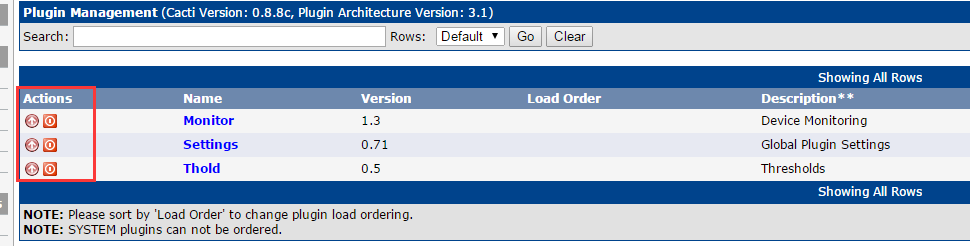
- 以admin用户登录到Cacti
- Console -> Configuration -> Plugin Management
配置如下图所示:
M4{P)`[ZRT0)$$VRJ")
7.监控nginx配置文件修改
7.1 配置nginx.conf
- 使用root用户登录受控服务器
- 在 nginx.conf中添加如下(粗体字部分)
#vi /usr/local/nginx/conf/nginx.conf server { listen 80; server_name localhost; #charset koi8-r; #access_log logs/host.access.log main; location / { root /data/web_server/index; index index.html index.htm; } location /nginx_status { # Turn on nginx stats stub_status on; # I do not need logs for stats access_log off; # Security: Only allow access from 192.168.1.100 IP # #allow 192.168.1.100; # Send rest of the world to /dev/null # #deny all; }}7.2 页面确认
- 通过http://127.0.0.1/nginx_status访问
返回结果类似于:
Active connections: 1 server accepts handled requests 655 655 1985 Reading: 0 Writing: 1 Waiting: 0 8.监控redis配置文件修改
8.1 配置ss_get_by_ssh.php
注:此文件在检出监控插件中安装
- 使用root用户登录受控服务器
#vim /var/www/html/cacti/scripts/ $ssh_user = 'root'; # SSH username $ssh_port = 22; # SSH port $ssh_iden = '-i/root/.ssh/id_rsa'; # SSH identity ##修改根据你的配置,你的ssh连接用户,还有认证私钥的位置
$redis_port = 6379; # Which port redis listens on8.2 配置ssh公私钥无需密码登录
注: 因为cacti监控redis是需要登录到redis的服务端运行redis的状态获取命令,所以需要ssh连接登录。需要配置非交互式帐号密码登录。这里采用公私钥模式。
- 使用root用户登录监控服务器
- 在监控服务器生成一对公私钥
ssh-keygen ##如果是root用户,生成的默认目录为/root/.ssh下2个文件id_rsa(公钥) id_rsa.pub(私钥)
cd /root/.ssh/ && chmod 600 id_rsa* ##把这2个文件修改权限,为600
ssh-copy-id -i /root/.ssh/id_rsa root@192.168.200.1 #加被监控节点公私钥认证
8.3 上传redis监控模板
- 在本机下载监控模板
http://www.percona.com/downloads/percona-monitoring-plugins/1.1.4/percona-monitoring-plugins-1.1.4.tar.gz- 解压percona-monitoring-plugins-1.1.4.tar.gz
- 上传监控模板Console-> Import Templates
cacti_host_template_percona_redis_server_ht_0.8.6i-sver1.1.4.xml9.1 创建受控Mysql需要的账户以及权限
- 使用root用户登录受控服务器
- 配置MySQL服务器
让cacti所在机器能够访问MySQL服务器的状态信息,必须拥有”process”权限。如果要监控InnoDB状态,还必须有”SUPER”权限。
mysql> grant process,super on *.* to 'cacti'@'%' identified by 'cacti';mysql> grant all privileges on cacti.* to cacti@"%" identified by "cacti";
9.2 配置ss_get_mysql_stats.php
- 使用root用户登录监控服务器
vim /var/www/html/cacti/scripts/scriptsss_get_mysql_stats.php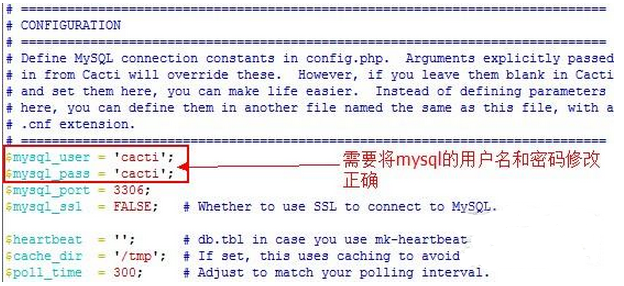
9.3 上传mysql监控模板
- 在本机下载监控模板
http://www.percona.com/downloads/percona-monitoring-plugins/1.1.4/percona-monitoring-plugins-1.1.4.tar.gz- 解压percona-monitoring-plugins-1.1.4.tar.gz
- 上传监控模板Console-> Import Templates
cacti_host_template_percona_mysql_server_ht_0.8.6i-sver1.1.4.xml10.1 创建php监控脚本
- 使用root用户登录监控服务器
vim /var/www/html/cacti/scripts/get_php_fpm_status.php
<?php#!/usr/bin/php -q/* do NOT run this script through a web browser */if (!isset($_SERVER["argv"][0]) || isset($_SERVER['REQUEST_METHOD']) || isset($_SERVER['REMOTE_ADDR'])) { die("<br><strong>This script is only meant to run at the command line.</strong>");} $default['host'] = ''; # server host$default['script'] = '/status'; # test script (absolute path starting at / - root directory -)$default['port'] = 80; # tcp port$default['timeout'] = 3; # timeout in seconds $args = array();@list(, $args['host'], $args['script'], $args['port'], $args['timeout']) = $_SERVER["argv"];foreach($args as $key => $value) $args[$key] = ($value)? $value : $default[$key]; if (($args['host'] == '') || ($args['port'] == '')) { print "Usage: get_php_fpm_status.php <host> [<test script>] [<port>] [<timeout seconds>]
"; exit(-1);}#get resouce$con = curl_init();curl_setopt($con, CURLOPT_URL, 'http://' . $args['host'] . ':' . $args['port'] . $args['script'] );curl_setopt ($con, CURLOPT_RETURNTRANSFER, 1);curl_setopt ($con, CURLOPT_CONNECTTIMEOUT,10);$content = curl_exec($con);curl_close($con); $result = preg_match("/accepted conn:s+(d+)s*
/i", $content, $matches);$conn['accepted'] = ($result)? $matches[1] : 'n/a';$result = preg_match("/idle processes:s+(d+)s*
/i", $content, $matches);$conn['idle'] = ($result)? $matches[1] : 'n/a';$result = preg_match("/active processes:s+(d+)s*
/i", $content, $matches);$conn['active'] = ($result)? $matches[1] : 'n/a';$result = preg_match("/total processes:s+(d+)s*
/i", $content, $matches);$conn['total'] = ($result)? $matches[1] : 'n/a';echo 'accepted:' . $conn['accepted'] . ' idle:' . $conn['idle'] . ' active:'. $conn['active'] . ' total:' . $conn['total']; - 保存退出,赋予权限
chmod 755 /var/www/html/cacti/scripts/get_php_fpm_status.php
10.2 配置php.ini
- 使用root用户登录监控服务器
cp /etc/php-fpm.d/www.conf /etc/php-fpm.d/www.conf.bakvim /etc/php-fpm.d/www.conf 原:allow_url_fopen = Off改:allow_url_fopen = On 原:#user_agent="PHP"改:user_agent="PHP"10.3 上传mysql监控模板
- 在本机下载监控模板
- 解压PHP-FPM-Template.tar
- 上传监控模板Console-> Import Templates
Custom_PHP-FPM.xml