我使用了两个版本的postman:
- Postman-linux-x64-7.1.1 这是目前(2019)最新版本。这个版本也有坑:
(因为系统崩溃重装了,所以目前只有最新版本。本文截图都是这个版本的截图。)
- 没有配套的chrome postman interceptor插件
- 界面collection run遇到了上传的request就不运行了。例如,第4个request是上传文件,那么它只运行3个cases。
- Postman-linux-x64-5.x.x 这是之前安装的,配套的chrome postman interceptor版本0.2.24。但是,这个版本及以下,有2个坑:
- 不能保存上传文件的路径。
- 如果在postman中,request中有上传很多个文件的,那么,postman会频繁崩溃。
在postman的使用中,遇到一些问题,记录如下:
1. 旧版本上传文件解决办法(新版本上这样做也没有问题,但假如文件不多的话,可以使用另一种方式解决见下面2):
- 在postman中,设置好占位
Content-Type:multipart/form-data; boundary=;
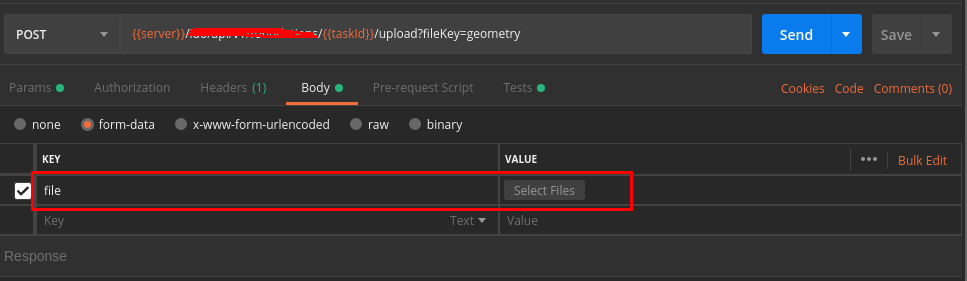
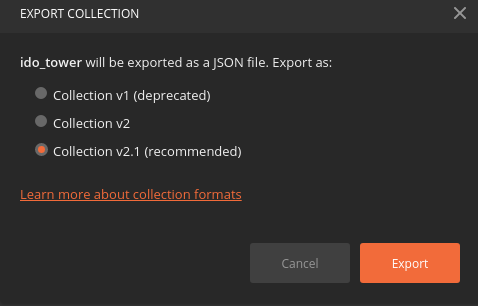
- 导出collection, 保存为json文件

- 使用python等脚本,将文件路径填进去。就是替换下面json中的src的value
            "request": {
                "url": "https://echo.getpostman.com/post",
                "method": "POST",
                "header": [],
                "body": {
                    "mode": "formdata",
                    "formdata": [
                        {
                            "key": "file",
                            "type": "file",
                            "enabled": true,
                            "src": "sample-file.txt"
                        }
                    ]
                },
                "description": "Uploads a file as a form data field to `https://echo.getpostman.com/post` via a `POST` request."
            },
如果你的collection下面没有文件夹,那么可以使用下面的脚本。当collection下面有文件夹时,导出的json文件层级结构会改变。
import os
import json

'''
必须使用python3运行,否则会在读写文件时报错。
在读写文件时,指定了编码,是为了对中文的支持。
'''
_target_file = 'postman_export.json'

_file_dict = {'上传xxx参数表': 'inputData.xlsx',
                   '上传xxx参数表2': 'inputData2.xlsx',
                   '批量上传': '',
             }

def main(filepath):
    upload_files = ["file1","file2"]
    with open(filepath, 'r', encoding='utf-8') as f:
        json_data = json.load(f)
    for item in json_data['item']:
        # print(item['name'])
        if '上传' in item['name']:
            if _file_dict[item['name']]:
                item['request']['body']['formdata'][0]['src'] = _file_dict[item['name']]
            else: #批量上传文件
                item['request']['body']['formdata'] = []
                for f in upload_files:
                    upload_form = {"key": "files", "type": "file", "src":""}
                    upload_form['src'] = f
                    item['request']['body']['formdata'].append(upload_form)

    with open(filepath, 'w', encoding='utf-8') as f:
        json.dump(json_data, f, sort_keys=True, indent=4, ensure_ascii=False)

if __name__ == '__main__':
    main(_target_file)
- 使用newman命令行运行
# newman 安装:npm install -g newman
newman run postman_export.json -e dev_env.json
detail see: https://learning.getpostman.com/docs/postman/collection_runs/command_line_integration_with_newman/
如果使用的postman版本太老,比如说5,那么,导出的json文件是不能使用newman在命令行中运行的,层级结构也不一样。
此时,把导出的json文件,在新版本的postman中,导入,然后再导出,就可以了。
2. 在新版本postman中保存上传文件路径的方法:
在postman的右上角,点击设置图标(如下图),选择settings,将红框的选项设置为on。

其实,如果要上传的文件在设置的Working Directory里,那么,这个选项是不用开启的。但是,为了能访问本地的任意路径,还是打开这个选项为好。
现在,在上传的request中,选择的文件路径,就会保存在postman中了。导出json文件中,也保存了该路径。
3. postman中的变量。
postman中有global和environment两种变量,设置后,在request url, request body中使用方式都一样:{{variable}}
在tests和pre-tests的脚本中这样使用: pm.environment.get("variable")
建议使用environment变量,因为可以导出,在命令行中也方便指定,方便管理方便切换。
4. postman不能不执行某个或某些request .
注意:postman中一个collection内是不能有同名request的,即使是建了文件夹,它也是在一个collection内的。
官方文档上说,可以使用postman.setNextRequest('request name')构建workflow,但必须指定request名字,是不能不执行某个request之后的requests的。就是说,不能stop运行。
例如:当某个request失败后,不想执行后面的request了,只能在最后增加一个随便的查询request,把名字指向它。
查找网上,说在tests脚本中可以throw error, 但是这个并不能阻止request的执行。
5. collection runs
- data file : 是json或者csv文件。官网给的例子是csv文件,每一行作为一次输入,执行整个collection一次。
data file中的变量名,在url和request body中,使用方式:{{variable}}, 在tests脚本中,data.variable
detail see: https://learning.getpostman.com/docs/postman/collection_runs/working_with_data_files/
- iterations: 连续执行collection的次数(不换数据)
目前没有用到,只是了解。
另外比较好奇,是否可以在上传文件的path中使用{{variable}}。在界面上似乎不行,那么修改导出的collection.json文件呢?
6. 单独调试某个request。
这个只能在postman界面中做。
在环境变量中设置好需要的数据,然后,选择该环境,比如说dev。写好request和tests脚本。打开左下角的console,就可以看到输入和输出了。

7. 可以使用swagger的url或者文件,直接导入request
我试过使用interceptor拦截到history然后直接保存到指定collection,试过使用swagger导入request,感觉都可以。相对来讲,使用swagger更好些。
使用interceptor可以把url和body都填好,取个名字就可用。但是需要一个一个操作。当然,这个也不是必须,因为在浏览器中按F12在network中也都能看到,只是省略一个copy过程。
因为,swagger是把所有的request都列出来,这样就直接生成了体系。但是需要修改url, body等。
使用swagger import, 可以直接输入link 或者swagger的api-doc直接paste raw text:

8. tests 脚本
注意:在脚本中,没找到打印request header,body的方法。
该脚本的意思是:当request返回200时,每60秒查询该task的status, 当它的状态改变(不为1)时,继续后面的request。
tests["Status code is 200"] = responseCode.code === 200;
var jsonData = JSON.parse(responseBody);
if (tests["Status code is 200"]) {
    console.log('wait for submitting successfully...');
    var status = 1;
    var timer
    pm.sendRequest(pm.environment.get("server")+"/ido/api/v1/tasks/"+pm.environment.get("taskId"), function (err, response) {
        status = response.json().body.status;
        console.log(status);
    });
    timer = setInterval(() => {
        if (status !== 1) {
            console.log('stop');
            clearInterval(timer);
        }
        pm.sendRequest(pm.environment.get("server")+"/ido/api/v1/tasks/"+pm.environment.get("taskId"), function (err, response) {
            status = response.json().body.status;
            console.log(status);
        });
    }, 60000);
    console.log("1:运行中 2:成功 3:失败");
} else {
    console.log(responseCode);
    console.log(jsonData);
}
另外,解析response的json时,当返回的是数组时,它是不能使用for in遍历的。使用for in 遍历后的结果与预期不一样,数组返回是[0:{},1:{}]这样的。
使用for(var i=0; i<xx.length;i++)
tests["Status code is 200"] = responseCode.code === 200;
var jsonData = JSON.parse(responseBody);
if (tests["Status code is 200"]) {
    for(var i=0; i<jsonData.body.items.length; i++) {
        item = jsonData.body.items[i]
        if (item.status == "通过"){
            console.log("projectId:"+item.projectId);
            console.log("projectName:"+item.projectName);
            pm.environment.set("projectId", item.projectId);
            break;
        }
    }
} else {
    console.log(responseCode);
    console.log(jsonData);
}
也可以使用:
var item = jsonData.body.items.filter((p) => {
    return p.status == "通过";
});
pm.environment.set("projectId", item[0].projectId);