采用AlertDialog的自定义布局方式实现设置交互,新建android layout布局后,采用LayoutInflater是用来获得布局文件对象,通过AlertDialog.Builder.setView().show()方式实现自定义布局对话框的打开。比起之前“开发webapp的准备工作”中使用intent打开一个activity的方式,AlertDialog实现更轻松,交互更友好。
新建android xml layout file
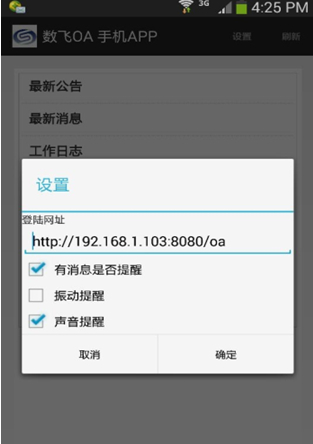
New – android – android xml layout file – 名称为“layout_set”,实现OA的访问地址、是否需要提醒、是否需要声音提醒、振动提醒等设置。这里我用了一个TableLayout,加入一个EditText和3个Checkbox。代码如下:
<TableLayout xmlns:android="http://schemas.android.com/apk/res/android"
android:id="@+id/TableLayout1"
android:layout_width="match_parent"
android:layout_height="match_parent"
android:orientation="vertical" >
<TextView
android:id="@+id/textView1"
android:layout_width="wrap_content"
android:layout_height="wrap_content"
android:text="登陆网址" />
<EditText
android:id="@+id/editText_url"
android:layout_width="wrap_content"
android:layout_height="wrap_content"
android:ems="10" >
<requestFocus />
</EditText>
<CheckBox
android:id="@+id/checkBox_alert"
android:layout_width="wrap_content"
android:layout_height="wrap_content"
android:text="有消息是否提醒" />
<CheckBox
android:id="@+id/checkBox_vibrate"
android:layout_width="wrap_content"
android:layout_height="wrap_content"
android:text="振动提醒" />
<CheckBox
android:id="@+id/checkBox_sound"
android:layout_width="wrap_content"
android:layout_height="wrap_content"
android:text="声音提醒" />
</TableLayout>
这里将用AlertDialog方式打开,不需要增加button。
打开AlertDialog
在菜单onOptionsItemSelected的“设置”部分增加打开的代码,并实现读取EditText和CheckBox的值,采用SharedPreferences保存。CheckBox是否被选中用isChecked() ,选中用setChecked(Boolean)。alertDialog的创建代码如下,其中“layout_set”是我创建的布局文件名称,“TableLayout1”是布局文件的layout id。为了能在“确定”的OnClickListener匿名内部类中调用外部变量dialogLayout,dialogLayout需要用final修饰.
LayoutInflater inflater = getLayoutInflater();
final View dialogLayout = inflater.inflate(R.layout.layout_set, (ViewGroup)findViewById(R.id.TableLayout1));
new AlertDialog.Builder(this).setTitle("设置").setView(dialogLayout)
.setPositiveButton("确定", new OnClickListener() {
public void onClick(DialogInterface dialog, int which) {
//获得EditText和CheckBox的值,采用SharedPreferences保存。
dialog.dismiss();
}
})
.setegativeButton("取消", null).show();
关于AlertDialog
我曾经尝试在AlertDialog.Builder builder = new AlertDialog.Builder(this);之后,一口气加完setTitle、setMessage、setView(EditText)、setMultiChoiceItems、setSingleChoiceItems、setItems,结果只出现EditText,而没有单选多选,研究后发现在 AlertDialog中setMessage、setMultiChoiceItems等只能一个有效,因此复杂的交互内容只能用setView的自定义布局方式。