关于Object类(Java 10)中的方法,根据其所涉及的知识点,分为如下4个部分:
- 基础
- 反射
- 线程
- JVM GC
- finalize : protected void finalize() throws Throwable
2018-09-15
今天写:equals、hashCode、toString、clone、getClass,后面的方法等学到相关知识再作补充。
一. equals


1 public boolean equals(Object obj) {
2     return (this == obj);
3 }
equals用来判断两个对象是否”相等“,而对“相等”这个词的定义不同,得出的结果也不同:
- 1. Object类中的equals使用 this == obj 来定义相等,即:两个引用是否指向同一个对象;
- 2. 有些时候,我们并不需要定义如此严格的相等,比如:定义一个Point类,只要两个点的横纵坐标分别相等,我们就认为它们相等;
要实现上面的需求,我们就需要重写equals方法,如下:
 1 public class Point {
 2     int x;
 3     int y;
 4
 5     Point(int x, int y) {
 6         this.x = x;
 7         this.y = y;
 8     }
 9
10     @Override
11     public boolean equals(Object obj) {
12         if (this == obj) {
13             return true;
14         }
15         if (obj instanceof Point) {
16             Point p = (Point)obj;
17             return (this.x == p.x && this.y == p.y);
18         }
19         return false;
20     }
21 }
测试:
 1 public static void main(String[] args) {
 2     Point p1 = new Point(1, 1);
 3     Point p2 = new Point(1, 1);
 4     System.out.println("p1.equals(p2) : " + p1.equals(p2));
 5     p2.x = 2;
 6     System.out.println("p1.equals(p2) : " + p1.equals(p2));
 7 }
 8 /* 输出
 9 p1.equals(p2) : true
10 p1.equals(p2) : false
11 */
另记:String类也重写了equals方法,实现了:只要两个字符串长度相等及字符串中对应位置的字符相等,则两字符串相等。可以参考String类中的equals方法。
注意:在重写equals方法时,方法定义要写为:public boolean equals(Object obj) {....} ,参数类型是:Object obj
二. hashCode
1 public native int hashCode();
hashCode,官方解释:返回对象的一个哈希码,为基于哈希表的数据结构提供便利,如:HashMap等。
Object类中的hashCode方法为本地方法,在重写hashCode方法时,需遵循以下规则:
- 1. 在对象equals比较中使用的信息未被修改的前提下,在Java程序运行期间,同一个对象多次调用(不同时间)应该始终返回同一个整数。在程序不同的运行期间,返回的整数不需要保持一致;
- 2. 如果两个对象调用 equals(Object obj) 时相等,那么这两个对象在调用 hashCode 时应该返回同一个整数值;
- 3. 并不要求为调用 equals(Object obj) 时不相等的两个对象,返回两个不同的哈希码。只不过为不相等的对象返回不同的哈希码可以提高哈希表的性能;
关于第2条规则,我们继续Point类这个例子。首先,在未重写hashCode方法的情况下,我们测试两个对象的hashCode()输出值:
 1 public static void main(String[] args) {
 2     Point p1 = new Point(9483, 89382);
 3     Point p2 = new Point(9483, 89382);
 4     System.out.println("p1.hashCode() : " + p1.hashCode());
 5     System.out.println("p2.hashCode() : " + p2.hashCode());
 6 }
 7 /* 输出:
 8 p1.hashCode() : 166239592
 9 p2.hashCode() : 991505714
10 */
可以看到,在我们定义的equals方法下相等的两个对象,得到的hashCode是不同的,如此不一致会造成什么后果呢?我们知道 HashMap 在存储<Key, Value>时,如果Key1等于Key2,那么存储的键值对为:<Key1, Value2>,即:只会存储一个Key,使用的是最新的Value。而 HashMap 中在判断 Key1是否等于Key2时,就使用到了它们的hashCode。在未重写hashCode方法的情况下,看如下测试:
 1 public static void main(String[] args) {
 2     Point p1 = new Point(9483, 89382);
 3     Point p2 = new Point(9483, 89382);
 4
 5     HashMap<Point, Integer> map = new HashMap<Point, Integer>();
 6     map.put(p1, p1.hashCode());
 7     map.put(p2, p2.hashCode());
 8     for (Map.Entry<Point, Integer> m : map.entrySet()) {
 9         System.out.println(m);
10     }
11 }
12 /* 输出
13 Point@9e89d68=166239592
14 Point@3b192d32=991505714
15 */
根据我们对Point类相等的定义,p1与p2相等,而在 HashMap 中却存入了两个键值对,显然不符合我们的意图。(equals与hashCode的不一致,会造成使用时产生歧义,从而导致意想不到的错误。所以,我们在重写equals方法后,也要重写hashCode方法,使其意义一致)现在我们来重写hashCode方法,再进行如上测试:
1 @Override
2 public int hashCode() {
3     return (x & y) | (x ^ y);
4 }
5 /* 输出
6 Point@17d2f=97583
7 */
根据我们对hashCode方法的定义,对象的hashCode只与(x, y)相关,所以 p1.hashCode() == p2.hashCode() 为 true。这样一来,HashMap 中只会存入一个键值对,符合我们的预期。
三. toString
1 public String toString() {
2     return getClass().getName() + "@" + Integer.toHexString(hashCode());
3 }
源码中直接返回:对象类型名@对象hashCode的十六进制,举个例子:
1 public static void main(String[] args) {
2     Point p1 = new Point(9483, 89382);
3     System.out.println(p1.toString());
4 }
5 /* 输出
6 Point@17d2f
7 */
很多情况下,我们都要重写toString()方法,就比如Point类,我们想知道的是点的横纵坐标(x, y),而不是 Point@17d2f 这串不知所云的字符。
1 @Override
2 public String toString() {
3     return "(" + x + ", " + y + ")";
4 }
5 /* 输出
6 (9483, 89382)
7 */
四.Clone
1 protected native Object clone() throws CloneNotSupportedException;
从方法定义入手:
- 1. protected,表明只有本类及其子类可以使用该方法来克隆对象,子类可以重写该方法;
- 2. native,表明Object类中clone是本地方法;
- 3. CloneNotSupportedException,如果调用clone方法的对象的类没有 implememnts Cloneable,就会抛出这个异常;
现在,我们对之前的Point类进行部分修改,为了节省空间,我只贴出修改部分的代码:
首先,定义Data类,用来记录一个点所包含的相关信息;
1 public class Data {
2     int weight;
3     String name;
4
5     Data(int weight, String name) {
6         this.weight = weight;
7         this.name = name;
8     }
9 }
然后,Point类实现Cloneable接口,并且Point类中包含一个Data类型字段,如下:
 1 public class Point implements Cloneable {
 2     int x;
 3     int y;
 4     Data data;
 5
 6     Point(int x, int y, Data data) {
 7         this.x = x;
 8         this.y = y;
 9         this.data = data;
10     }
11     ...
12 }
测试:
 1 public static void main(String[] args) throws Exception {
 2     Data data = new Data(20, "A");
 3     Point p1 = new Point(1, 2, data);
 4     Point p2 = (Point)p1.clone();
 5
 6     System.out.println("p1 == p2 : " + (p1 == p2));
 7     System.out.println("p1.(x, y) = " + p1.toString() + ", p2.(x, y) = " + p2.toString());
 8     System.out.println("p1.data == p2.data : " + (p1.data == p2.data));
 9 }
10 /* 输出
11 p1 == p2 : false
12 p1.(x, y) = (1, 2), p2.(x, y) = (1, 2)
13 p1.data == p2.data : true
14 */
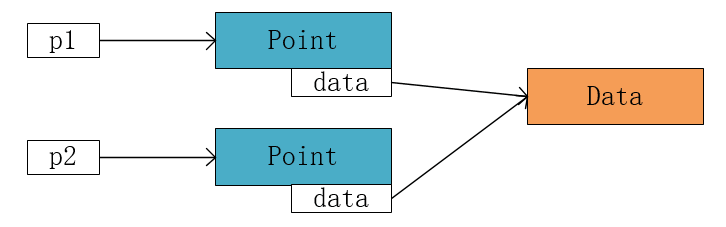
对于测试的输出,我们可以发现:
- 1. p1 == p2 为 false,说明 p1.clone() 重新生成了一个对象;
- 2. p1.(x, y) 等于 p2.(x, y),说明 p1.clone() 会把原对象的基础数据类型字段的值拷贝给生成的新对象的对应字段;
- 3. p1.data == p2.data 为 true,说明引用类型字段,新对象的字段与原对象的字段引用同一个对象;
对于第3条,即Object类的clone方法是浅拷贝,理解如图:
在一些并发编程情景下,我们常常需要操作 不可变对象 来保证并发安全性。不可变对象,顾名思义就是你创建的对象不会改变,你可以理解为:
- 1. 对象本身就是不可变的,如:字段都是final修饰等;
- 2. 对象本身可变,但是我们确保在使用的时候不会去改变它,即人为的不可变;
(更详细的内容,可以参考《Java并发编程实战》)
现在,假如我要在并发环境下使用p1.clone()出来的对象p2,并要求p2是不可变的。而事实上,其他线程可以通过 p1.data 来改变 p2.data 的状态,以破坏p2的不可变性。
要想使p2不可变,我们就需要对Point类进行深拷贝,即:对Piont类中的Data类型字段也创建一个新的对象,使得 p1.data != p2.data,如下:
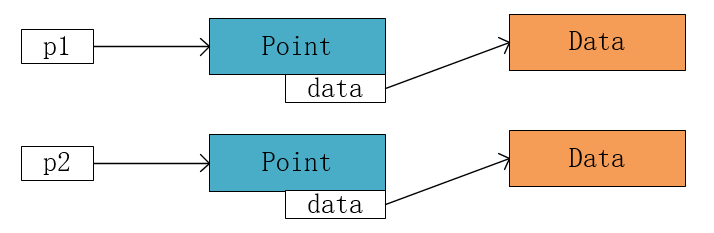
 1 public class Data {
 2     ...
 3     // 自定义的clone(),并非重写Object类中的clone()
 4     public Data clone() {
 5         return new Data(weight, name);
 6     }
 7 }
 8 public class Point implements Cloneable {
 9     ...
10     @Override
11     protected Object clone() throws CloneNotSupportedException {
12         Point p = (Point)super.clone();
13         p.data = data.clone(); // 这里的data.clone()与Object类中的clone()无关
14         return p;
15     }
16     ...
17 }
18 /* 重复上面的测试,输出:
19 p1 == p2 : false
20 p1.(x, y) = (1, 2), p2.(x, y) = (1, 2)
21 p1.data == p2.data : false
22 */
思考:如果一个类中一直嵌套着包含引用类型字段,那么我们该怎么才能做到深拷贝呢?很明显,对于类中每一个引用类型对象都做深拷贝。(递归处理)
五. getClass
1 public final native Class<?> getClass();
getClass方法,返回对象的类对象,在反射中经常使用,例如:
Data类中有个私有方法 printInfo(),该方法在Point类中无法正常调用,但是我们可以通过反射机制来调用该方法。
 1 public class Data {
 2     ...
 3     private void printInfo() {
 4         System.out.println("weight = " + weight);
 5         System.out.println("name : " + name);
 6     }
 7 }
 8 // 在Point类中
 9 public static void main(String[] args) throws Exception {
10     Data data = new Data(20, "A");
11     Class<?> clz = data.getClass();
12     Method m = clz.getDeclaredMethod("printInfo");
13     m.setAccessible(true); // 抑制Java的访问控制检查
14     m.invoke(data);
15 }
16 /* 输出
17 weight = 20
18 name : A
19 */
这里只是简单提一下,更多关于反射的知识,会在后期总结。
2018-10-06
今天更新:wait系列、notify系列、finalize。
(我尽量以简单清晰的方式来展现我的内容,对于涉及到的知识点,这里只是抛砖引玉,若想深入研究,大家可以进一步去查阅资料)
六. wait、notify
来看字面意思的解释:
- wait
- wait():使当前线程等待,直到被唤醒(notified)或被中断(interrupted),等价于wait(0L, 0) ;
- wait(long timeout):使当前线程等待,直到被唤醒或被中断,或者一段确定的时间(timeout)过去了;
- wait(long timeout, int nanos):使当前线程等待,直到被唤醒或被中断,或者一段确定的时间(
1000000*timeout+nanos)过去了;
- notify
- notify():唤醒一个正在等待该对象锁的线程,如果有多个线程在等待资源,那么以某种规则(不确定的)选取其中一个线程唤醒;
- notifyAll():唤醒所有正在等待该对象锁的线程;
(注:线程被唤醒后,需要等待当前线程释放锁资源,然后与其他请求该锁的线程竞争,获取锁后才能得到执行)
字面解释就这些,下面要写的是我在阅读API(JavaSE 10 & JDK10)中该部分内容时的困惑及解答。先来看看这些方法的源码吧:
 1 /************************** wait **************************/
 2 public final void wait() throws InterruptedException {
 3     wait(0L); // 调用 wait(long timeout)
 4 }
 5
 6 public final native void wait(long timeout) throws InterruptedException;
 7
 8 public final void wait(long timeout, int nanos) throws InterruptedException {
 9     if (timeout < 0) {
10         throw new IllegalArgumentException("timeout value is negative");
11     }
12     if (nanos < 0 || nanos > 999999) {
13         throw new IllegalArgumentException(
14                             "nanosecond timeout value out of range");
15     }
16     /*
17     timeout 是ms(毫秒)计时
18     nanos   是ns(纳秒)计时
19     原本我以为某些领域需要更精确的时间控制,所以才提供wait(long timeout, int nanos)这个方法
20     而当我看到源码的时候,这不就多了个timeout++吗?这个判断和加法在外部也可以做啊。
21     所以,为什么要有这个方法呢? - -?(这个问题这里不深入讨论)
22     */
23     if (nanos > 0) {
24         timeout++;
25     }
26     wait(timeout); // 调用 wait(long timeout)
27 }
28
29 /************************** notify ************************/
30 @HotSpotIntrinsicCandidate
31 public final native void notify();
32
33 @HotSpotIntrinsicCandidate
34 public final native void notifyAll();
在API中,可以看到wait的3个方法中都抛出以下异常:
- IllegalMonitorStateException - if the current thread is not the owner of the object's monitor
- InterruptedException - if any thread interrupted the current thread before or while the current thread was waiting. The interrupted status of the current thread is cleared when this exception is thrown.
1. IllegalMonitorStateException
如果当前线程不是该对象锁的持有者时,抛出该异常。如何理解呢,看下面的代码:
 1 class T1 extends Thread {
 2
 3     @Override
 4     public void run() {
 5         try {
 6             this.wait(1000);
 7             System.out.println("wait over");
 8         } catch (InterruptedException e) {}
 9     }
10 }
11
12 public class IllegalMonitorStateTest {
13
14     public static void main(String[] args) {
15         T1 t = new T1();
16         t.start();
17     }
18 }
19
20 /* 异常
21 Exception in thread "Thread-0" java.lang.IllegalMonitorStateException
22     at java.base/java.lang.Object.wait(Native Method)
23     at T1.run(IllegalMonitorStateTest.java:6)
24 */
抛出异常的原因:[线程 t] 执行 this.wait(),但其并未获取 this锁。wait操作是要释放当前锁资源的,都没有获取如何释放呢?
官方给出的说明:在以下3种情况下,线程为对象锁的持有者:
- 执行该对象的同步实例方法,如:public synchronzied void foo(){}
- 执行以该对象为锁的同步代码块,如:synchronized (this) {}
- 对于类类型的对象,执行该类的静态同步方法,如:public static synchronized void foo(){}
所以,针对上面的例子,做以下修改(只贴出修改的部分),确保其不会抛出IllegalMonitorStateException异常。
 1 @Override
 2 public void run() {
 3     synchronized (this) {
 4         try {
 5             this.wait(1000);
 6             System.out.println("wait over");
 7         } catch (InterruptedException e) {}
 8     }
 9 }
10 /* 再进行测试,输出
11 wait over
12 */
2. InterruptedException
 1 class T2 extends Thread {
 2     T2(String name) {
 3         super(name);
 4     }
 5
 6     @Override
 7     public void run() {
 8         synchronized (this) {
 9             try {
10                 this.wait();
11                 System.out.println("wait over");
12             } catch (InterruptedException e) {
13                 e.printStackTrace();
14             }
15         }
16     }
17 }
18
19 public class InterruptedExceptionTest {
20     public static void main(String[] args) throws Exception {
21         T2 t = new T2("[线程 t]");
22         t.start();
23         System.out.println(t.getName() + "中断状态:" + t.isInterrupted());
24         System.out.println("[线程 main]执行 t.interrupt();");
25         t.interrupt();
26         System.out.println(t.getName() + "中断状态:" + t.isInterrupted());
27
28         System.out.println("------------------------------------------");
29         Thread mainThread = Thread.currentThread();
30         System.out.println("[线程 main]中断状态:" + mainThread.isInterrupted());
31         System.out.println("[线程 main]执行 mainThread.interrupt();");
32         mainThread.interrupt();
33         System.out.println("[线程 main]中断状态:" + mainThread.isInterrupted());
34         System.out.println("[线程 main]running......");
35     }
36 }
37
38 /* 输出 & 异常,两个线程都有信息要输出到控制台,所以也可能异常信息先输出
39 [线程 t]中断状态:false
40 [线程 main]执行 t.interrupt();
41 [线程 t]中断状态:true
42 ------------------------------------------
43 [线程 main]中断状态:false
44 [线程 main]执行 mainThread.interrupt();
45 [线程 main]中断状态:true
46 [线程 main]running......
47 java.lang.InterruptedException
48     at java.base/java.lang.Object.wait(Native Method)
49     at java.base/java.lang.Object.wait(Unknown Source)
50     at T3.run(InterruptedExceptionTest.java:10)
51 */
在当前线程等待前或等待期间,如果有其他线程中断当前线程,则抛出该异常。看下面的例子:
在这个示例中,我们需要注意两点:
- 抛出了InterruptedException异常,因为 [线程 t] 在等待期间,[线程 main] 执行 t.interrupte()使其中断;
- interrupt()不能中断运行中的线程,它只能改变中断状态。在分割线后,可以看到正在运行的 [线程 main] 执行了 mainThread.interrupt(),中断状态也由 false -> true,但是后面的输出语句仍然被执行了,即 [线程 main] 并没有被终止。那要如何才能终止呢?其实可以通过加个判断和return语句来完成终止,如:if (mainThread.isInterrupted()) return;
3. Note that only the locks on this object are relinquished; any other objects on which the current thread may be synchronized remain locked while the thread waits.
只有基于这个对象的锁被释放;在线程等待期间,当前线程可能被同步的任何其他对象都将保持锁定。(翻译看不懂?直接看代码吧)
 1 class T3 extends Thread {
 2     Object obj;
 3
 4     T3(String name, Object obj) {
 5         super(name);
 6         this.obj = obj;
 7     }
 8
 9     @Override
10     public void run() {
11         synchronized (this) {
12             System.out.println(Thread.currentThread().getName() + "获取this锁");
13             synchronized (obj) {
14                 System.out.println(Thread.currentThread().getName() + "获取obj锁");
15                 try {
16                     this.wait();
17                 } catch (InterruptedException e) {}
18             }
19         }
20     }
21 }
22
23 public class OtherLockBeRetainedTest {
24
25     public static void main(String[] args) throws Exception {
26         Object obj = "x";
27         T3 t1 = new T3("[线程 t1]", obj);
28         T3 t2 = new T3("[线程 t2]", obj);
29         t1.start();
30         Thread.sleep(2000);
31         t2.start();
32     }
33 }
34
35 /* 输出 (程序死锁)
36 [线程 t1]获取this锁
37 [线程 t1]获取obj锁
38 [线程 t2]获取this锁
39 */
顺着代码理一下程序执行过程:
- 首先,[线程 t1] 得到执行,并且相继拿到了 this锁 和 obj锁;
- [线程 t1] 执行 this.wait()(等待被唤醒),把 this锁释放了,而 obj锁依旧保留在 [线程 t1]手中;
- [线程 t2] 得到执行,拿到了 this锁,进一步需要获取 obj锁,发现 obj锁依旧拽在 [线程 t1]手中,于是等待,产生了死锁;
4. 虚假唤醒(spurious wakeups)
(我这里只给出一种简单的虚假唤醒情况,更详细的内容,大家可以自行查阅资料,可以参看:《Java并发编程实战》14.2 “使用条件队列”,《Effective Java》第69条 “并发工具优先于wait和notify”)
在某些情况下,我们需要某个条件成立,线程才能往下执行,而下面的示例中,未必按这个套路出牌:
 1 class T4 extends Thread {
 2    boolean condition;
 3
 4    T4(boolean condition) {
 5        this.condition = condition;
 6    }
 7
 8    @Override
 9    public void run() {
10        synchronized (this) {
11            try {
12                if (!condition) {
13                    this.wait();
14                }
15                // 当 condition == true 时,执行下面的操作
16                System.out.println("condition : " + condition);
17            } catch (InterruptedException e) {}
18        }
19    }
20 }
21
22 public class SpuriousWakeupTest {
23     public static void main(String[] args) throws Exception {
24         T4 t = new T4(false);
25         t.start();
26         Thread.sleep(1000);
27         synchronized (t) {
28             t.notify();
29         }
30     }
31 }
32
33 /* 输出
34 condition : false
35 */
上面的例子,我们的原意是:当condition为true时,[线程 t] 继续执行下面的操作,否则继续等待直到条件成立。当然,[线程 t] 第一次判断condition时,符合我们的意图,进行了等待;后来被主线程notify唤醒,condition依旧为false,而 [线程 t] 却执行了后续的操作,显然不符合我们的意图。虽然 [线程 t] 真的被唤醒了,但是在我们的业务逻辑定义下,它不应该被唤醒执行操作,应该继续等待。对于这样的唤醒,我们称为虚假唤醒(情况不止于此)。如何解决这个问题呢?其实只需要做一点小修改即可,即:把 if语句换成 while语句,如下:
 1 @Override
 2 public void run() {
 3     synchronized (this) {
 4         try {
 5             while (!condition) {
 6                 this.wait();
 7             }
 8             // 当 condition == true 时,执行下面的操作
 9             System.out.println("condition : " + condition);
10         } catch (InterruptedException e) {}
11     }
12 }
七. finalize
1 @Deprecated(since="9")
2 protected void finalize() throws Throwable {}
finalize,终结方法,当GC认为对象不再被引用时,会先调用finalize(),再回收该对象。子类可以重写finalize方法,来处理一些系统资源或者完成其他清理工作。(自Java 9 开始被弃用)
关于finalize,有以下4个点需要注意(摘自《Effective Java》第2版,第7条:避免使用终结方法):
- Java语言规范不仅不保证终结方法会被及时地执行,而且根本就不保证它们会被执行;
- System.gc和System.runFinalization这两个方法确实增加了终结方法被执行的机会,但它们同样不保证终结方法一定会被执行;
- 使用终结方法存在非常严重的性能损失,使用不当可能导致内存溢出(Java的Finalizer引发的内存溢出);
- “终结方法链”并不会被自动执行。如果类(非Object)有终结方法,并且子类覆盖了终结方法,子类的终结方法就必须手工调用超类的终结方法;
在我看来,我们可以把finalize()看成是对象被GC回收前的回调,来看个“对象复活”的例子。代码来自:https://www.cnblogs.com/Smina/p/7189427.html
 1 public class FinalizeTest {
 2
 3     public static FinalizeTest SAVE_HOOK = null;
 4
 5     public static void main(String[] args) throws Exception {
 6         SAVE_HOOK = new FinalizeTest();
 7         SAVE_HOOK = null;
 8         System.gc();
 9         Thread.sleep(500);
10         if (null != SAVE_HOOK) {
11             System.out.println("Yes, I am still alive");
12         } else {
13             System.out.println("No, I am dead");
14         }
15         SAVE_HOOK = null;
16         System.gc();
17         Thread.sleep(500);
18         if (null != SAVE_HOOK) {
19             System.out.println("Yes, I am still alive");
20         } else {
21             System.out.println("No, I am dead");
22         }
23     }
24
25     @Override
26     protected void finalize() throws Throwable {
27         super.finalize();
28         System.out.println("execute method finalize()");
29         SAVE_HOOK = this;
30     }
31 }
32
33 /* 输出
34 execute method finalize()
35 Yes, I am still alive
36 No, I am dead
37 */
分析(为了描述方便,把 new FinalizeTest() 生成的对象叫做 对象A):
- 第1次调用System.gc(),此时SAVE_HOOK = null,没有引用指向对象A。GC认为对象A可以回收,而该类重写了finalize方法,所以会先调用对象的finalize(),因此输出“execute method finalize()”;
- 调用finalize()后,SAVE_HOOK = this(对象A),所以接下来的 if 判断为true,输出“Yes, I am still alive”;(就这样,本来要被回收的对象复活了)
- 第2次调用System.gc(),此时SAVE_HOOK = null,GC认为对象A可以回收,但是不会再去调用该对象的finalize()(GC只会调用一次对象的finalize方法)。所以接下来的 if 判断为false,输出"No, I am dead";
总的来说,终结方法(finalizer)通常是不可预测的,也是很危险的,一般情况下是不必要的。使用终结方法会导致行为不稳定、降低性能,以及可移植性问题。
那么,如果类的对象中封装了资源(如文件或线程)确实需要终止,怎么做才能不用编写终结方法呢?
其实,我们只需要提供一个显示的终止方法即可,比较典型的例子:InputStream、OutputStream和java.sql.Connection上的close方法。通常,显示的终止方法会与try-finally结构结合使用,以确保及时终止。代码结构如下:
1 FOO foo = new Foo();
2 try {
3     // do something
4 } finally {
5     foo.terminate(); // 如flie.close();
6 }
终结方法有什么好处呢?或者说,我们什么时候该使用它?
- 当对象的所有者忘记调用显示的终止方法时,终结方法可以充当“安全网”。迟一点释放关键资源总比永远不释放要好,FileInputStream、FileOutputStream等都有终结方法;
- 清理本地对等体(native peer)。本地对等体是一个本地对象(native object),普通对象通过本地方法(native method)委托给一个本地对象。因为本地对等体不是一个普通对象,所以GC不会知道它,当它的Java对等体被回收的时候,它不会被回收;
因为对JVM和GC方面不太了解,所以在深入理解和实践时比较费劲,Emmmmm....再接再厉吧!
转载请说明出处,have a good time! :D