http://kivy.org/docs/guide/basic.html#quickstart
I followed this tutorial about how to create basic kivy application
*********************
Creating a kivy application is as simple as:
- sub-classing the App class
- implementing its build() method so it returns a Widget instance (the root of your widget tree)
- instantiating this class, and calling its run() method.
Here is an example of a minimal application:
import kivy
kivy.require('1.0.6') # replace with your current kivy version !

from kivy.app import App
from kivy.uix.label import Label


class MyApp(App):

    def build(self):
        return Label(text='Hello world')


if __name__ == '__main__':
    MyApp().run()
You can save this to a text file, main.py for example, and run it.
*********************
LETS EXPLAIN IT!
##################
Kivy App Life Cycle
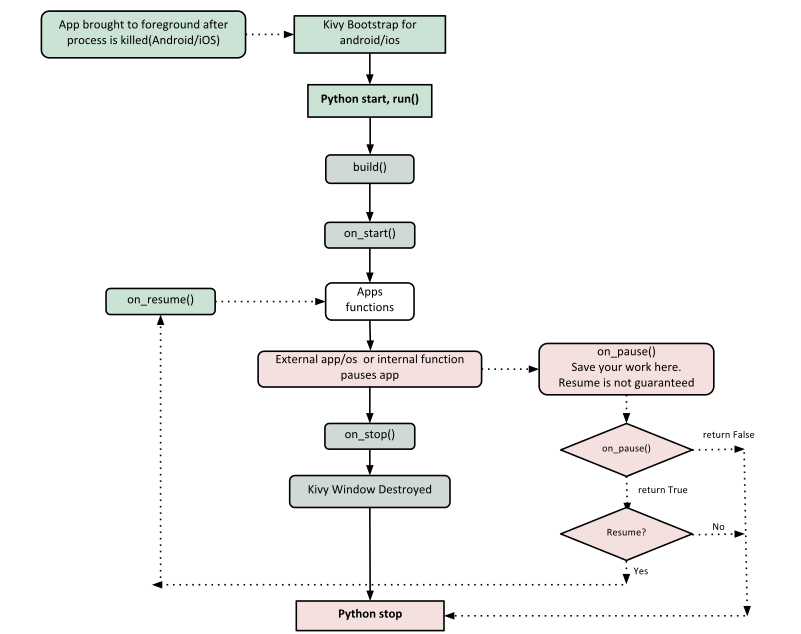
First off, let’s get familiar with the Kivy app life cycle.

As you can see above, for all intents and purposes, our entry point into our App is the run() method, and in our case that is “MyApp().run()”. We will get back to this, but let’s start from the third line:
from kivy.app import App
It’s required that the base Class of your App inherits from the App class. It’s present in the kivy_installation_dir/kivy/app.py.
Note
Go ahead and open up that file if you want to delve deeper into what the Kivy App class does. We encourage you to open the code and read through it. Kivy is based on Python and uses Sphinx for documentation, so the documentation for each class is in the actual file.
Similarly on line 2:
from kivy.uix.label import Label
One important thing to note here is the way packages/classes are laid out. The uix module is the section that holds the user interface elements like layouts and widgets.
Moving on to line 5:
class MyApp(App):
This is where we are defining the Base Class of our Kivy App. You should only ever need to change the name of your app MyApp in this line.
Further on to line 7:
def build(self):
As highlighted by the image above, show casing the Kivy App Life Cycle, this is the function where you should initialize and return your Root Widget. This is what we do on line 8:
return Label(text='Hello world')
Here we initialize a Label with text ‘Hello World’ and return it’s instance. This Label will be the Root Widget of this App.
Note
Python uses indentation to denote code blocks, therefore take note that in the code provided above, at line 9 the class and function definition ends.
Now on to the portion that will make our app run at line 11 and 12:
if __name__ == '__main__':
    MyApp().run()
Here the class MyApp is initialized and it’s run() method called. This initializes and starts our Kivy application.
##################