OpenSSL 创建私有 CA 三部曲:
使用 OpenSSL 创建私有 CA:1 根证书
使用 OpenSSL 创建私有 CA:2 中间证书
使用 OpenSSL 创建私有 CA:3 用户证书
在前文《使用 OpenSSL 创建私有 CA:2 中间证书》中我们介绍了如何创建中间证书,并生成证书链。本文我们将介绍如何为应用生成用户证书(web 站点的 ssl 证书),并把证书部署到应用服务器上和客户端上。说明:本系列文章的演示环境为 Ubuntu 18.04,OpenSSL 的版本为 1.1.0g。
目标
为局域网中的站点 bigxa 创建 ssl 证书并部署。
准备用户证书的配置文件
在 myca 目录下创建 bigxa 目录,然后创建配置文件 bigxa/bigxa.cnf,编辑其内容如下:
# OpenSSL to generate a certificate signing requests(csr) configuration file.
# v1

[ req ]
# Options for the `req` tool (`man req`).
# use prompt config control user interactive
prompt = no
input_password = 123456

default_bits        = 2048
distinguished_name  = req_distinguished_name
string_mask         = utf8only

# SHA-1 is deprecated, so use SHA-2 instead.
default_md          = sha256

# Extension to add when the -x509 option is used.
#x509_extensions     = v3_ca
req_extensions     = v3_req

[ req_distinguished_name ]
# See <https://en.wikipedia.org/wiki/Certificate_signing_request>.
countryName                     = CN
stateOrProvinceName             = ShaanXi
localityName                    = Xian
organizationName                = PowerCity Ltd
organizationalUnitName          = Star
commonName = bigxa
emailAddress                    = ljfpower@163.com

[ v3_req ]
subjectAltName = DNS:bigxa
该配置文件主要通过 [ req_distinguished_name ] 段来设置证书的信息,请注意 [ v3_req ] 段中的 subjectAltName 信息,如果你为局域网中的 IP 地址生成 https 证书,就必须要设置 subjectAltName。
创建秘钥
进入 bigxa 目录:
$ cd bigxa
创建目录 private csr certs:
$ mkdir private csr certs
执行下面的命令重建私钥:
$ openssl genrsa -out private/bigxa.key.pem 2048
注意,这里我们没有使用 -aes256 选项,这样创建的秘钥不包含密码。如果要创建 web 服务器用的 ssl 证书,一定不要为秘钥设置密码!否则在每次重启 web 服务的时候都需要输入密码!同样也把秘钥的权限设置为 400:
$ chmod 400 private/bigxa.key.pem
此时当前目录为 myca/bigxa。
创建 Certificate Signing Requests(csr)
对于创建站点的 https 类型的证书,必须在配置文件中设置 Common Name 为 fully qualified domain name(也就是 网站的域名,或者是局域网中的机器名或 IP)。我们的 web 服务器机器名为 bigxa,所以在配置文件中设置 Common Name 为 bigxa,同时设置 subjectAltName 为 DNS:bigxa。注意,Common Name 不能与根 CA 和中间 CA 的 Common Name 相同。
使用下面的命令生成 csr:
$ openssl req -config bigxa.cnf
    -key private/bigxa.key.pem
    -new -sha256
    -out csr/bigxa.csr.pem
用下面的命令来验证已经生成的 csr:
$ openssl req -text -noout -in csr/bigxa.csr.pem
注意确认下图中的关键信息 CN = bigxa:
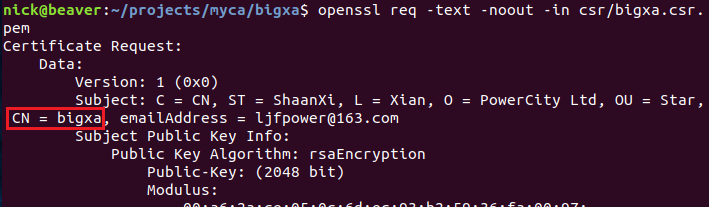
还有 Subject Alternative Name:

创建用户证书
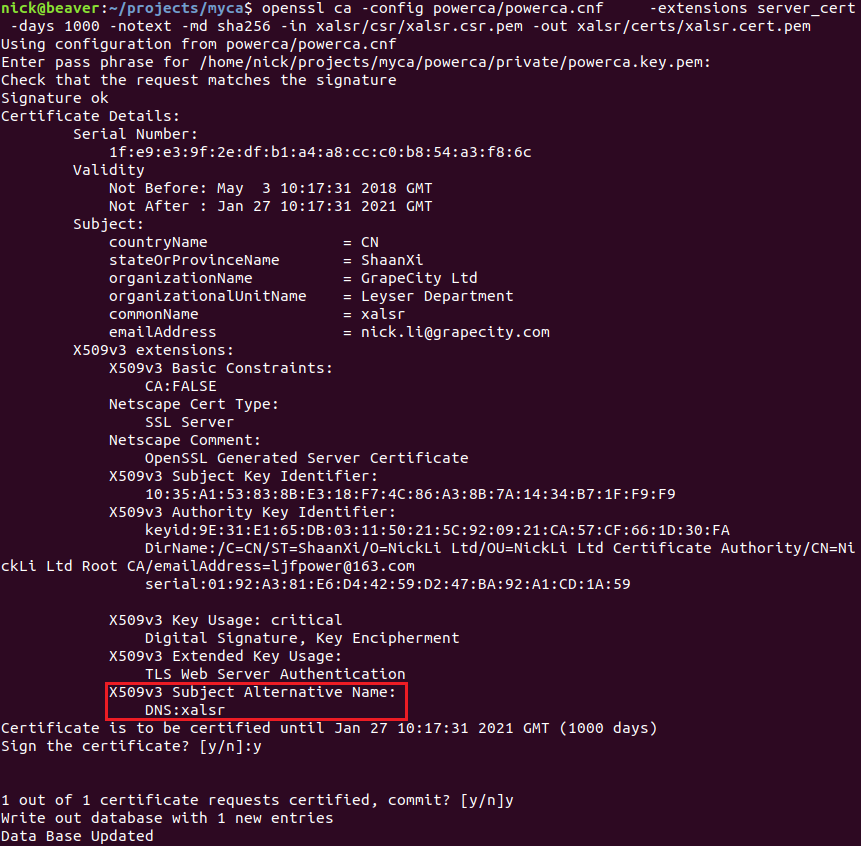
因为我们在 powerca.cnf 中添加了 copy_extensions = copy,所以在使用 csr 生成用户证书时可以直接使用中间证书的配置文件(powerca/powerca.cnf)而不用修改。下面先回到 myca 目录下,然后生成用户证书:
$ cd ..
$ openssl ca -config powerca/powerca.cnf
    -extensions server_cert -days 1000 -notext -md sha256
    -in bigxa/csr/bigxa.csr.pem
    -out bigxa/certs/bigxa.cert.pem
这次输入的密码为 powerca 秘钥的保护密码:123456。
如果发生 "TXT_DB error number 2" 的错误,把 powerca/db/index 文件中相同名称的记录删除即可。这个文件是 OpenSSL CA 工具存储数据的数据库:

证书生成后我们把它的权限修改为 444:
$ chmod 444 bigxa/certs/bigxa.cert.pem
验证证书
先通过下面的命令来验证用户证书中的基本信息:
$ openssl x509 -text -in bigxa/certs/bigxa.cert.pem -noout
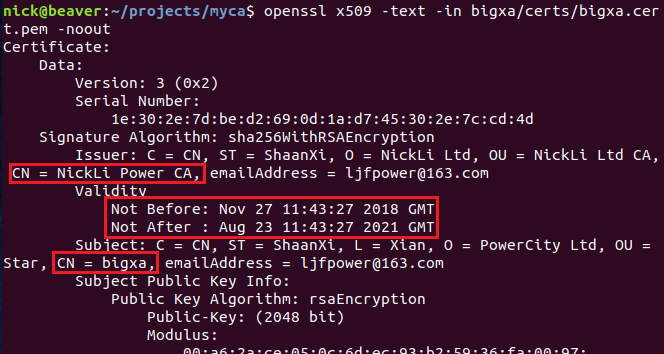
图中显示证书颁发机构为 NickLi Power CA,可用日期为 2018-11-27 至 2021-8-23 号,证书的 Common Name 为 bigxa。还有一些 X509 协议相关的信息:

CA:FALSE 表示该证书不能用作中间证书了,SSL Server 表示该证书可以用来支持 HTTPS 协议,最后确认 Subject Alternative Name 为:DNS:bigxa。
最后通过下面的命令验证证书的合法性:
$ openssl verify -CAfile powerca/certs/powerca-chain.cert.pem bigxa/certs/bigxa.cert.pem

自动创建用户证书
如果手动创建每个用户证书还是挺繁琐的,我们可以把这个过程自动化掉。在 myca 目录下创建 usercert 目录:
$ mkdir usercert
把 bigxa/bigxa.cnf 拷贝到 usercert 目录下:
$ cp bigxa/bigxa.cnf usercert/usercert.csr.cnf
在 usercert 目录下创建 private csr certs 三个目录:
$ mkdir usercert/{private,csr,certs}
然后在 myca 目录下创建脚本文件 certhelper.sh,编辑其内容如下:
#!/bin/bash
# ./certhelper.sh yourhostname
# if hostname is IP, should add the second paramerter "ip"
# ./certhelper.sh 10.3.2.33 ip

set -ex
# demo: check string is empty
if [ -z "$1" ]; then
    echo the first parameter is empty.
    echo plese add hostname as parameter
    exit 2
fi
cname="$1"
ctype="DNS"

if [ ! -z "$2" ]; then
    if [ "$2" = "ip" ]; then
        ctype="IP"
    fi
fi

sed -i "s/^commonName.*/commonName = ${cname}/g" usercert/usercert.csr.cnf
sed -i "s/^subjectAltName.*/subjectAltName = ${ctype}:${cname}/g" usercert/usercert.csr.cnf

openssl genrsa -out usercert/private/${cname}.key.pem 2048
chmod 400 usercert/private/${cname}.key.pem

openssl req -config usercert/usercert.csr.cnf
    -key usercert/private/${cname}.key.pem
    -new -sha256
    -out usercert/csr/${cname}.csr.pem

openssl ca -batch -config powerca/powerca.cnf
    -passin pass:123456
    -extensions server_cert -days 3000 -notext -md sha256
    -in usercert/csr/${cname}.csr.pem
    -out usercert/certs/${cname}.cert.pem

openssl x509 -noout -text -in usercert/certs/${cname}.cert.pem
openssl verify -CAfile powerca/certs/powerca-chain.cert.pem usercert/certs/${cname}.cert.pem

cat usercert/certs/${cname}.cert.pem usercert/private/${cname}.key.pem > /tmp/temp.${cname}.certkey.pem
cat /tmp/temp.${cname}.certkey.pem powerca/certs/powerca-chain.cert.pem > usercert/${cname}.ha.pem
然后在 myca 目录下执行该脚本就可以了:
$ ./certhelper.sh bigxa
$ ./certhelper.sh 10.32.2.22 ip
生成的证书会保存在 usercert 目录下。
把证书部署到 web 服务器
为了创建 HTTPS 站点,我们需要为 web 服务器 bigxa 配置 ssl 证书。所需的文件为 powerca-chain.cert.pem、bigxa.key.pem 和 bigxa.cert.pem。笔者的站点通过 HAProxy 做了负载均衡,所以在 HAProxy 的配置中添加 SSL 证书就可以了。具体的做法是通过下面的命令合成 HAProxy 所需的证书文件:
$ cat bigxa/certs/bigxa.cert.pem bigxa/private/bigxa.key.pem > bigxa/temp.certkey.pem
$ cat bigxa/temp.certkey.pem powerca/certs/powerca-chain.cert.pem > bigxa/bigxa.ha.pem
把 bigxa.ha.pem 放置在 bigxa 机器上的 /etc/ssl/private/ 目录中,所有者和组都设置为 haproxy。最后在 HAProxy 的配置文件 /etc/haproxy/haproxy.cfg 中设置 ssl 证书的路径:
bind *:443 ssl crt /etc/ssl/private/usercert.ha.pem
这样 web 服务器端的配置就完成了。
把证书链安装到客户端
Firefox 支持直接导入 pem 格式的证书链,直接导入这个文件就可以了。但是 windows 中需要使用 p12(pfx) 等格式,需要把 powerca-chain.cert.p12 安装到信任的根证书列表中,然后 IE 和 chrome 就可以正常识别到根证书了。
总结
本系列文章主要介绍如何在局域网中创建私有 CA,并用来颁发内网中使用的数字证书。内容以操作步骤为主,目的是让朋友们拷贝了就能立即使用。如果要了解数字证书的理论知识以及相关概念,建议阅读更专业的资料。
参考:
OpenSSL Certificate Authority
《openssl-cookbook》