使用Spring Cloud Config我们能实现服务配置的集中化管理,在服务启动时从Config Server获取需要的配置属性。但如果在服务运行过程中,我们需要将某个配置属性进行修改,比如将验证码的失效时间从五分钟调整为十分钟,如何将这个更新在服务端不重启服务就能动态生效,是本文讨论的内容。
Spring Cloud Bus
Spring Cloud Bus可以理解为Spring Cloud体系架构中的消息总线,通过一个轻量级的Message Broker来将分布式系统中的节点连接起来。可用来实现广播状态更新(如配置更新),或其它管理指令。
Spring Cloud Bus 就像是一个分布式的Spring Boot Actuator, 目前提供了两种类型的消息队列中间件支持:RabbitMQ与Kafka(对应的pom依赖分别为spring-cloud-starter-bus-amqp, spring-cloud-starter-bus-kafka)。
Spring Cloud 在spring-cloud-context中添加了两个actuator管理接口(POST请求): /actuator/env 与 /actuator/refresh, 前者可用于更新当前服务实例Environment对象中的配置属性,后者可用于刷新当前服务实例的配置信息。
Spring Cloud Bus也提供了两个对应的接口
/actuator/bus-env,相对于/actuator/env, 使用键值对更新每个实例的Environment,默认不暴露,需配置management.endpoints.web.exposure.include=bus-env 来开放接口访问/actuator/bus-refresh,相对于/actuator/refresh,对每个实例,清空RefreshScope缓存,重新绑定@ConfigurationProperties, 默认不暴露,可通过配置
management.endpoints.web.exposure.include=bus-refresh 来开放接口访问
综上,/actuator/env 与 /actuator/refresh 是针对单个服务实例修改或刷新其配置信息,而 /actuator/bus-env 与 /actuator/bus-refresh 则是借助于Spring Cloud Bus的消息机制作用于分布式系统中的所有服务实例,因此前面有Spring Cloud Bus 就像是一个分布式的Spring Boot Actuator的说法。
使用Spring Cloud Bus来实现服务配置动态更新的结构图如下
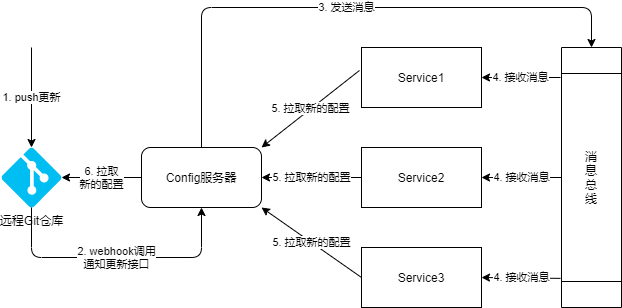
- 更新配置仓库中的配置文件,push到远程Git仓库
- 远程Git仓库通过Webhook调用配置服务器的通知更新接口
- 配置服务器发送配置更新消息到消息总线
- 其它服务节点监听到配置服务器发送的配置更新消息
- 其它服务节点向配置服务器发送拉取最新配置的请求
- 配置服务器向配置仓库拉取最新的配置返回给其它服务节点
案例演示
我们还是以前面的springcloud-config, springcloud-eureka, springcloud-eureka-client三个项目来完成本文的案例演示。源码地址
使用Actuator
在不引入Spring Cloud Bus的情况下,我们可以通过Spring Cloud提供的actuator接口来实现单个实例的配置动态更新。
依次启动springcloud-eureka, springcloud-config, springcloud-eureka-client项目,然后修改springcloud-eureka-client的启动端口,将8080改为8081,再启动一个springcloud-eureka-client的服务实例。
springcloud-eureka-client 的测试接口代码如下
@RestController
@RefreshScope
public class HelloController {

    @Autowired
    private Environment env;

    @Value("${app}")
    private String app;

    @RequestMapping("/hello")
    public String hello(){
        return "Hello, welcome to spring cloud 2. env: " + env.getProperty("app") + ", value: " + app;
    }
}
此时依次请求两个实例的hello接口,得到结果如下


我们通过/actuator/env接口来修改端口8080实例的属性app的值,使用postman操作如图

此时再请求接口返回结果如下

可以看到Environment对象中app属性的值已更新,但是 @Value注解的属性值未变,可见 /actuator/env 接口只是更新了Environment对象,并不负责刷新其它方式引用的属性值。此时请求另一个端口为8081的实例接口,其属性值都未更新,也可见 /actuator/env 只作用于当前实例本身。
如果要让8080实例的@Value属性也动态更新,则可再调用/actuator/refresh接口,如图
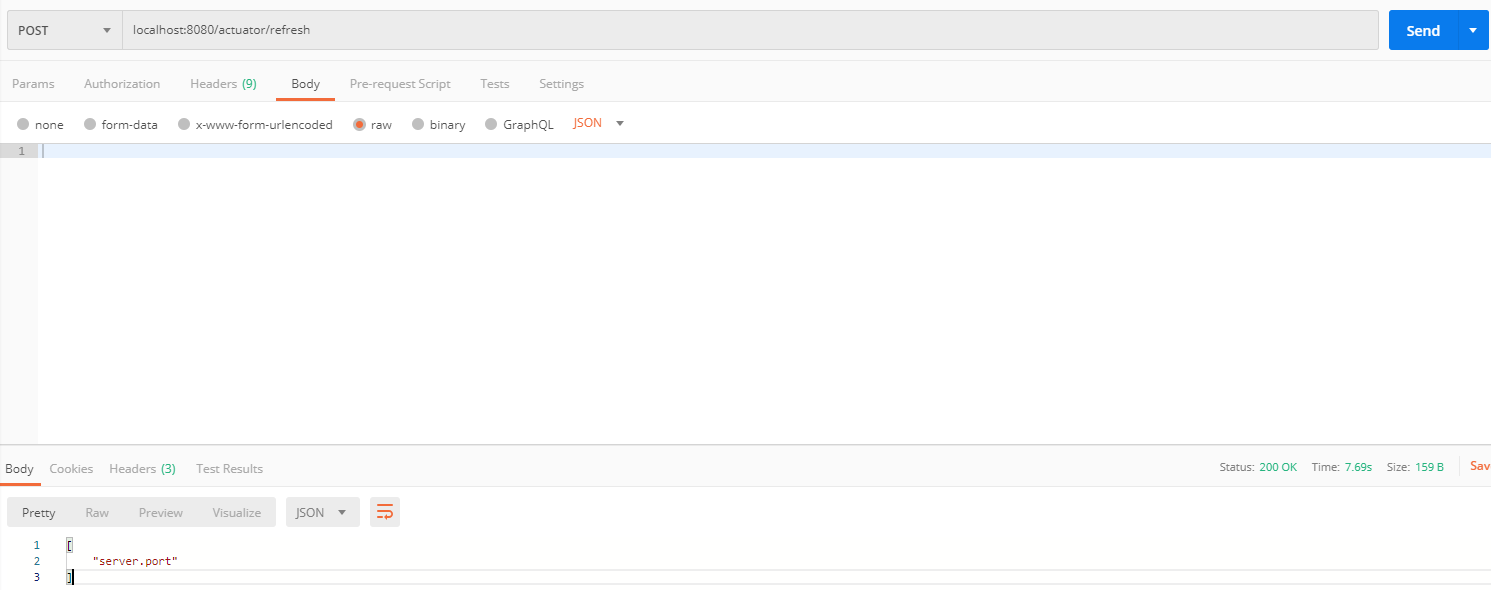
此时再请求测试接口,得到结果如下(@Value注解的属性也已经更新了)

使用Spring Cloud Bus
前面我们使用 /actuator/env 与 /actuator/refresh 两个接口可以实现单个服务实例配置的动态更新,但在微服务架构中,服务实例可能达几十甚至几百个,一个个调用来做动态更新就有点太不方便了。这时就该Spring Cloud Bus登场了。
1.添加依赖与配置
在springcloud-config, 与springcloud-eureka-client两个项目中,添加spring cloud bus的依赖与配置。
在pom.xml文件中添加依赖
<dependency>
    <groupId>org.springframework.cloud</groupId>
    <artifactId>spring-cloud-starter-bus-amqp</artifactId>
</dependency>
在application.yml配置文件中添加RabbitMQ的相关配置
spring:
  rabbitmq:
    host: 127.0.0.1
    port: 5672
    username: rabbitmq
    password: passw0rd
2.依次启动springcloud-eureka, springcloud-config, springcloud-eureka-client项目,并以8081端口再启动一个springcloud-eureka-client的服务实例。
3.我们使用postman对配置服务器调用/actuator/bus-env接口,
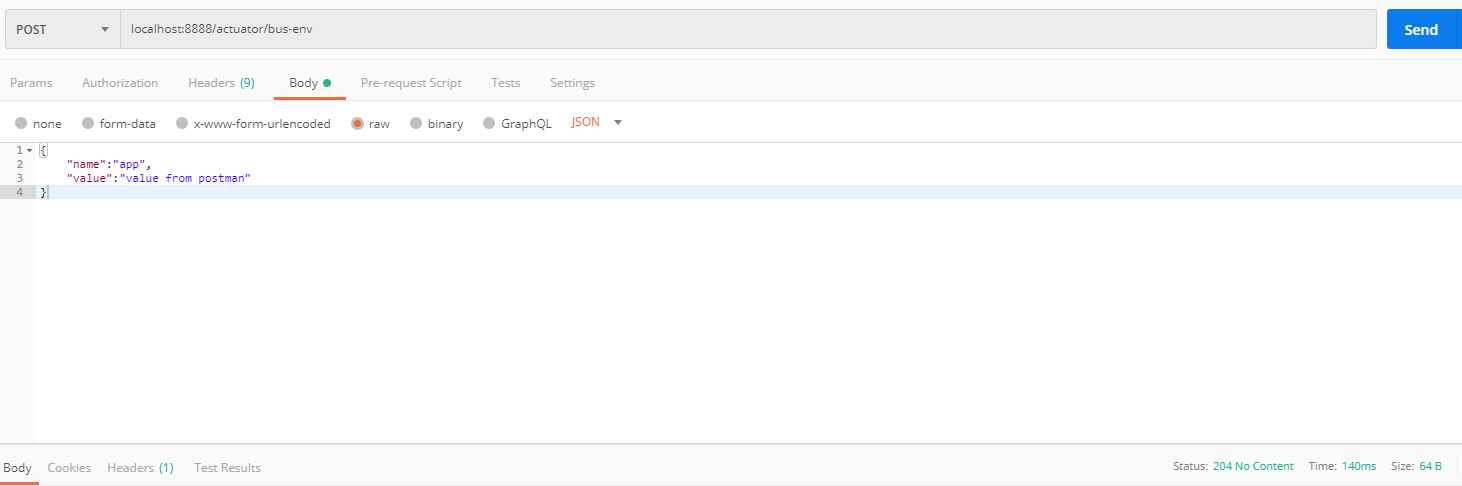
请求两个服务实例的测试接口,得到结果


两个实例的Environment对象都已经更新,如果要将@Value注解的属性也更新,则可再调用配置服务器的/actuator/bus-refresh接口。
/actuator/bus-env接口是直接更新的内存Environment实例属性,如果服务重启,则又还原到之前的配置了, 所以还是需要借助配置仓库来永久更新。配置更新后还需要手动调用接口使其生效?DevOps时代了,能自动化的就自动化吧,我们可以借助Git的webhook机制来实现自动化。
自动化
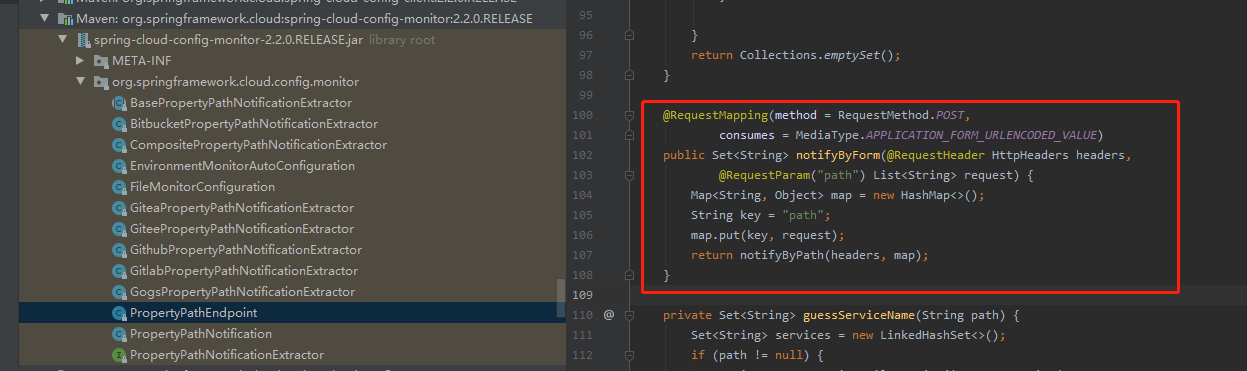
本文开头的“使用Spring Cloud Bus来实现服务配置动态更新的结构图”已经示例了使用Git仓库的webhook来触发自动更新配置的流程。但是在Git(如Github)中,我们不能直接使用/actuator/bus-refresh接口来作为webhook(因为接口协议不一致,会出现解析异常),也有人通过提供自己的接口来作为webhook,在自己接口中再转发请求到/actuator/bus-refresh来实现。但实际上,spring-cloud-config-monitor已经提供了对Git webhook的支持。
如下图,spring-cloud-config-monitor提供了对Github,Gitlab,Gitee,BitBucket等的支持
1.在配置服务器springcloud-config的pom.xml文件中添加依赖
<dependency>
    <groupId>org.springframework.cloud</groupId>
    <artifactId>spring-cloud-config-monitor</artifactId>
</dependency>
2.在配置仓库的设置页面配置webhook,比如Github的配置如图
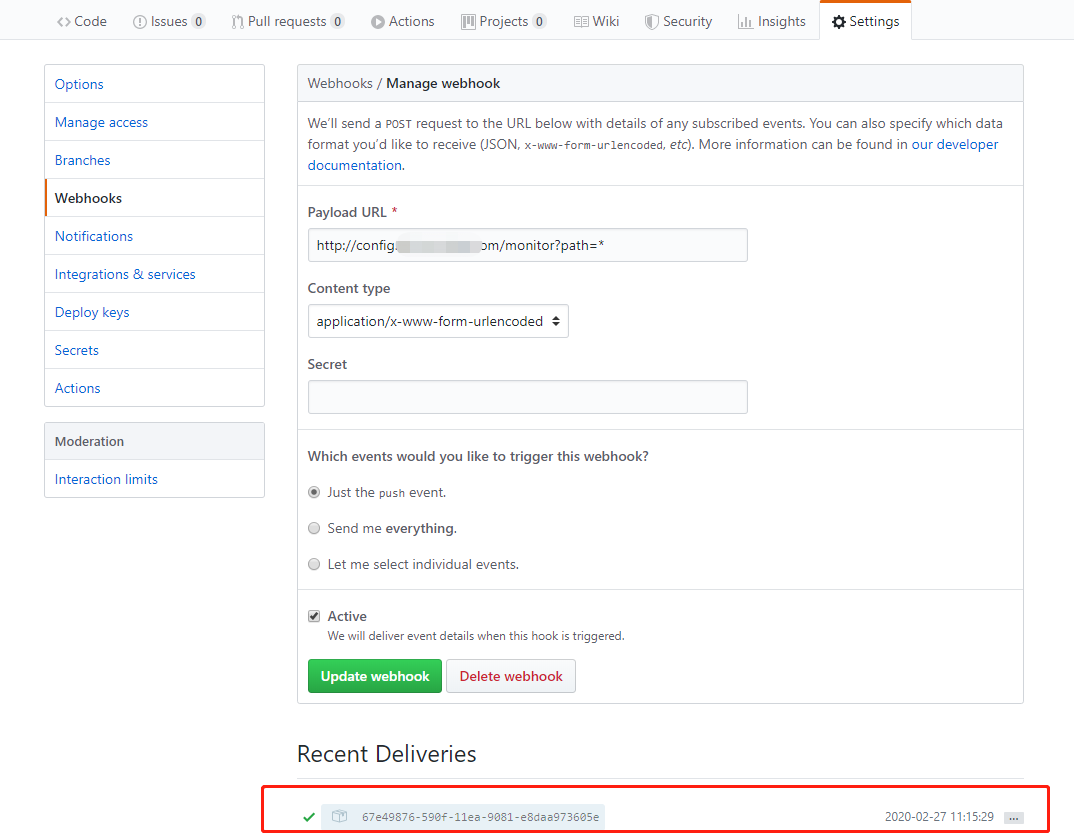
Payload URL 配置为配置服务器的monitor接口地址,path参数必须。如果你的配置服务器在内网,比如做本地测试时,还需要实现一下内网穿透(如frp)。
在配置仓库项目中修改配置属性,提交代码,Github webhook就会触发自动更新,上图下方红色框为触发自动更新的记录。
自动更新配置未生效排查
如果出现Github触发了自动更新,但服务的配置更新未生效的情况,则需要查看webhook的匹配规则与服务实例的ServiceID是否匹配,webhook的匹配规则为 spring.application.name:spring.cloud.config.profile:**,服务实例的ServiceID可通过spring.cloud.bus.id配置,如果没有配置,则默认为
${vcap.application.name:${spring.application.name:application}}:${vcap.application.instance_index:${spring.application.index:${local.server.port:${server.port:0}}}}:${vcap.application.instance_id:${random.value}}
遵循app:index:id的格式,
- app:如果vcap.application.name存在,使用vcap.application.name,否则使用spring.application.name,默认值为application
- index:优先使用vcap.application.instance_index,如果不存在则依次使用spring.application.index、local.server.port、server.port, 默认值为0
- id:如果vcap.application.instance_id存在,使用vcap.application.instance_id,否则给一个随机值
我们可以在服务项目中打开spring cloud bus的debug日志
logging:
  level:
    org.springframework.cloud.bus: debug
通过DefaultBusPathMatcher的debug日志来查看是否匹配,如
DEBUG 286196 --- [7O8XC9KNWbyDA-1] o.s.cloud.bus.DefaultBusPathMatcher : In match: hello-service:8081:c96f04c81dfce6dffaa9d116811d127c, hello-service:8081:c96f04c81dfce6dffaa9d116811d127c
如果没有匹配则可以按照webhook的匹配规则设置spring.cloud.bus.id值或vcap.application.instance_index值,如
spring:
  application:
    name: hello-service
  cloud:
    config:
      discovery:
        service-id: config-server
        enabled: true
      profile: ${spring.profiles.active:default}
    bus:
      id: ${spring.application.name}:${spring.cloud.config.profile}:${random.value}
#或
vcap:
  application:
    instance_index: ${spring.cloud.config.profile}
配置更新未生效的另一个情况是查看是否用了@RefreshScope注解。
@RefreshScope
细心的人会发现本文开头的测试接口类上加了@RefreshScope注解。 @RefreshScope是Spring Cloud提供的用来实现配置、实例热加载的注解。被@RefreshScope修饰的@Bean都是延迟加载的,即在第一次访问(调用方法)时才会被初始化,并且这些bean存于缓存中。当收到配置更新的消息时,缓存中的@RefreshScope bean会被清除,这样下次访问时将会重新创建bean,此时使用的就是最新的配置信息,从而实现配置的热加载。
总结
本文分别示例了使用spring boot actuator与spring cloud bus来实现服务配置的更新及两者之间的区别, spring cloud bus一定程度上像是一个分布式的spring boot actuator。同时演示了使用webhook与spring cloud bus,monitor结合来实现配置自动更新的具体流程及可能遇到的问题。
认真生活,快乐分享!如果你觉得文章对你有帮助,欢迎分享转发!
欢迎关注微信公众号:空山新雨的技术空间
获取Spring Boot,Spring Cloud,Docker等系列技术文章