卷积和池化在深度学习中的作用是对图像和文本信息提取特征的常用方式,特别是在分类领域
卷积:通过不同的卷积核与图像或文本数据矩阵 进行矩阵相乘,得到不同特征的若干组训练特征数据
池化:池化通常有两种最大池化(max-pooling)和平均池化,最大池化就是在一块矩阵区域(比如2X2,4个像素点),取最大的那个值作为输出,平均池化就是取四个像素点的平均值作为输出值
卷积池化后再加上全连接层,详细可去搜一下具体介绍,我们直接看代码,代码关键部分都有注释。
# -*- coding: UTF-8 -*-

import tensorflow as tf
from tensorflow.examples.tutorials.mnist import input_data

mnist = input_data.read_data_sets("MNIST_data", one_hot=True)

#每批次的大小
batch_size = 100
#计算一共有多少批次
n_batch = mnist.train.num_examples // batch_size

#初始化权值
def weight_variable(shape):
    initial = tf.truncated_normal(shape, stddev=0.1) #生成截断的正态分布
    return tf.Variable(initial)
#初始化偏执值
def bias_variable(shape):
    initial = tf.constant(0.1, shape=shape)
    return tf.Variable(initial)
#卷积层
def conv2d(x, W):
#x input tensor of shape '[batch, in_height, in_width,in_channels]',in_channels是通道数,如果为黑白则为1,彩色则为3
#W filter /kernel tensor of shape [filter_height,filter_width,in_channels,out_channels]滤波器或是卷积核
#'strides[0]=strides[3]=1',strides[1]代表x方向的步长,strides[2]代表y方向的步长
#padding:在外面补0
    return tf.nn.conv2d(x,W,strides=[1,1,1,1],padding='SAME')
#池化层
def max_pool_2x2(x):
#ksize[1,x,y,1]是窗口的大小。'strides[0]=strides[3]=1'。x,y代表窗口的大小
    return tf.nn.max_pool(x,ksize=[1,2,2,1],strides=[1,2,2,1],padding='SAME')

#定义两个placeholder
x=tf.placeholder(tf.float32,[None,784]) #28*28=784
y=tf.placeholder(tf.float32,[None,10])

#改变x的格式转为4D的向量[batch, in_height, in_width, in_channels]
x_image = tf.reshape(x,[-1,28,28,1])

#初始化第一个卷积层的权值和偏置
W_conv1=weight_variable([5,5,1,32]) #5*5的采样窗口,32个卷积核从1个平面抽取特征
b_conv1=bias_variable([32]) #每一个卷积核一个偏执值(32个卷积核需要32个偏执值)

#把x_image和权重向量进行卷积,再加上偏执值,然后应用于relu激活函数
h_conv1=tf.nn.relu(conv2d(x_image,W_conv1)+b_conv1)
h_pool1=max_pool_2x2(h_conv1) #进行max-pooling

#初始化第二个卷积层的权重和偏置
W_conv2=weight_variable([5,5,32,64]) #5*5的采样窗口,64个卷积核从32个平面抽取特征
b_conv2=bias_variable([64]) #每一个卷积核一个偏执值

#把h_pool1和权值向量进行卷积,再加上偏执值,然后应用于relu激活函数
h_conv2=tf.nn.relu(conv2d(h_pool1,W_conv2)+b_conv2)
h_pool2=max_pool_2x2(h_conv2)#进行maxpooling

#28*28的图像第一次卷积后还是28*28,第一次池化后变成14*14,最后得到32张14*14的平面
#第二次卷积后为14*14,第二次池化后为7*7,最后得到64张7*7的平面
#经过上面的操作后得到64张7*7的平面

#初始化第一个全连接的权值
W_fc1=weight_variable([7*7*64,100]) #上一层有7*7*64个神经元,全连接层有1024个神经元
b_fc1=bias_variable([100]) #1024个节点

#把池化层2的输出扁平化为1维
h_pool2_flat=tf.reshape(h_pool2,[-1,7*7*64])
#求第一个全连接层的输出
h_fc1=tf.nn.relu(tf.matmul(h_pool2_flat, W_fc1) + b_fc1)

#keep_prob用来表示神经元的输出概率
keep_prob=tf.placeholder(tf.float32)
h_fc1_drop=tf.nn.dropout(h_fc1,keep_prob)

#初始化第二个全连接层
W_fc2=weight_variable([100,10])#100个神经元,10个分类
b_fc2=bias_variable([10])

#计算输出
prediction = tf.nn.softmax(tf.matmul(h_fc1_drop, W_fc2)+b_fc2)

#交叉墒代价函数
cross_entropy=tf.reduce_mean(tf.nn.softmax_cross_entropy_with_logits(labels=y,logits=prediction))
#使用AdamOptimizier进行优化
train_step=tf.train.AdamOptimizer(1e-4).minimize(cross_entropy)

#结果存放在一个布尔列表中
correct_prediction=tf.equal(tf.argmax(prediction,1), tf.argmax(y,1)) #argmax返回一维张量中最大的值所在的位置

#求准确率
accuracy=tf.reduce_mean(tf.cast(correct_prediction,tf.float32))

with tf.Session() as sess:
    sess.run(tf.global_variables_initializer())
    for epoch in range(21):
        for batch in range(n_batch):
            batch_xs,batch_ys=mnist.train.next_batch(batch_size)
            sess.run(train_step,feed_dict={x:batch_xs,y:batch_ys,keep_prob:0.7})

        acc=sess.run(accuracy,feed_dict={x:mnist.test.images, y:mnist.test.labels,keep_prob:1.0})
        print ("Iter "+str(epoch) + ", Testing Accuracy= " +str(acc))
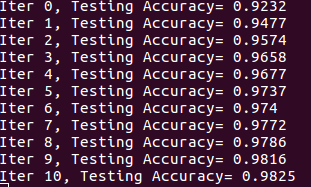
执行结果图:迭代到最后的时候准确率可达到99%多