一、日志模块(logging )
日志是一种追踪软件运行时所发生事件的方法
1、简单的日志编写(文件输出)
import logging      # 日志模块

# 日志配置,把日志内容存到文件中
logging.basicConfig(level=logging.ERROR,     # 级别修改,注意一定是大写
                    format='%(asctime)s %(filename)s[line:%(lineno)d] %(levelname)s %(message)s',
                    datefmt='%a, %d %b %Y %H:%M:S',  # 指定时间格式
                    filename='test.log',    # 日志内容存到该文件目录下
                    filemode='w')    # 模式,每次开始都刷新重写,如果想要之前的内容就把‘w’改为‘a’


# 日志级别,()里面是日志的内容,可以随意添加
logging.debug('debug message')
logging.info('info message')
logging.warning('warning message')
logging.error('error message')
logging.critical('critical message')
输出:Tue, 05 Mar 2019 16:37:S logging .py[line:16] ERROR error message
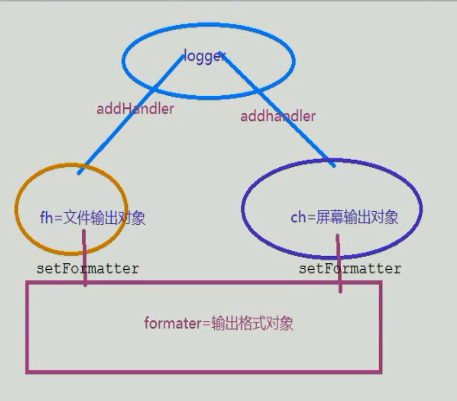
Tue, 05 Mar 2019 16:37:S logging .py[line:17] CRITICAL critical message2、文件和屏幕同时输出
import logging

logger = logging.getLogger()

# 创建一个hangler, 用于写入日志文件
fh = logging.FileHandler('test.log')    # 文件输出对象

# 再创建一个handler, 用于输出到控制台
ch = logging.StreamHandler()      # 屏幕输出对象

formatter = logging.Formatter('%(asctime)s - %(name)s - %(levelname)s - %(message)s')

fh.setFormatter(formatter)     # 文件输出创建一个formatter输出流格式
ch.setFormatter(formatter)

logger.addHandler(fh)     # logger里面有两种输出对象,文件和屏幕
logger.addHandler(ch)

logger.setLevel(logging.WARNING)     # 修改输出日志的级别,从DEBUG开始,输出5行,注意全是大写
# 日志等级是从上到下依次升高的,即:DEBUG < INFO < WARNING < ERROR < CRITICAL
logging.debug('debug message')
logging.info('info message')
logging.warning('waring message')
logging.error('error message')
logging.critical('critical message')
输出: 

二、os模块
作用:对大量的文件和文件路径进行操作
import os

print(os.getcwd())   # 获取当前工作目录

os.chdir(r'F:My testfullstackweek2')  # 改变当前工作目录,加r表示原生字符串,不进行任何转义

print(os.curdir)   # 获取当前目录:‘.’  用一个‘.’ 表示
print(os.pardir)   # 获取当前目录的父级目录字符串名:‘..’
os.makedirs('abc')   # 创建文件夹,默认创建在当前目录下,如果文件已存在,报错

os.makedirs('abc\long')  # 创建多层目录,用 \ 隔开
os.mkdir('abc')    # 只能生成一个文件
os.mkdir('abc\long')   # 在已经有abc 文件的基础上,再生成一个文件loing

os.removedirs('abc\long')  # 删除文件夹(只能删除空文件)先判断long中有没有文件,没有就删除,一层层往外找
os.rmdir('abc')  # 删除单级空目录,若目录不为空无法删除

dirs = os.listdir(r'F:My testfullstackweek2')   # 打印绝对目录里面的所有文件
print(dirs)

os.remove('abc\dff')    # 删除dff文件,只能删除文件不能删除文件夹,
os.rename('abc', 'www')    # 修改文件(夹)名, abc改为www

info = os.stat('.\www')   # 获取文件的详细信息
print(info)
print(info.st_size)   # 获取文件大小

print(os.sep)  #   获取当前系统的路径分割符
q = os.sep   # 用q替换分隔符, q是一个变量

# windows里换行符为:
   linux里换行符为:


print(os.pathsep)   # 输出用于路径分割文件路径的字符

print(os.name)  # 输出字符串当前使用平台  win->'nt'
print(os.system("dir"))  # 显示当前目录的内容
print(os.environ)  # 获取系统环境变量
print(os.path.abspath('./www'))    # 获取文件www的绝对路径

s = os.path.split(r'F:My testfullstackweek2day3www')
print(s)   # 把文件路径和文件名分隔开

s = os.path.dirname('F:\My test\fullstack\week2\day3')
print(s)    # 返回当前文件上一级的文件夹路径

s = os.path.basename('F:\My test\fullstack\week2\day3')
print(s)    # day3   返回文件名,就是 os.path.split(path) 的第二个内容

s = os.path.exists('F:\My test\fullstack\week2\day3')
print(s)   # path存在返回True,不存在返回False

s = os.path.isabs('F:\My test\fullstack\week2\day3')
print(s)   # 如果path是绝对路径返回True,否则返回False

s = os.path.isfile('F:\My test\fullstack\week2\day3')
print(s)   # 如果path是一个存在的文件返回True,否则返回False

s = os.path.isdir('F:\My test\fullstack\week2\day3')
print(s)   # 如果path是一个存在的目录返回True,否则返回False

s = os.path.join('F:\My test\fullstack\week2\day3', 'F:\My test\fullstack\week2\day4')
print(s)   # 路径拼接: F:My testfullstackweek2day4

s = os.path.getatime('F:\My test\fullstack\week2\day3')
print(s)   # 返回path所指向文件或目录的最后存取时间

s = os.path.getmtime('F:\My test\fullstack\week2\day3')
print(s)   # 返回path所指向文件或目录的最后修改时间
三、configparser 模块
作用:用于生成和修改常见的配置文件,通过字典录入
import configparser

# 所有操作都围绕config对象进行
config = configparser.ConfigParser()

# 写入文件
config["DEFAULT"] = {'ServerAliveInterval': '45',
                     'Compression': 'yes',
                     'CompressionLevel': '9'}
# 生成的是字典的形式:DEFAULG 是键,中括号里面是键值,下同

config['bitbucket.org'] = {'User': 'hg'}

config['topsecret.server.com'] = {}
topsecret = config['topsecret.server.com']
topsecret['Host Port'] = '50022'
topsecret['ForwardXll'] = 'no'
config['DEFAULT']['ForwardXll'] = 'yes'

with open('example.ini', 'w') as configfile:
    config.write(configfile)
输出:

写入的文件还可以读出来:
import configparser

config = configparser.ConfigParser()    # 所有操作都围绕config对象进行

config.read('example.ini')   # 读配置文件操作
print(config.sections())     # 不能读取默认块儿的内容:['bitbucket.org', 'topsecret.server.com']
print(config.defaults())     # 读取默认块儿DEFAULT里面的信息
print(config['bitbucket.org']['User'])   # hg

for key in config:
    print(key)   # 打印所有块儿的名字

for key in config['bitbucket.org']:
    print(key)    # DEFAULT 是特殊的,打印别的块下的内容它也跟在下面
配置文件的增删改:
config.remove_section('topsecret.server.com')   # 删除块:topsecret.server.com
config.write(open('i.cfg', 'w'))  # 无论如何修改都要加这句,下同
print(config.has_section('topsecret.server.com'))   # 判断有没有该字符串:False  (因为前面删除了)

config.set('bitbucket.org', 'user', 'xiaoss')  # 修改操作:('块', '键', '要修改的值')


config.remove_option('DEFAULT', 'forwardxll')   # 删除块下的某个键值对儿:('块', '键值')

config.write(open('example.ini', 'w'))    # 注意对文件example.ini,是完全清空重新写入,是覆盖,文件名与原来相同
注意:一个文件一旦命名绝对不会被修改,只能重新建立文件写入,修改并不是真正的修改,而是建立新的文件放在对象里面然后覆
盖原来的对象