Yaml数据存储文件
概述
YAML 是一种所有编程语言可用的友好的数据序列化标准,语法和其他高阶语言类似,并且可以简单表达清单、散列表,标量等资料形态.语法规则
1.大小写敏感
2.使用缩进表示层级关系
3.缩进时不允许使用Tab键,只允许使用空格。
4.缩进的空格数目不重要,只要相同层级的元素左侧对齐即可
支持的数据结构
1.对象:键值对的集合,又称为映射(mapping)/ 哈希(hashes) / 字典(dictionary)
2.数组:一组按次序排列的值,又称为序列(sequence) / 列表(list)
3.纯量(scalars):单个的、不可再分的值
字典
值为字符
yml文件
name: 'sunt'读取并打印
import yaml
def yml_data_with_file():
    with open("./data.yml",'r') as f:
       return yaml.load(f)
if __name__ == '__main__':
    print(yml_data_with_file())

结果:
  {'name': 'sunt'}
值为字典
yml文件
people: {'name':'sunt','age':20}结果
{'people': {'name': 'sunt', 'age': 20}}多个值为字符
yml文件
name: 'st'
age: 20
结果
{'name': 'st', 'age': 20}值为列表
yml文件
num:
  - 1
  - 2
  - 3
结果
{'num': [1, 2, 3]}列表
yml文件
# 注意列表要和字典搭配使用效果更佳,因为字典是key=value形式,有利于快速定位需要的值
num:
  - 1
  - 2
  - 3
结果
{'num': [1, 2, 3]}yml文件
num: [1,2,3]结果
{'num': [1, 2, 3]}日期
yml文件
time: 2017-10-11 15:12:12结果
{'time': datetime.datetime(2017, 10, 11, 15, 12, 12)}Python解析yaml文件
PyYAML库安装
PyYAML为python解析yaml的库
安装:pip3 install -U PyYAML
读取yaml文件内容
data.yml
search_test_001:
        value: 456
        expect: [4,5,6]
search_test_002:
        value: "hello"
        expect: {"value":"hello"}
读yaml方法
    yaml.load(stream, Loader=Loader)
    参数:
        stream:待读取文件对象
import yaml
def yml_data_with_file():
with open("./data.yml",'r') as f:
return yaml.load(f)
if __name__ == '__main__':
print(yml_data_with_file())执行结果
{'search_test_001': {'value': 456, 'expect': [4, 5, 6]}, 'search_test_002': {'value': 'hello', 'expect': {'value': 'hello'}}}写入yaml文件内容
{'search_test_001': {'value': 456, 'expect': [4, 5, 6]}, 'search_test_002': {'value': 'hello', 'expect': {'value': 'hello'}}}方法:
yaml.dump(data,stream,**kwds)
    常用参数:
        data:写入数据类型为字典
        stream:打开文件对象
        encoding='utf-8' # 设置写入编码格式
        allow_unicode=True # 是否允许unicode编码
import yaml
def yml_data_with_file():
data={'search_test_001': {'value': 456, 'expect': [4, 5, 6]},
'search_test_002': {'value': 'hello', 'expect': {'value': '你好'}}}
with open("./text.yaml", "w") as f: # 在当前目录下生成text.yaml文件,若文件存在直接更新内容
yaml.dump(data, f,encoding='utf-8',allow_unicode=True)
if __name__ == '__main__':
print(yml_data_with_file())结果:
/*想要搞明白其结构,有个方法:从宏观到微观。*/
search_test_001:
  expect:
  - 4
  - 5
  - 6
  value: 456
search_test_002:
  expect:
    value: 你好
  value: hello
Yaml数据驱动应用
目标集成Pytest完成测试任务业务需求
1.进入设置点击搜索按钮
2.输入搜索内容
3.点击返回
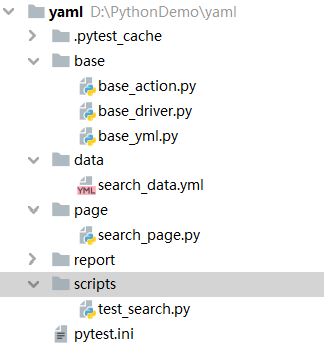
目录文件

base文件夹
base_driver.py
from appium import webdriver
def init_driver():
    # server 启动参数
    desired_caps = {}
    # 设备信息
    desired_caps['platformName'] = 'Android'
    desired_caps['platformVersion'] = '5.1'
    desired_caps['deviceName'] = '192.168.164.101:5555'
    # app信息
    desired_caps['appPackage'] = 'com.android.settings'
    desired_caps['appActivity'] = '.Settings'
    # 中文
    desired_caps['unicodeKeyboard'] = True
    desired_caps['resetKeyboard'] = True
    # 声明对象
    driver = webdriver.Remote('http://localhost:4723/wd/hub', desired_caps)
    return driver
base_action.py
class BaseAction:
    def __init__(self,driver):
        self.driver=driver
    def click(self,loc):
        self.find_element(loc).click()
    def input_text(self,loc,text):
        self.find_element(loc).send_keys(text)
    def find_element(self,loc):
        return self.driver.find_element(loc[0],loc[1])
base_yml.py
import yaml
def yml_data_with_file(file_name):
    with open("./data/"+file_name+".yml",'r') as f:
       return yaml.load(f)
data文件夹
search_data.yml
test_search:
  - '1'
  - '2'
test_search2:
  - '3'
  - '4'
page文件夹
search_page.py
from selenium.webdriver.common.by import By
from base.base_action import BaseAction

class SearchPage(BaseAction):
    def __init__(self,driver):
        BaseAction.__init__(self,driver)
    # 点击放大镜
    view_button=By.XPATH, "//*[contains(@content-desc,'搜索')]"
    # 点击搜索,输入文字
    search_button=By.XPATH, "//*[contains(@text,'搜索')]"
    # 点击返回
    back_button=By.XPATH, "//*[contains(@content-desc,'收起')]"

    def view_click(self):
        self.click(self.view_button)

    def search_click(self,txt):
        self.input_text(self.search_button,txt)

    def back_click(self):
        self.click(self.back_button)
scripts文件夹
test_search.py
import os, sys
import pytest
sys.path.append(os.getcwd())
from base.base_driver import init_driver
from page.search_page import SearchPage
from base.base_yml import yml_data_with_file
def data_with_key(key):
   return yml_data_with_file('search_data')[key]
class Test_search:
    def setup(self):
        self.driver=init_driver()
        self.searchpage=SearchPage(self.driver)

    @pytest.mark.parametrize("content",data_with_key('test_search'))
    def test_search(self,content):
        # 点击放大镜
        self.searchpage.view_click()
        # 点击搜索框输入文字
        self.searchpage.search_click(content)
        # 点击返回
        self.searchpage.back_click()

    @pytest.mark.parametrize("content", data_with_key('test_search2'))
    def test_search2(self, content):
        # 点击放大镜
        self.searchpage.view_click()
        # 点击搜索框输入文字
        self.searchpage.search_click(content)
        # 点击返回
        self.searchpage.back_click()