行为设计模式是识别对象之间的通信模式,行为模式涉及对象之间的责任分配,或者,将行为封装在对象中并将请求委托给它,也就是对象之间的关系。
涉及:
- 状态模式
- * 中介模式
- 观察者模式
- * 备忘录模式
- * 迭代器模式
- * 命令模式
- 策略模式
- 模板模式
- 访客模式示例
- * 责任链模式
责任链模式
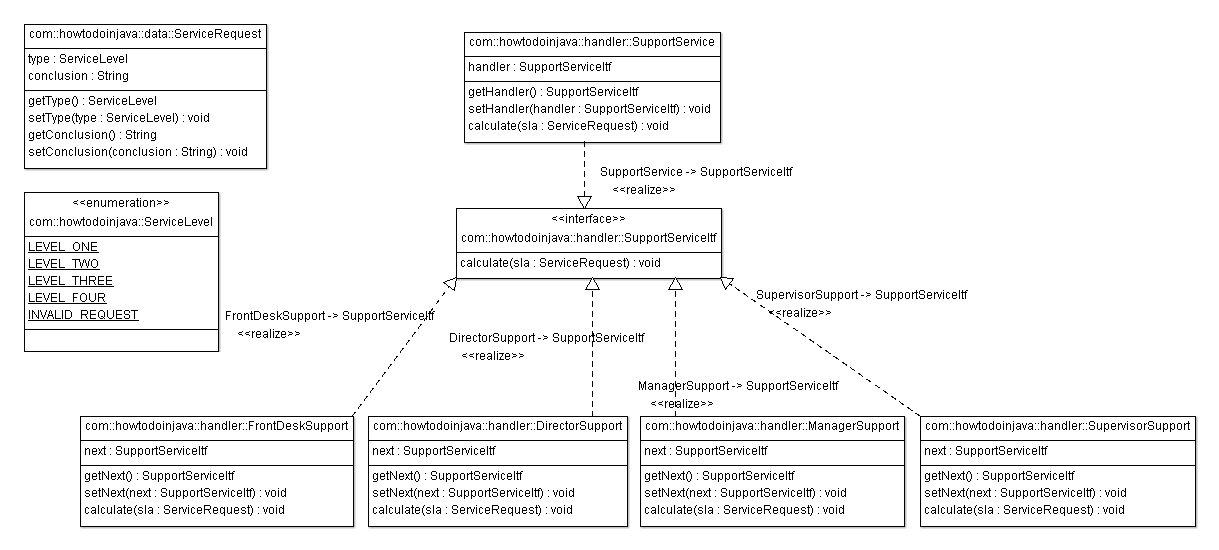
责任链模式(Chain of Responsibility Pattern)为请求创建了一个接收者对象的链。这种模式给予请求的类型,对请求的发送者和接收者进行解耦。这种类型的设计模式属于行为型模式。
在这种模式中,通常每个接收者都包含对另一个接收者的引用。如果一个对象不能处理该请求,那么它会把相同的请求传给下一个接收者,依此类推。

//Support desk > supervisor > manager > director
public enum ServiceLevel
{
    LEVEL_ONE, LEVEL_TWO, LEVEL_THREE, LEVEL_FOUR, INVALID_REQUEST
}

public class ServiceRequest {

    private ServiceLevel type;
    private String conclusion = null;

    public ServiceLevel getType() {
        return type;
    }
    public void setType(ServiceLevel type) {
        this.type = type;
    }
    public String getConclusion() {
        return conclusion;
    }
    public void setConclusion(String conclusion) {
        this.conclusion = conclusion;
    }
}

public interface SupportServiceItf
{
    public void handleRequest(ServiceRequest request);
}

public class SupportService implements SupportServiceItf {

    private SupportServiceItf handler = null;

    public SupportServiceItf getHandler() {
        return handler;
    }

    public void setHandler(SupportServiceItf handler) {
        this.handler = handler;
    }

    @Override
    public void handleRequest(ServiceRequest request) {
        handler.handleRequest(request);
    }
}

public class FrontDeskSupport implements SupportServiceItf {

    private SupportServiceItf next = null;
    public SupportServiceItf getNext() {
        return next;
    }
    public void setNext(SupportServiceItf next) {
        this.next = next;
    }

    @Override
    public void handleRequest(ServiceRequest service) {
        if(service.getType() == ServiceLevel.LEVEL_ONE)
        {
            service.setConclusion("Front desk solved level one reuqest !!");
        }
        else
        {
            if(next != null){
                next.handleRequest(service);
            }
            else
            {
                throw new IllegalArgumentException("No handler found for :: " + service.getType());
            }
        }
    }
}

public class SupervisorSupport implements SupportServiceItf {

    private SupportServiceItf next = null;
    public SupportServiceItf getNext() {
        return next;
    }
    public void setNext(SupportServiceItf next) {
        this.next = next;
    }

    @Override
    public void handleRequest(ServiceRequest request) {
        if(request.getType() == ServiceLevel.LEVEL_TWO)
        {
            request.setConclusion("Supervisor solved level two reuqest !!");
        }
        else
        {
            if(next != null){
                next.handleRequest(request);
            }
            else
            {
                throw new IllegalArgumentException("No handler found for :: " + request.getType());
            }
        }
    }
}

public class ManagerSupport implements SupportServiceItf {

    private SupportServiceItf next = null;
    public SupportServiceItf getNext() {
        return next;
    }
    public void setNext(SupportServiceItf next) {
        this.next = next;
    }

    @Override
    public void handleRequest(ServiceRequest request) {
        if(request.getType() == ServiceLevel.LEVEL_THREE)
        {
            request.setConclusion("Manager solved level three reuqest !!");
        }
        else
        {
            if(next != null){
                next.handleRequest(request);
            }
            else
            {
                throw new IllegalArgumentException("No handler found for :: " + request.getType());
            }
        }
    }
}

public class DirectorSupport implements SupportServiceItf {

    private SupportServiceItf next = null;
    public SupportServiceItf getNext() {
        return next;
    }
    public void setNext(SupportServiceItf next) {
        this.next = next;
    }

    @Override
    public void handleRequest(ServiceRequest request) {
        if(request.getType() == ServiceLevel.LEVEL_FOUR)
        {
            request.setConclusion("Director solved level four reuqest !!");
        }
        else
        {
            if(next != null){
                next.handleRequest(request);
            }
            else
            {
                request.setConclusion("You problem is none of our business");
                throw new IllegalArgumentException("You problem is none of our business :: " + request.getType());
            }
        }
    }
}

<?xml  version="1.0" encoding="UTF-8"?>
<beans xmlns="http://www.springframework.org/schema/beans"
    xmlns:xsi="http://www.w3.org/2001/XMLSchema-instance"
    xmlns:aop="http://www.springframework.org/schema/aop"
    xmlns:context="http://www.springframework.org/schema/context"
    xmlns:jee="http://www.springframework.org/schema/jee"
    xmlns:lang="http://www.springframework.org/schema/lang"
    xmlns:p="http://www.springframework.org/schema/p"
    xmlns:tx="http://www.springframework.org/schema/tx"
    xmlns:util="http://www.springframework.org/schema/util"
    xsi:schemaLocation="http://www.springframework.org/schema/beans http://www.springframework.org/schema/beans/spring-beans.xsd
        http://www.springframework.org/schema/aop http://www.springframework.org/schema/aop/spring-aop.xsd
        http://www.springframework.org/schema/context http://www.springframework.org/schema/context/spring-context.xsd
        http://www.springframework.org/schema/jee http://www.springframework.org/schema/jee/spring-jee.xsd
        http://www.springframework.org/schema/lang http://www.springframework.org/schema/lang/spring-lang.xsd
        http://www.springframework.org/schema/tx http://www.springframework.org/schema/tx/spring-tx.xsd
        http://www.springframework.org/schema/util http://www.springframework.org/schema/util/spring-util.xsd">

    <bean id="supportService" class="com.howtodoinjava.handler.SupportService">
        <property name="handler" ref="frontDeskSupport"></property>
    </bean>

    <bean id="frontDeskSupport" class="com.howtodoinjava.handler.FrontDeskSupport">
        <property name="next" ref="supervisorSupport"></property>
    </bean>
    <bean id="supervisorSupport" class="com.howtodoinjava.handler.SupervisorSupport">
        <property name="next" ref="managerSupport"></property>
    </bean>
    <bean id="managerSupport" class="com.howtodoinjava.handler.ManagerSupport">
        <property name="next" ref="directorSupport"></property>
    </bean>
    <bean id="directorSupport" class="com.howtodoinjava.handler.DirectorSupport"></bean>

</beans>


public class TestChainOfResponsibility {
    public static void main(String[] args)
    {
        ApplicationContext context = new ClassPathXmlApplicationContext("application-config.xml");
        SupportService supportService = (SupportService) context.getBean("supportService");

        ServiceRequest request = new ServiceRequest();
        request.setType(ServiceLevel.LEVEL_ONE);
        supportService.handleRequest(request);
        System.out.println(request.getConclusion());

        request = new ServiceRequest();
        request.setType(ServiceLevel.LEVEL_THREE);
        supportService.handleRequest(request);
        System.out.println(request.getConclusion());

        request = new ServiceRequest();
        request.setType(ServiceLevel.INVALID_REQUEST);
        supportService.handleRequest(request);
        System.out.println(request.getConclusion());
    }
}

Output:

Front desk solved level one reuqest !!
Manager solved level three reuqest !!
Exception in thread "main" java.lang.IllegalArgumentException: You problem is none of our business :: INVALID_REQUEST
还有一个经典的例子:
//步骤 1
//创建抽象的日志基类。

AbstractLogger.java
public abstract class AbstractLogger {
   public static int INFO = 1;
   public static int DEBUG = 2;
   public static int ERROR = 3;

   protected int level;

   //责任链中的下一个元素
   protected AbstractLogger nextLogger;

   public void setNextLogger(AbstractLogger nextLogger){
      this.nextLogger = nextLogger;
   }

   public void logMessage(int level, String message){
      if(this.level <= level){
         write(message);
      }
      if(nextLogger !=null){
         nextLogger.logMessage(level, message);
      }
   }

   abstract protected void write(String message);

}
//步骤 2
//创建扩展了该基类的实体类。

//ConsoleLogger.java
public class ConsoleLogger extends AbstractLogger {

   public ConsoleLogger(int level){
      this.level = level;
   }

   @Override
   protected void write(String message) {
      System.out.println("Standard Console::Logger: " + message);
   }
}
//ErrorLogger.java
public class ErrorLogger extends AbstractLogger {

   public ErrorLogger(int level){
      this.level = level;
   }

   @Override
   protected void write(String message) {
      System.out.println("Error Console::Logger: " + message);
   }
}
//FileLogger.java
public class FileLogger extends AbstractLogger {

   public FileLogger(int level){
      this.level = level;
   }

   @Override
   protected void write(String message) {
      System.out.println("File::Logger: " + message);
   }
}
//步骤 3
//创建不同类型的记录器。赋予它们不同的错误级别,并在每个记录器中设置下一个记录器。每个记录器中的下一个记录器代表的是链的一部分。

//ChainPatternDemo.java
public class ChainPatternDemo {

   private static AbstractLogger getChainOfLoggers(){

      AbstractLogger errorLogger = new ErrorLogger(AbstractLogger.ERROR);
      AbstractLogger fileLogger = new FileLogger(AbstractLogger.DEBUG);
      AbstractLogger consoleLogger = new ConsoleLogger(AbstractLogger.INFO);

      errorLogger.setNextLogger(fileLogger);
      fileLogger.setNextLogger(consoleLogger);

      return errorLogger;
   }

   public static void main(String[] args) {
      AbstractLogger loggerChain = getChainOfLoggers();

      loggerChain.logMessage(AbstractLogger.INFO, "This is an information.");

      loggerChain.logMessage(AbstractLogger.DEBUG,
         "This is a debug level information.");

      loggerChain.logMessage(AbstractLogger.ERROR,
         "This is an error information.");
   }
}
//步骤 4
//执行程序,输出结果:

Standard Console::Logger: This is an information.
File::Logger: This is a debug level information.
Standard Console::Logger: This is a debug level information.
Error Console::Logger: This is an error information.
File::Logger: This is an error information.
Standard Console::Logger: This is an error information.
命令模式
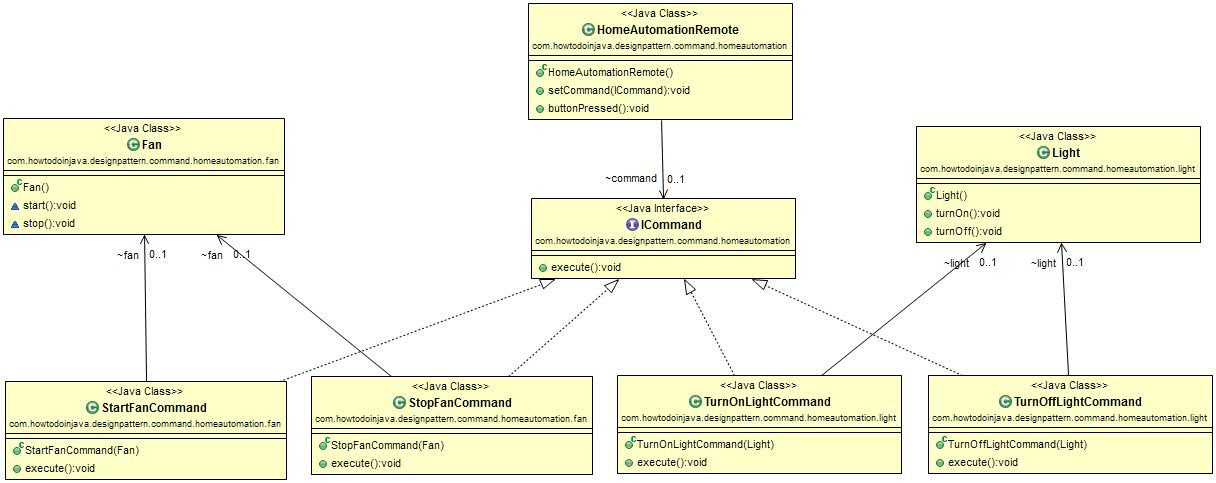
命令模式(Command Pattern)是一种数据驱动的设计模式,它属于行为型模式。请求以命令的形式包裹在对象中,并传给调用对象。调用对象寻找可以处理该命令的合适的对象,并把该命令传给相应的对象,该对象执行命令。
关键代码:定义三个角色:1、received 真正的命令执行对象 2、Command 3、invoker 使用命令对象的入口
假设我们需要为家庭自动化系统建立一个远程控制,该系统将控制家庭的不同灯光/电气单元。
遥控器中的单个按钮可以在类似的设备上执行相同的操作,例如,可以使用电视开/关按钮在不同的房间中打开/关闭不同的电视机。
在这里,这个遥控器是一个可编程的遥控器,用来打开和关闭各种灯/风扇等。
首先,让我们看看如何用任何设计方法解决这个问题。看起来像-
If(buttonName.equals(“Light”))
{
    //Logic to turn on that light
}
else If(buttonName.equals(“Fan”))
{
    //Logic to turn on that Fan
}
但上述解决方案显然存在许多明显的问题,如-
- 任何新项目(如管灯)都需要更改遥控器的代码。
- 如果我们想改变按钮的任何其他用途,那么我们也需要改变代码。
- 除此之外,如果家中有很多项,代码的复杂性和可维护性将增加。
- 最后,代码是不干净的,并且是紧密耦合的,并且我们没有遵循最佳实践,比如对接口进行编码等。
那么用命令模式

@FunctionalInterface
public interface ICommand {
    public void execute();
}

public class Light {
    public  void turnOn() {
        System.out.println("Light is on");
    }

    public void turnOff() {
        System.out.println("Light is off");
    }
}

/**
 * Fan class is a Receiver component in command pattern terminology.
 *
 */
public class Fan {
    void start() {
        System.out.println("Fan Started..");

    }

     void stop() {
        System.out.println("Fan stopped..");

    }
}

public class TurnOffLightCommand implements ICommand {

    Light light;

    public TurnOffLightCommand(Light light) {
        super();
        this.light = light;
    }

    public void execute() {
        System.out.println("Turning off light.");
        light.turnOff();
    }
}

/**
 * Light stop Command where we are encapsulating both Object[light] and the
 * operation[turnOff] together as command. This is the essence of the command.
 *
 */
public class TurnOnLightCommand implements ICommand {

    Light light;

    public TurnOnLightCommand(Light light) {
        super();
        this.light = light;
    }

    public void execute() {
        System.out.println("Turning on light.");
        light.turnOn();
    }
}

**
 * Fan Start Command where we are encapsulating both Object[fan] and the
 * operation[start] together as command. This is the essence of the command.
 *
 */
public class StartFanCommand implements ICommand {

    Fan fan;

    public StartFanCommand(Fan fan) {
        super();
        this.fan = fan;
    }

    public void execute() {
        System.out.println("starting Fan.");
        fan.start();
    }
}

/**
 * Fan stop Command where we are encapsulating both Object[fan] and the
 * operation[stop] together as command. This is the essence of the command.
 *
 */
public class StopFanCommand implements ICommand {

    Fan fan;

    public StopFanCommand(Fan fan) {
        super();
        this.fan = fan;
    }

    public void execute() {
        System.out.println("stopping Fan.");
        fan.stop();
    }
}


/**
 * Remote Control for Home automation where it will accept the command and
 * execute. This is the invoker in terms of command pattern terminology
 */
public class HomeAutomationRemote {

    //Command Holder
    ICommand command;

    //Set the command in runtime to trigger.
    public void setCommand(ICommand command) {
        this.command = command;
    }

    //Will call the command interface method so that particular command can be invoked.
    public void buttonPressed() {
        command.execute();
    }
}

/**
 * Demo class for HomeAutomation
 *
 */
public class Demo   //client
{
    public static void main(String[] args)
    {
        Light livingRoomLight = new Light();    //receiver 1

        Fan livingRoomFan = new Fan();  //receiver 2

        Light bedRoomLight = new Light();   //receiver 3

        Fan bedRoomFan = new Fan();     //receiver 4

        HomeAutomationRemote remote = new HomeAutomationRemote();   //Invoker

        remote.setCommand(new TurnOnLightCommand( livingRoomLight ));
        remote.buttonPressed();

        remote.setCommand(new TurnOnLightCommand( bedRoomLight ));
        remote.buttonPressed();

        remote.setCommand(new StartFanCommand( livingRoomFan ));
        remote.buttonPressed();

        remote.setCommand(new StopFanCommand( livingRoomFan ));
        remote.buttonPressed();

        remote.setCommand(new StartFanCommand( bedRoomFan ));
        remote.buttonPressed();

        remote.setCommand(new StopFanCommand( bedRoomFan ));
        remote.buttonPressed();
    }
}
迭代器模式
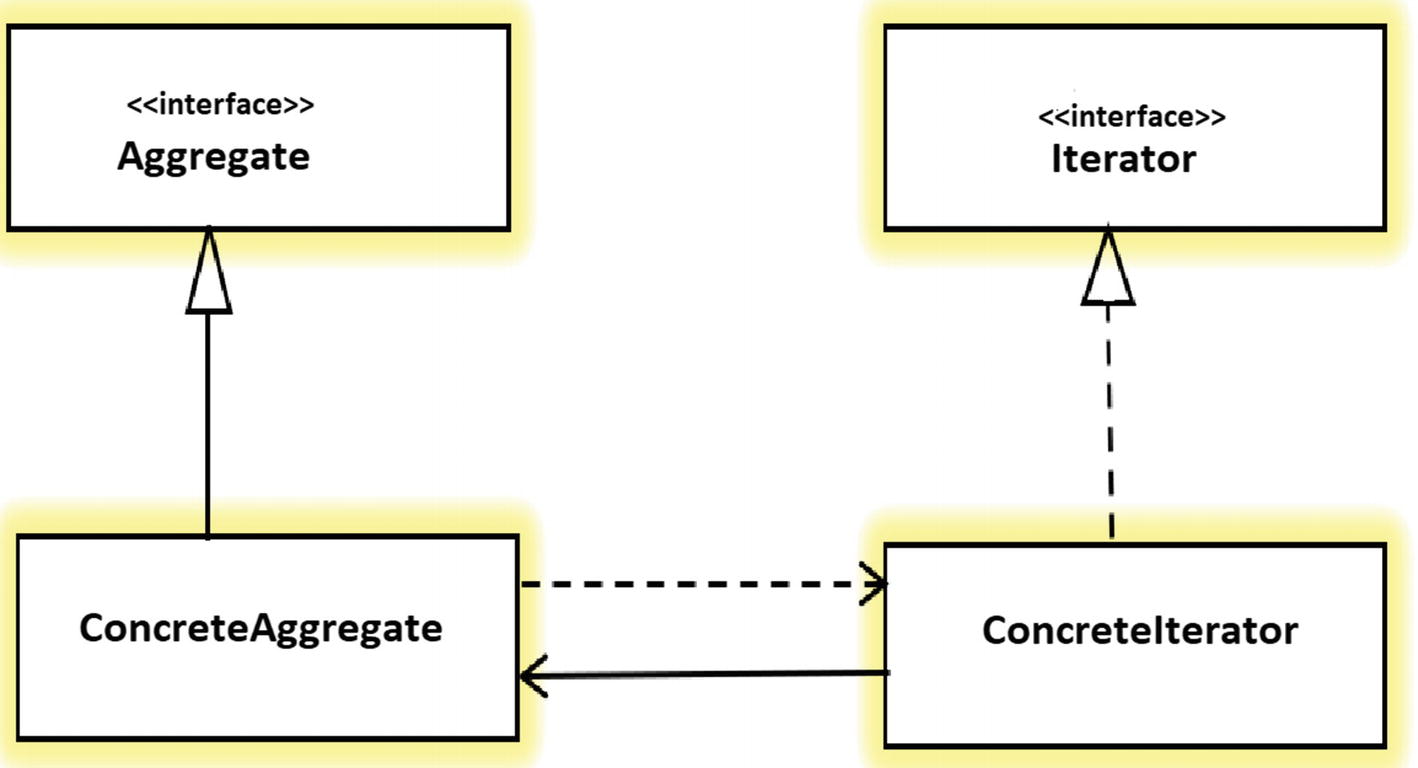
迭代器模式(Iterator Pattern)是 Java 和 .Net 编程环境中非常常用的设计模式。这种模式用于顺序访问集合对象的元素,不需要知道集合对象的底层表示。
关键代码:定义接口:hasNext, next。
例如java.util.Iterator interface和他的实现类ListIterator

    List<String> names = Arrays.asList("alex", "brian", "charles");

    Iterator<String> namesIterator = names.iterator();

    while (namesIterator.hasNext())
    {
        String currentName = namesIterator.next();

        System.out.println(currentName);
    }
例子
//Topic.java
public class Topic
{
    private String name;

    public Topic(String name) {
        super();
        this.name = name;
    }

    public String getName() {
        return name;
    }

    public void setName(String name) {
        this.name = name;
    }
}
//Iterator.java
public interface Iterator<E>
{
    void reset();   // reset to the first element

    E next();   // To get the next element

    E currentItem();    // To retrieve the current element

    boolean hasNext();  // To check whether there is any next element or not.
}
//TopicIterator.java
public class TopicIterator implements Iterator<Topic> {

    private Topic[] topics;
    private int position;

    public TopicIterator(Topic[] topics)
    {
        this.topics = topics;
        position = 0;
    }

    @Override
    public void reset() {
        position = 0;
    }

    @Override
    public Topic next() {
        return topics[position++];
    }

    @Override
    public Topic currentItem() {
        return topics[position];
    }

    @Override
    public boolean hasNext() {
        if(position >= topics.length)
            return false;
        return true;
    }
}
//List.java
public interface List<E>
{
    Iterator<E> iterator();
}
//TopicList.java
public class TopicList implements List<Topic>
{
    private Topic[] topics;

    public TopicList(Topic[] topics)
    {
        this.topics = topics;
    }

    @Override
    public Iterator<Topic> iterator() {
        return new TopicIterator(topics);
    }
}

//Main.java
public class Main
{
    public static void main(String[] args)
    {
        Topic[] topics = new Topic[5];
        topics[0] = new Topic("topic1");
        topics[1] = new Topic("topic2");
        topics[2] = new Topic("topic3");
        topics[3] = new Topic("topic4");
        topics[4] = new Topic("topic5");

        List<Topic> list = new TopicList(topics);

        Iterator<Topic> iterator = list.iterator();

        while(iterator.hasNext()) {
            Topic currentTopic = iterator.next();
            System.out.println(currentTopic.getName());
        }
    }
}
Program output.

Console
topic1
topic2
topic3
topic4
topic5
中介者模式
中介者模式(Mediator Pattern)是用来降低多个对象和类之间的通信复杂性。这种模式提供了一个中介类,该类通常处理不同类之间的通信,并支持松耦合,使代码易于维护。

//Mediator Interface
public interface IChatRoom
{
    public void sendMessage(String msg, String userId);

    void addUser(User user);
}

import java.util.HashMap;
import java.util.Map;

public class ChatRoom implements IChatRoom {

    private Map<String, User> usersMap = new HashMap<>();

    @Override
    public void sendMessage(String msg, String userId)
    {
        User u = usersMap.get(userId);
        u.receive(msg);
    }

    @Override
    public void addUser(User user) {
        this.usersMap.put(user.getId(), user);
    }
}

public abstract class User
{
    private IChatRoom mediator;

    private String id;
    private String name;

    public User(IChatRoom room, String id, String name){
        this.mediator = room;
        this.name = name;
        this.id = id;
    }

    public abstract void send(String msg, String userId);
    public abstract void receive(String msg);

    public IChatRoom getMediator() {
        return mediator;
    }

    public String getId() {
        return id;
    }

    public String getName() {
        return name;
    }
}

public class ChatUser extends User {

    public ChatUser(IChatRoom room, String id, String name) {
        super(room, id, name);
    }

    @Override
    public void send(String msg, String userId) {
        System.out.println(this.getName() + " :: Sending Message : " + msg);
        getMediator().sendMessage(msg, userId);
    }

    @Override
    public void receive(String msg) {
        System.out.println(this.getName() + " :: Received Message : " + msg);
    }

}

public class Main
{
    public static void main(String[] args)
    {
        IChatRoom chatroom = new ChatRoom();

        User user1 = new ChatUser(chatroom,"1", "Alex");
        User user2 = new ChatUser(chatroom,"2", "Brian");
        User user3 = new ChatUser(chatroom,"3", "Charles");
        User user4 = new ChatUser(chatroom,"4", "David");

        chatroom.addUser(user1);
        chatroom.addUser(user2);
        chatroom.addUser(user3);
        chatroom.addUser(user4);

        user1.send("Hello brian", "2");
        user2.send("Hey buddy", "1");
    }
}
//Program output.

Alex :: Sending Message : Hello brian
Brian :: Received Message : Hello brian

Brian :: Sending Message : Hey buddy
Alex :: Received Message : Hey buddy
备忘录模式
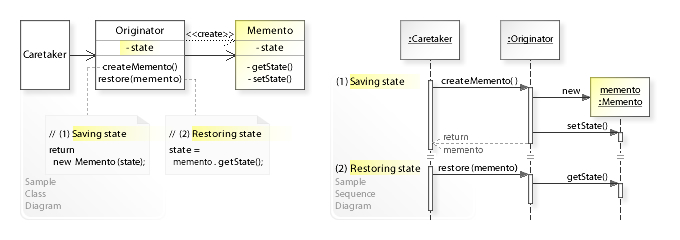
备忘录模式(Memento Pattern)保存一个对象的某个状态,以便在适当的时候恢复对象。
关键代码:客户不与备忘录类耦合,与备忘录管理类耦合。
在对象状态不断变化的应用程序中,都应使用备忘录模式,应用程序的用户可以决定在任何时候回滚或撤消更改。
备忘录也可用于必须从其上次已知工作状态或草稿重新启动的应用程序。这方面的一个例子可以是一个IDE,它从用户在关闭IDE之前所做的更改重新启动。

Article.java
public class Article
{
    private long id;
    private String title;
    private String content;

    public Article(long id, String title) {
        super();
        this.id = id;
        this.title = title;
    }

    //Setters and getters

    public ArticleMemento createMemento()
    {
        ArticleMemento m = new ArticleMemento(id, title, content);
        return m;
    }

    public void restore(ArticleMemento m) {
        this.id = m.getId();
        this.title = m.getTitle();
        this.content = m.getContent();
    }

    @Override
    public String toString() {
        return "Article [id=" + id + ", title=" + title + ", content=" + content + "]";
    }
}
ArticleMemento.java
public final class ArticleMemento
{
    private final long id;
    private final String title;
    private final String content;

    public ArticleMemento(long id, String title, String content) {
        super();
        this.id = id;
        this.title = title;
        this.content = content;
    }

    public long getId() {
        return id;
    }

    public String getTitle() {
        return title;
    }

    public String getContent() {
        return content;
    }
}
The Main class is acting as Caretaker which creates and restores the memento objects.

Main.java
public class Main
{
    public static void main(String[] args)
    {
        Article article = new Article(1, "My Article");
        article.setContent("ABC");      //original content
        System.out.println(article);

        ArticleMemento memento = article.createMemento();   //created immutable memento

        article.setContent("123");      //changed content
        System.out.println(article);

        article.restore(memento);       //UNDO change
        System.out.println(article);    //original content
    }
}

Program Output:

Article [id=1, title=My Article, content=ABC]
Article [id=1, title=My Article, content=123]
Article [id=1, title=My Article, content=ABC]