一、canvas是基于状态的绘图环境
1、canvas是基于状态的绘制
context.moveTo(100,100);
context.lineTo(700,700);
context.lineWidth=10; //直线的宽度状态设置
context.strokeStyle="#058"; //直线的颜色状态设置
都是状态设置。
context.stroke()是绘制。
lineWidth和strokeStyle都是基于context的设置,而不是对线条设置的,说明canvas的绘制不是一个基于对象的绘制环境,不会创建线条对象,创建线条对象的各项属性,canvas是一个基于状态会绘制环境,基于canvas整体设置来状态后,最后来进行绘制。
2、一步步深入
画一条线:lineTo()


canvas.width=800;
canvas.height=800;

var context=canvas.getContext("2d");
context.moveTo(100, 100);
context.lineTo(700,700);
context.lineWidth=10;
context.strokeStyle="#058"

context.stroke();
画折线:
lineTo(),lineTo()以此连接
var canvas=document.getElementById("canvas");

canvas.width=800;
canvas.height=800;

var context=canvas.getContext("2d");
context.moveTo(100, 350);
context.lineTo(500,350);
context.lineTo(500,200);
context.lineTo(700,400);
context.lineTo(500,600);
context.lineTo(500,450);
context.lineTo(100,450);

context.lineWidth=10;
context.strokeStyle="#058"

context.stroke();
多条线段,不要首尾相连,要间断:
灵活使用moveTo()
var canvas=document.getElementById("canvas");

canvas.width=800;
canvas.height=800;

var context=canvas.getContext("2d");

context.moveTo(100, 200);
context.lineTo(300,400);
context.lineTo(100,600);

context.moveTo(300,200);
context.lineTo(500,400);
context.lineTo(300,600);

context.moveTo(500,200);
context.lineTo(700,400);
context.lineTo(500,600);

context.lineWidth=10;
context.strokeStyle="#058"

context.stroke();
绘制三条不同颜色的折线,
陷阱:
var canvas=document.getElementById("canvas");

canvas.width=800;
canvas.height=800;

var context=canvas.getContext("2d");


context.moveTo(100, 200);
context.lineTo(300,400);
context.lineTo(100,600);
context.lineWidth=10;
context.strokeStyle="blue";
context.stroke();

context.moveTo(300,200);
context.lineTo(500,400);
context.lineTo(300,600);
context.lineWidth=10;
context.strokeStyle="green";
context.stroke();

context.moveTo(500,200);
context.lineTo(700,400);
context.lineTo(500,600);

context.lineWidth=10;
context.strokeStyle="red"

context.stroke();
canvas是基于状态的绘制,绘制来3次,每次重制状态,即重制颜色和宽度再绘制全部线条。
第一次绘制来一条蓝色折线,第二次绘制两条绿色折线,第三次绘制三条红色折线。
新的API:
context.beginPath()开始全新的绘制。
正确代码如下:
var canvas=document.getElementById("canvas");

canvas.width=800;
canvas.height=800;

var context=canvas.getContext("2d");
context.lineWidth=10;

context.beginPath();
context.moveTo(100, 200);
context.lineTo(300,400);
context.lineTo(100,600);
context.strokeStyle="blue";
context.stroke();

context.beginPath();
context.moveTo(300,200);
context.lineTo(500,400);
context.lineTo(300,600);
context.strokeStyle="green";
context.stroke()

context.beginPath();
context.moveTo(500,200);
context.lineTo(700,400);
context.lineTo(500,600);
context.strokeStyle="red"
context.stroke();
- 对于beginPath()如果一个属性没有被改变,将一直使用属性值。属性值不会因为beginPath()的调用而回到默认状态,如lineWidth。strokeStyle一直被新值覆盖。
高级功能帮助开发者维持这些状态。
- 绘制第一条折线时候,由于之前没有任何的状态的定义,所以第一个beginPath()可以省略掉。为了维持代码的一致性还是建议写上。
- beginPath()表示开始一段全新的路径。而moveTo表示不从任何点开始,直接指定一个新的坐标点。lineTo是从上一个坐标点一直画到lineTo表示的坐标点。用beiginPath()后moveTo也可以用lineTo(),此时lineTo表示的上一个坐标点被beginPath清空了。清空不代表从(0,0)开始而是没有。所以beginPath和lineTo在一起相当于是一次moveTo的功能。
二、绘制封闭多边形的标准做法clothPath
1、绘制
第一种:
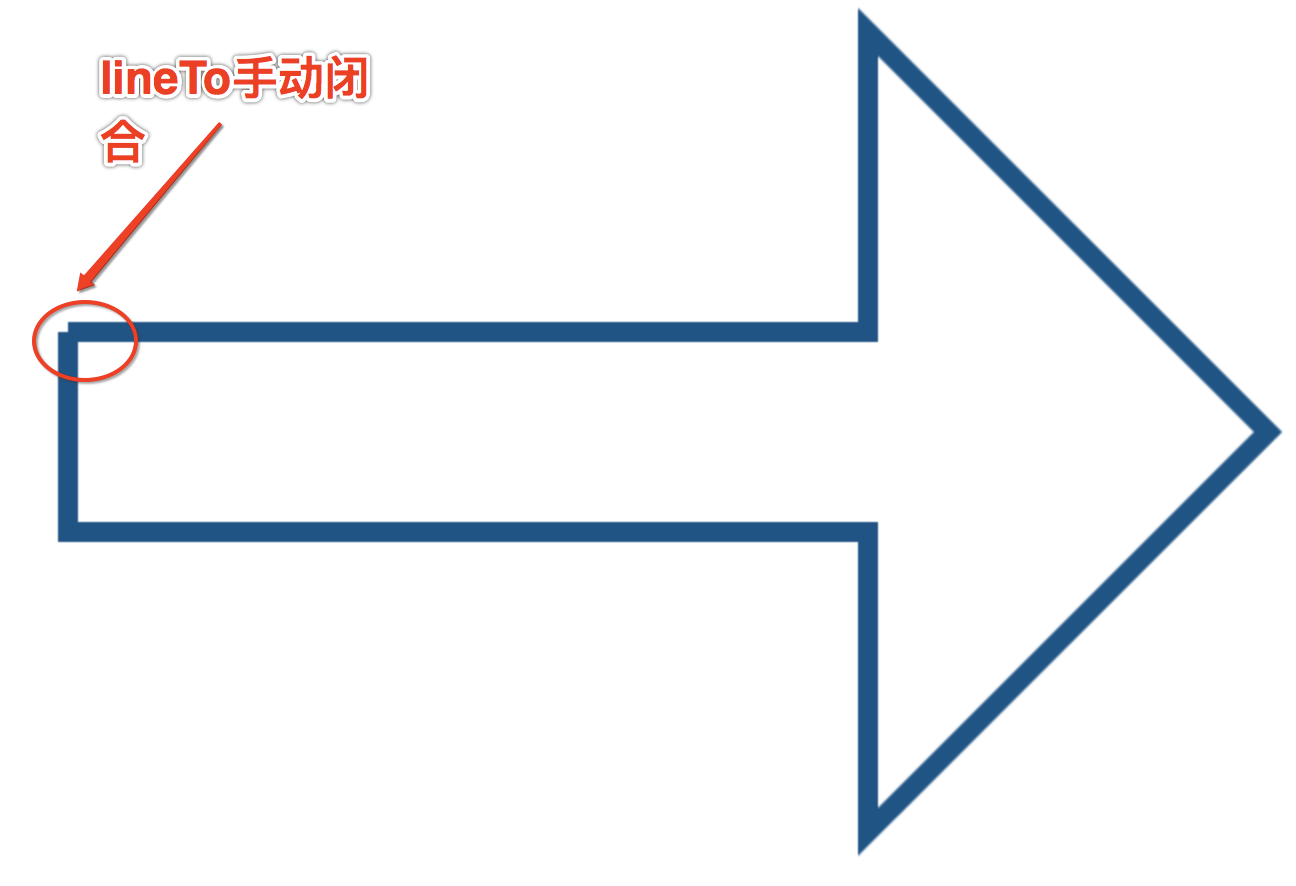
var canvas=document.getElementById("canvas");

canvas.width=800;
canvas.height=800;

var context=canvas.getContext("2d");
context.moveTo(100, 350);
context.lineTo(500,350);
context.lineTo(500,200);
context.lineTo(700,400);
context.lineTo(500,600);
context.lineTo(500,450);
context.lineTo(100,450);
context.lineTo(100,350);

context.lineWidth=10;
context.strokeStyle="#058"

context.stroke();
问题:10px宽的线条闭合处有5px的缺口。
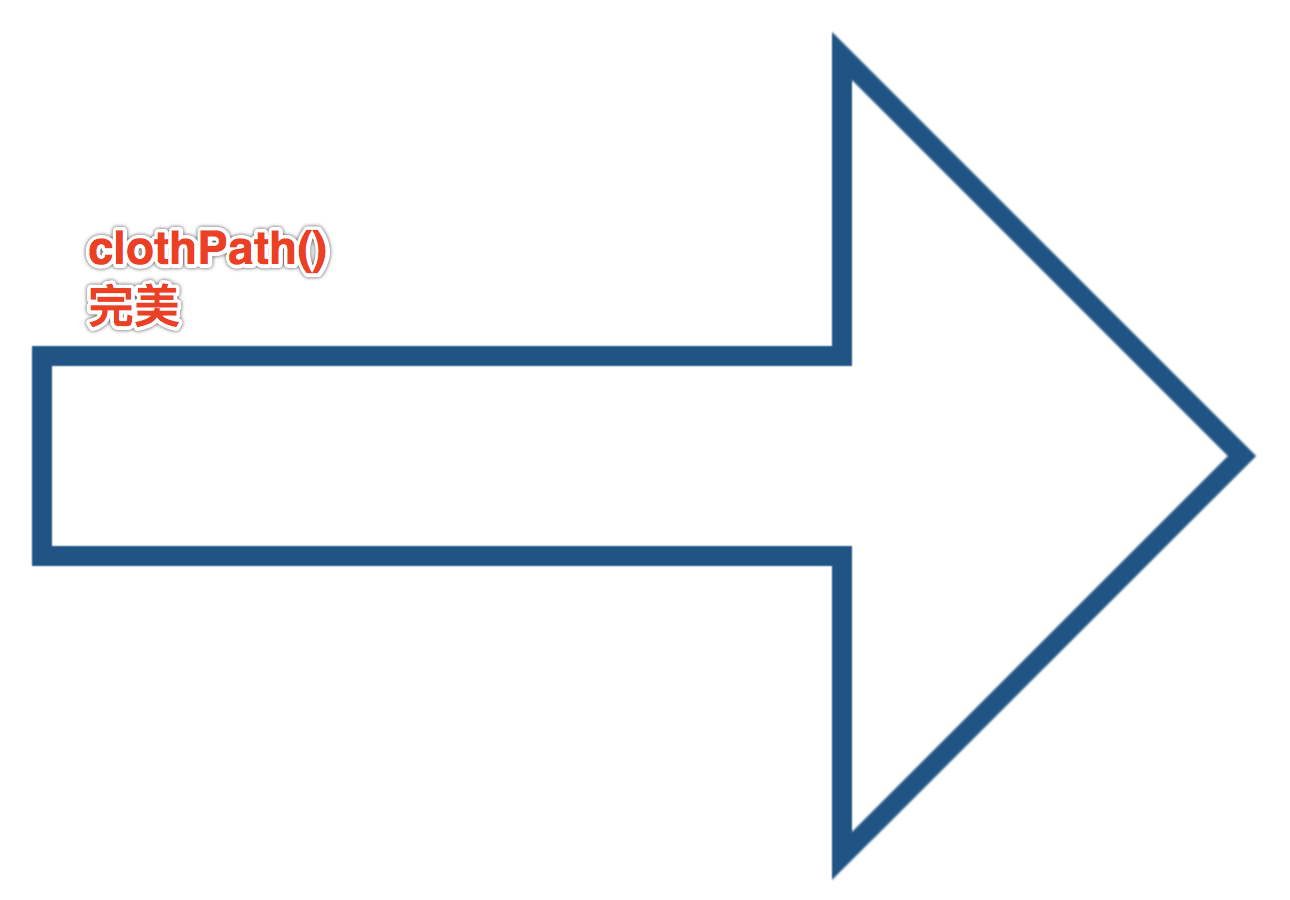
第二种:标准做法
把整个多边形的路径放在context.beiginPath()和clothPath()之间。
clothPath()表示当前路径要被封闭并且结束。
var canvas=document.getElementById("canvas");

canvas.width=800;
canvas.height=800;

var context=canvas.getContext("2d");

context.beginPath();
context.moveTo(100, 350);
context.lineTo(500,350);
context.lineTo(500,200);
context.lineTo(700,400);
context.lineTo(500,600);
context.lineTo(500,450);
context.lineTo(100,450);
context.lineTo(100,350);
context.closePath();

context.lineWidth=10;
context.strokeStyle="#058"

context.stroke();
注意:
使用clothPath()的时候最后一个lineTo可以省略,canvas会自动从最后一个顶点连接到第一个顶点。
var canvas=document.getElementById("canvas");

canvas.width=800;
canvas.height=800;

var context=canvas.getContext("2d");

context.beginPath();
context.moveTo(100, 350);
context.lineTo(500,350);
context.lineTo(500,200);
context.lineTo(700,400);
context.lineTo(500,600);
context.lineTo(500,450);
context.lineTo(100,450);
//context.lineTo(100,350);
context.closePath();

context.lineWidth=10;
context.strokeStyle="#058"

context.stroke();
2、给封闭多边形填充颜色fill
使用context.fillStyle="yellow" 指定状态
使用context.fill()进行填充。
var canvas=document.getElementById("canvas");

canvas.width=800;
canvas.height=800;

var context=canvas.getContext("2d");

context.beginPath();
context.moveTo(100, 350);
context.lineTo(500,350);
context.lineTo(500,200);
context.lineTo(700,400);
context.lineTo(500,600);
context.lineTo(500,450);
context.lineTo(100,450);
//context.lineTo(100,350);
context.closePath();

context.lineWidth=10;

context.fillStyle="yellow";
context.fill();

context.strokeStyle="#058"
context.stroke();
问题:先stroke后fill,10px边框内侧的5个px被填充色覆盖,解决办法先fill后stroke。
注意:绘制带有描边的填充图案时,先填充后描边。
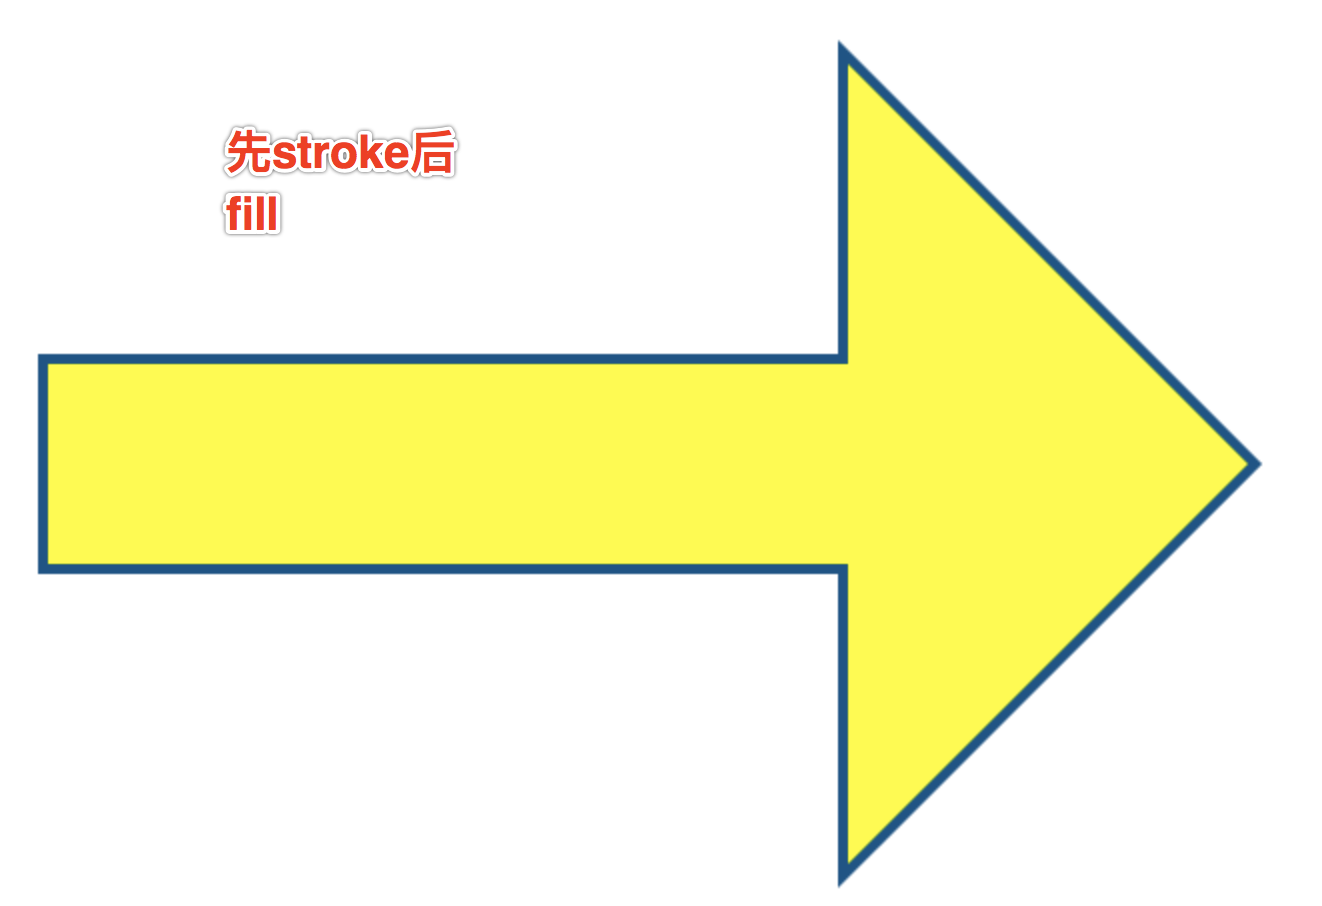

注意:fillStyle和strokeStyle都是对状态的定义,fill和stroke是真正的绘制,建议写代码把所有的状态放在一起,所有的绘制放在一起。
var canvas=document.getElementById("canvas");

canvas.width=800;
canvas.height=800;

var context=canvas.getContext("2d");

context.beginPath();
context.moveTo(100, 350);
context.lineTo(500,350);
context.lineTo(500,200);
context.lineTo(700,400);
context.lineTo(500,600);
context.lineTo(500,450);
context.lineTo(100,450);
//context.lineTo(100,350);
context.closePath();

context.lineWidth=10;
context.fillStyle="yellow";
context.strokeStyle="#058"

context.fill();
context.stroke();
3、编写绘图函数
根据上面的绘图的结构化思想来编写绘图函数。
window.onload=function(){
    var canvas=document.getElementById("canvas");
    canvas.width=800;
    canvas.height=800;
    var context=canvas.getContext("2d");
    drawRect(context,10,10,200,200,10,"red","green");
}

function drawRect(ctx,x,y,width,height,borderWidth,borderColor,fillColor){
    ctx.beginPath();
    ctx.moveTo(x,y);
    ctx.lineTo(x+width,y);
    ctx.lineTo(x+width,y+height);
    ctx.lineTo(x,y+height);
    ctx.closePath();

    ctx.lineWidth=borderWidth;
    ctx.strokeStyle=borderColor;
    ctx.fillStyle=fillColor;

    ctx.fill();
    ctx.stroke();
}
三、矩形,覆盖和透明色
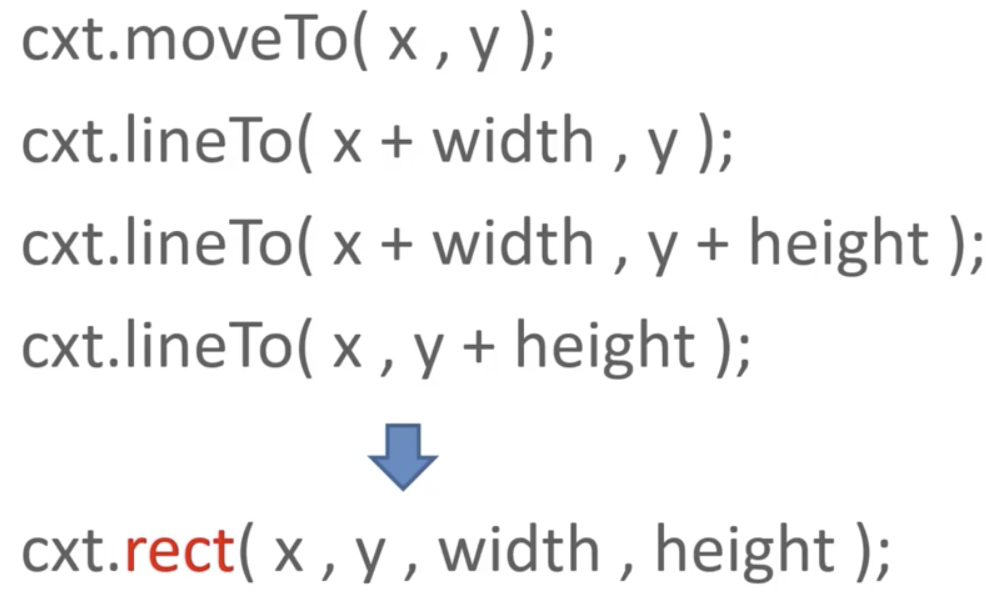
1、canvas自带绘制矩形的API.
context.rect(x,y,width,height)给了我们一个更简洁的方法来规划矩形的路径。
window.onload=function(){
    var canvas=document.getElementById("canvas");
    canvas.width=800;
    canvas.height=800;
    var context=canvas.getContext("2d");
    drawRect(context,10,10,200,200,10,"red","green");
}


function drawRect(ctx,x,y,width,height,borderWidth,borderColor,fillColor){
    ctx.beginPath();
    ctx.rect(x,y,width,height);
    ctx.closePath();

    ctx.lineWidth=borderWidth;
    ctx.strokeStyle=borderColor;
    ctx.fillStyle=fillColor;

    ctx.fill();
    ctx.stroke();
}
还有两个API可以直接绘制出矩形。
ctx.fillRect(x,y,width,height);使用当前的fillStyle绘制出一个填充矩形。
ctx.strokeRect(x,y,width,height); 使用当前的strokeStyle绘制出一个矩形的边框。
对比rect,不止规划路径,而且绘制。
window.onload=function(){
    var canvas=document.getElementById("canvas");
    canvas.width=800;
    canvas.height=800;
    var context=canvas.getContext("2d");
    drawRect(context,10,10,200,200,10,"red","green");
    drawRect(context,100,100,200,200,10,"blue","yellow");
}


function drawRect(ctx,x,y,width,height,borderWidth,borderColor,fillColor){
    ctx.beginPath();
    ctx.rect(x,y,width,height);
    ctx.closePath();

    ctx.lineWidth=borderWidth;
    ctx.strokeStyle=borderColor;
    ctx.fillStyle=fillColor;

    ctx.fill();
    ctx.stroke();
}

function drawRect2(ctx,x,y,width,height,borderWidth,borderColor,fillColor){
    //不需要规划路径了
    ctx.lineWidth=borderWidth;
    ctx.strokeStyle=borderColor;
    ctx.fillStyle=fillColor;

    ctx.fillRect(x,y,width,height);
    ctx.strokeRect(x,y,width,height);
}
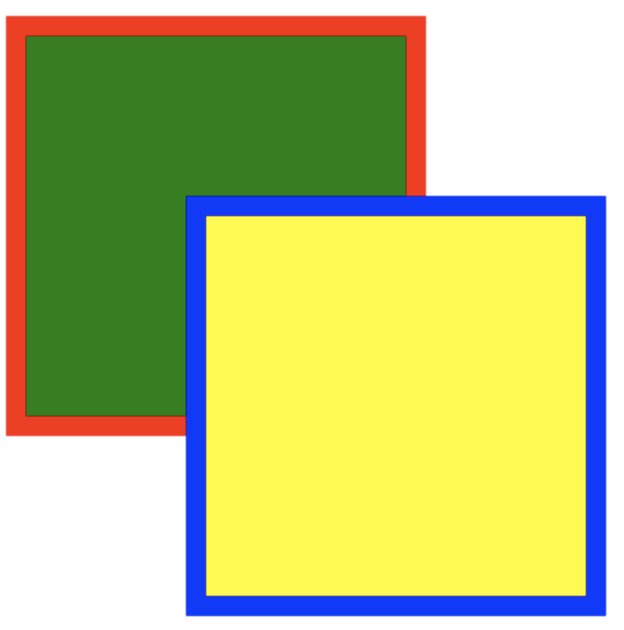
蓝色边框是strokeRect()绘制的,黄色正方形是fillRect()绘制的。
2、覆盖
上面黄色正方形遮挡住了部分绿色正方形,在canvas中图形重叠时后绘制的默认遮挡前面绘制的图形。
条件:
- 后面图形填充色是充实的填充色
- 重叠的合成模式是默认的。
3,fillStyle和strokeStyle赋值
css里的值都可以以字符串形式赋值给这两个style。

使用rgba来形式半透明覆盖效果
drawRect(context,10,10,200,200,10,"red","green");
drawRect(context,100,100,200,200,10,"blue","rgba(255,255,0,0.5)");
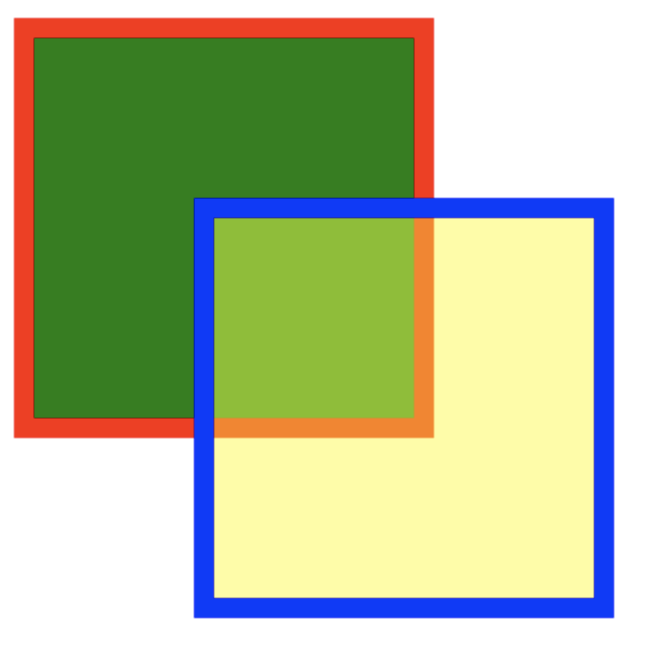
此时黄色正方形边框仍然是100%蓝色。
本文作者starof,因知识本身在变化,作者也在不断学习成长,文章内容也不定时更新,为避免误导读者,方便追根溯源,请诸位转载注明出处:http://www.cnblogs.com/starof/p/8597683.html 有问题欢迎与我讨论,共同进步。