介绍
MySQL 是一种开源数据库管理系统,通常作为流行的LAMP(Linux,Apache,MySQL,PHP / Python / Perl)堆栈的一部分安装。它使用关系数据库和SQL(结构化查询语言)来管理其数据。
安装的方式很简单:更新软件包索引,安装mysql-server软件包,然后运行附带的安全脚本即可。
sudo apt-get install mysql-server # 安装server
sudo apt-get isntall mysql-client #安装client客户端
安装完成后mysql-server 会提示可以运行mysql_secure_installation。运行mysql_secure_installation会执行几个设置:
a)为root用户设置密码
b)删除匿名账号
c)取消root用户远程登录
d)删除test库和对test库的访问权限
e)刷新授权表使修改生效
通过这几项的设置能够提高mysql库的安全。建议生产环境中mysql安装这完成后一定要运行一次mysql_secure_installation,直接在终端中输入mysql_secure_installation即可开始配置。详细步骤请参看下面的命令:
stephen@stephen:~$ mysql_secure_installation

Securing the MySQL server deployment.

Enter password for user root:

VALIDATE PASSWORD PLUGIN can be used to test passwords
and improve security. It checks the strength of password
and allows the users to set only those passwords which are
secure enough. Would you like to setup VALIDATE PASSWORD plugin?

Press y|Y for Yes, any other key for No:  #是否设置密码检测插件,检测密码复杂度 ,根据自己需求设置
Using existing password for root.
Change the password for root ? ((Press y|Y for Yes, any other key for No) :  #是否更改密码

 ... skipping.
By default, a MySQL installation has an anonymous user,
allowing anyone to log into MySQL without having to have
a user account created for them. This is intended only for
testing, and to make the installation go a bit smoother.
You should remove them before moving into a production
environment.

Remove anonymous users? (Press y|Y for Yes, any other key for No) : y  #是否移除匿名账户 生产环境建议移除
Success.


Normally, root should only be allowed to connect from
'localhost'. This ensures that someone cannot guess at
the root password from the network.

Disallow root login remotely? (Press y|Y for Yes, any other key for No) : y  #是否禁止远程登录 根据实际情况设置
Success.

By default, MySQL comes with a database named 'test' that
anyone can access. This is also intended only for testing,
and should be removed before moving into a production
environment.


Remove test database and access to it? (Press y|Y for Yes, any other key for No) : #删除测试数据库 直接回车

 ... skipping.
Reloading the privilege tables will ensure that all changes
made so far will take effect immediately.

Reload privilege tables now? (Press y|Y for Yes, any other key for No) : #是否重新加载权限表 直接回车

 ... skipping.
All done!
测试MySQL
安装过程中会提示设置密码什么的,注意设置了不要忘了,安装完成之后可以使用如下命令来检查是否安装成功:
sudo netstat -tap | grep mysql
通过上述命令检查之后,如果看到有mysql 的socket处于 listen 状态则表示安装成功。
按上边方式安装完成后,MySQL应该已经开始自动运行了。要测试它,请检查其状态。
systemctl status mysql.service #systemctl 用法 : https://linux.cn/article-5926-1.html
您将看到类似于以下内容的输出:
mysql.service - MySQL Community Server
Loaded: loaded (/lib/systemd/system/mysql.service; enabled; vendor preset: en Active: active (running) since Wed 2016-11-23 21:21:25 UTC; 30min ago Main PID: 3754 (mysqld) Tasks: 28 Memory: 142.3M CPU: 1.994s CGroup: /system.slice/mysql.service └─3754 /usr/sbin/mysqld
如果MySQL没有运行,您可以启动它:
sudo systemctl mysql start
如果额外的检查,您可以尝试使用该 mysqladmin 工具连接到数据库,该工具是允许您运行管理命令的客户端。例如,该命令表示以 root(-u root)方式连接到 MySQL ,提示输入密码(-p)并返回版本。
mysqladmin -p -u root version
你应该看到类似的输出:
mysqladmin  Ver 8.42 Distrib 5.7.16, for Linux on x86_64
Copyright (c) 2000, 2016, Oracle and/or its affiliates. All rights reserved.
Oracle is a registered trademark of Oracle Corporation and/or its affiliates. Other names may be trademarks of their respective owners.
Server version 5.7.16-0ubuntu0.16.04.1 Protocol version 10 Connection Localhost via UNIX socket UNIX socket /var/run/mysqld/mysqld.sock Uptime: 30 min 54 sec
Threads: 1 Questions: 12 Slow queries: 0 Opens: 115 Flush tables: 1 Open tables: 34 Queries per second avg: 0.006
这意味着MySQL正在运行。
登陆mysql数据库可以通过如下命令:
mysql -u root -p
-u 表示选择登陆的用户名, -p 表示登陆的用户密码,上面命令输入之后会提示输入密码,此时输入密码就可以登录到mysql。

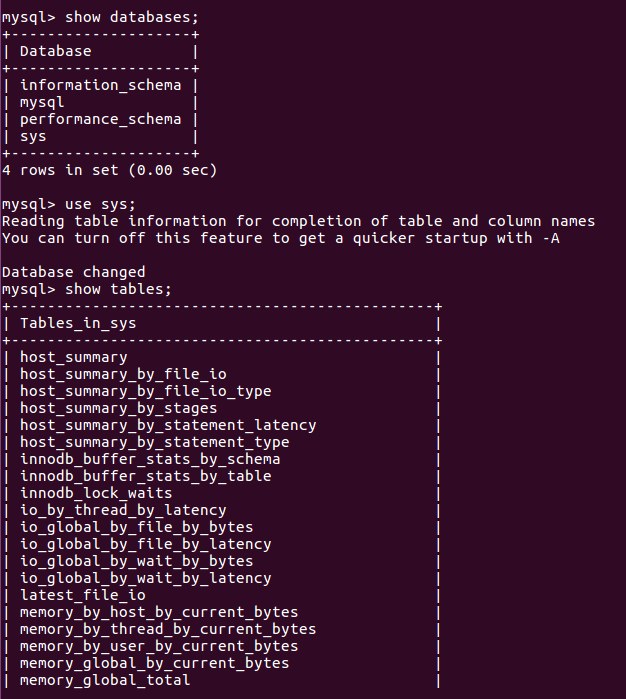
然后通过 show databases; 就可以查看当前的数据库。
我们选择 mysql数据库就行下一步操作,使用use mysql 命令,显示当前数据库的表单:show tables
