Eureka
Eureka采用了CS的设计架构,Eureka Server作为服务注册功能的服务器,它是服务注册中心,使用Eureka的客户端连接到Eureka Server并维持心跳连接。这样系统的维护人员就可以通过Eureka Server来监控系统中各个微服务是否正常运行。
Eureka包含两个组件:Eureka Server和Eureka Client
Eureka Server提供服务注册服务
各个微服务节点通过配置启动后,会在EurekaServer中进行注册,这样EurekaServer中的服务注册表中将会存储所有可用服务节点的信息,服务节点的信息可以在界面中直观看到。
EurekaClient通过注册中心进行访问
是一个java客户端,用于简化Eureka Server的交互,客户端同时也具备一个内置的、使用轮询de(round-robin)负载算法的负载均衡器。在应用启动后,将会向Eureka Server发送心跳(默认周期为30秒)。如果Eureka Server在多个心跳周期内没有接收到某个节点的心跳。EurekaServer将会从服务注册表中把这个服务节点移除(默认90秒)。
Eureka服务端安装
创建一个子项目maven名字叫cloud-eureka-server-7001
修改里面的pom.xml文件
<?xml version="1.0" encoding="UTF-8"?>
<project xmlns="http://maven.apache.org/POM/4.0.0"
         xmlns:xsi="http://www.w3.org/2001/XMLSchema-instance"
         xsi:schemaLocation="http://maven.apache.org/POM/4.0.0 http://maven.apache.org/xsd/maven-4.0.0.xsd">
    <parent>
        <artifactId>cloud2020</artifactId>
        <groupId>com.atguigu.springcloud</groupId>
        <version>1.0-SNAPSHOT</version>
    </parent>
    <modelVersion>4.0.0</modelVersion>

    <artifactId>cloud-eureka-server-7001</artifactId>

    <dependencies>
        <!-- eureka-server -->
        <dependency>
            <groupId>org.springframework.cloud</groupId>
            <artifactId>spring-cloud-starter-netflix-eureka-server</artifactId>
        </dependency>
        <!-- 引用自己定义的api通用包,可以使用Payment支付Entity -->
        <dependency>
            <groupId>com.atguigu.springcloud</groupId>
            <artifactId>cloud-api-commons</artifactId>
            <version>${project.version}</version>
        </dependency>
        <dependency>
            <groupId>org.springframework.boot</groupId>
            <artifactId>spring-boot-starter-web</artifactId>
        </dependency>
        <!--监控-->
        <dependency>
            <groupId>org.springframework.boot</groupId>
            <artifactId>spring-boot-starter-actuator</artifactId>
        </dependency>
        <!-- 一般通用配置 -->
        <dependency>
            <groupId>org.springframework.boot</groupId>
            <artifactId>spring-boot-devtools</artifactId>
            <scope>runtime</scope>
            <optional>true</optional>
        </dependency>
        <dependency>
            <groupId>org.projectlombok</groupId>
            <artifactId>lombok</artifactId>
            <optional>true</optional>
        </dependency>
        <dependency>
            <groupId>org.springframework.boot</groupId>
            <artifactId>spring-boot-starter-test</artifactId>
            <scope>test</scope>
        </dependency>
    </dependencies>
</project>
在resources目录下面创建application.yml配置文件
server:
  port: 7001

eureka:
  instance:
    hostname: localhost   #服务器的实例名称
  client:
    register-with-eureka: false #flase表示不向注册中心注册自己
    fetch-registry: false #false表示自己端就是注册中心,职责就是维护服务实例,并不需要检索服务
    service-url:
      #设置与Eureka Server交互地址查询服务和注册服务都需要依赖这个地址
      defaultZone: http://${eureka.instance.hostname}:${server.port}/eureka/
创建包(com.sun.springcloud),在包内创建启动类EurekaMain7001
package com.atguigu.springcloud;

import org.springframework.boot.SpringApplication;
import org.springframework.boot.autoconfigure.SpringBootApplication;
import org.springframework.cloud.netflix.eureka.server.EnableEurekaServer;

@SpringBootApplication
@EnableEurekaServer
public class EurekaMain7001 {
    public static void main(String[] args) {
        SpringApplication.run(EurekaMain7001.class,args);
    }
}
启动后,在浏览器上输入localhost:7001,回车
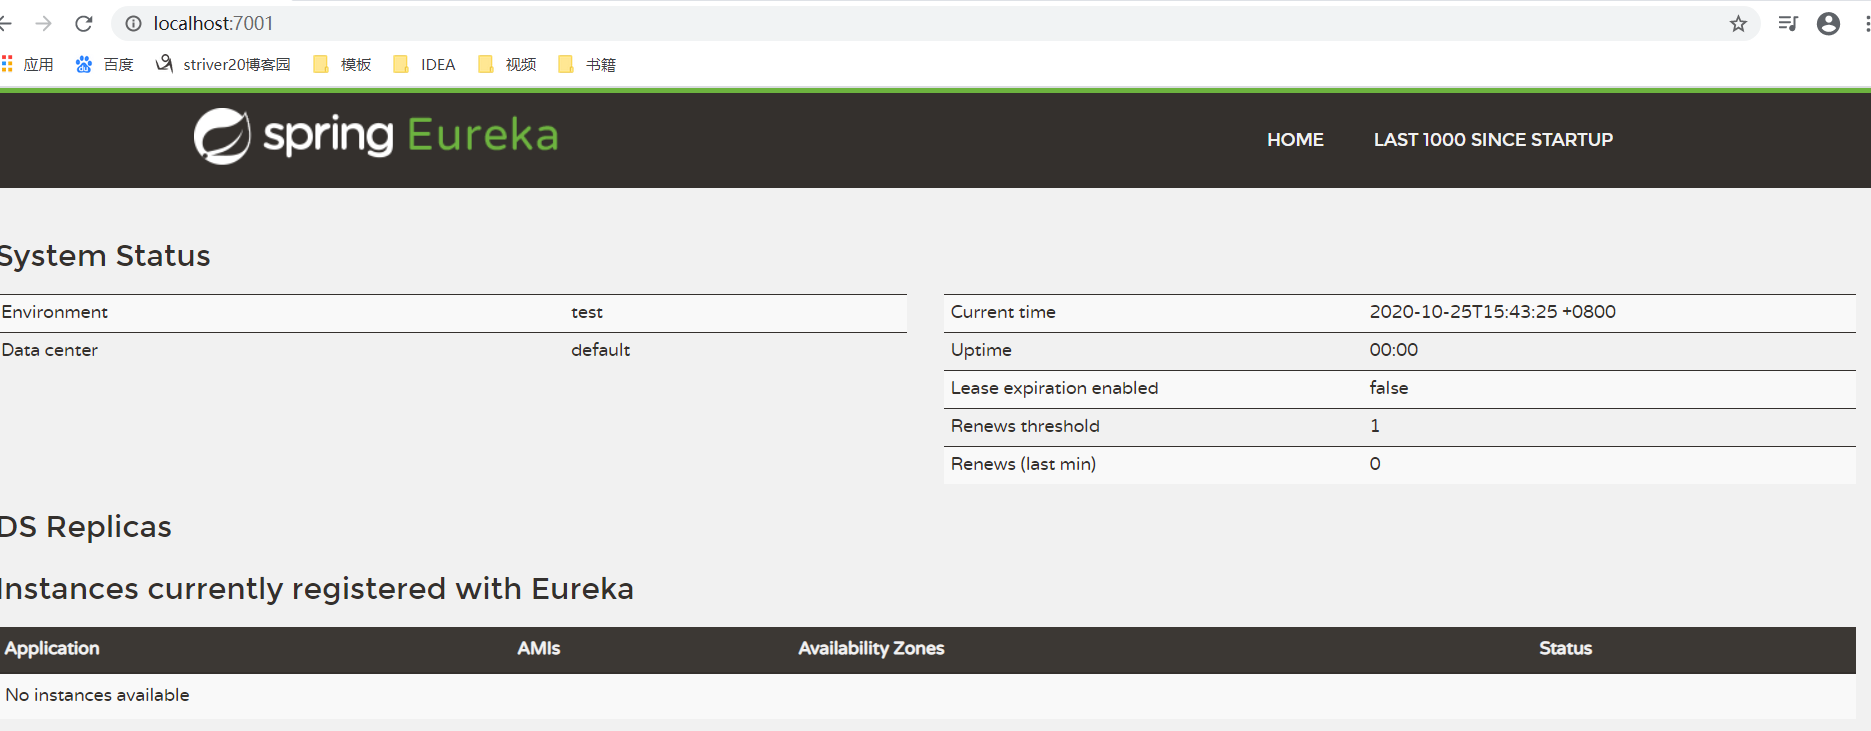
出现这个页面表示创建成功。
微服务入住EurekaServer
在8001项目的pom.xml里加入
<!--eureka client-->
        <dependency>
            <groupId>org.springframework.cloud</groupId>
            <artifactId>spring-cloud-starter-netflix-eureka-client</artifactId>
        </dependency>
修改配置文件application.xml
server:
  port: 8001
spring:
  application:
    name: cloud-payment-service
  datasource:
    # 当前数据源操作类型
    type: com.alibaba.druid.pool.DruidDataSource
    # mysql驱动类
    driver-class-name: com.mysql.cj.jdbc.Driver
    url: jdbc:mysql://localhost:3306/db2019?useUnicode=true&characterEncoding=UTF-8&useSSL=false&serverTimezone=GMT%2B8
    username: root
    password: 123456
mybatis:
  mapper-locations: classpath*:mapper/*.xml
  type-aliases-package: com.atguigu.springcloud.entities
eureka:
  client:
    register-with-eureka: true  #表示是否将自己注册到EurekaServer默认为true
    fetchRegistry: true #是否从EurekaServer抓却已有的注册信息,默认为true,单节点无所谓,集群必须设置为true才能配合集群ribbon使用负载均衡
    service-url:
      defaultZone: http://localhost:7001/eureka
在启动类PaymentMain8001里加上注解
package com.atguigu.springcloud;

import org.springframework.boot.SpringApplication;
import org.springframework.boot.autoconfigure.SpringBootApplication;
import org.springframework.cloud.netflix.eureka.EnableEurekaClient;

@SpringBootApplication
@EnableEurekaClient
public class PaymentMain8001 {
    public static void main(String[] args) {
        SpringApplication.run(PaymentMain8001.class,args);
    }
}
启动该项目
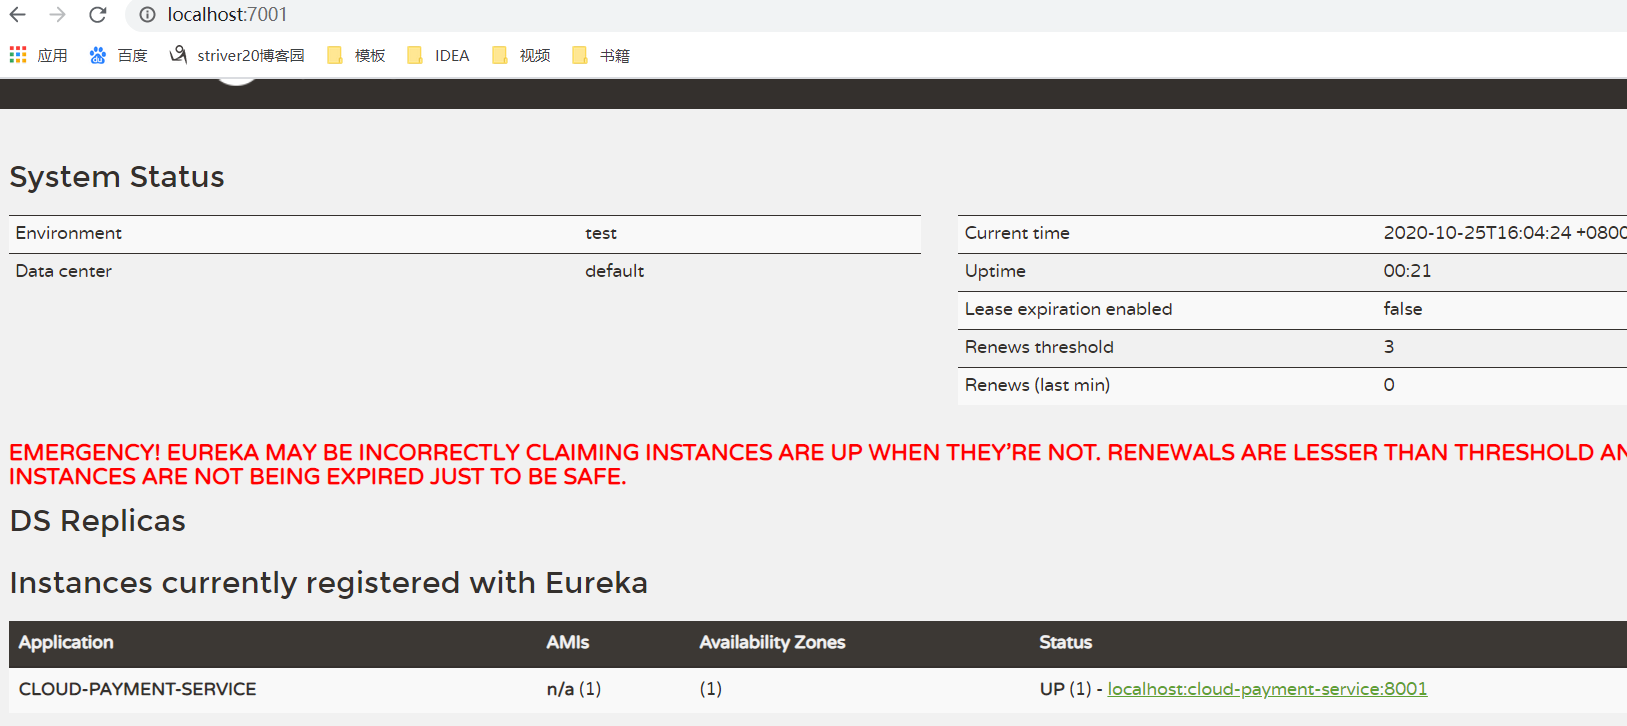
发现该项目注册进去。
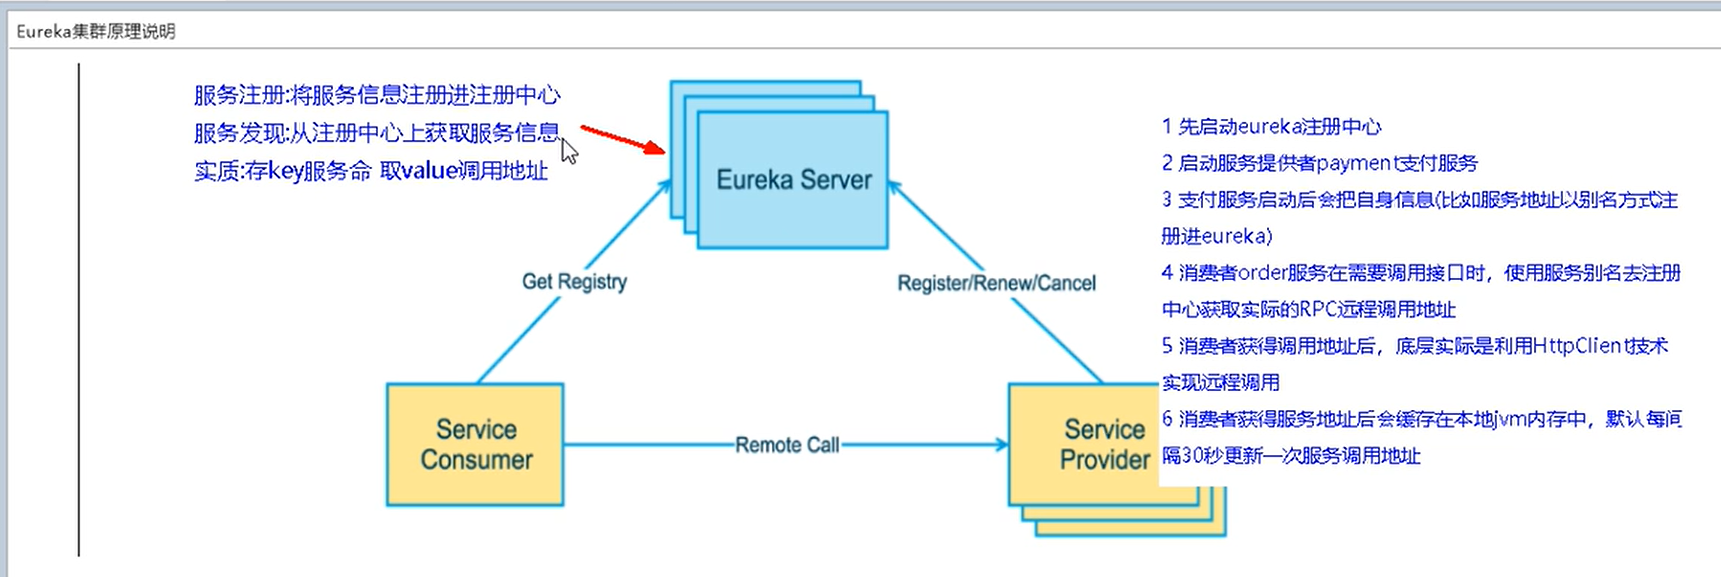
Eureka集群原理说明
EurekaServer集群环境构建
新建一个项目(cloud-eureka-server-7002)
pom.xml
<?xml version="1.0" encoding="UTF-8"?>
<project xmlns="http://maven.apache.org/POM/4.0.0"
         xmlns:xsi="http://www.w3.org/2001/XMLSchema-instance"
         xsi:schemaLocation="http://maven.apache.org/POM/4.0.0 http://maven.apache.org/xsd/maven-4.0.0.xsd">
    <parent>
        <artifactId>cloud2020</artifactId>
        <groupId>com.atguigu.springcloud</groupId>
        <version>1.0-SNAPSHOT</version>
    </parent>
    <modelVersion>4.0.0</modelVersion>

    <artifactId>cloud-eureka-server-7002</artifactId>
    <dependencies>
        <!-- eureka-server -->
        <dependency>
            <groupId>org.springframework.cloud</groupId>
            <artifactId>spring-cloud-starter-netflix-eureka-server</artifactId>
        </dependency>
        <!-- 引用自己定义的api通用包,可以使用Payment支付Entity -->
        <dependency>
            <groupId>com.atguigu.springcloud</groupId>
            <artifactId>cloud-api-commons</artifactId>
            <version>${project.version}</version>
        </dependency>
        <dependency>
            <groupId>org.springframework.boot</groupId>
            <artifactId>spring-boot-starter-web</artifactId>
        </dependency>
        <!--监控-->
        <dependency>
            <groupId>org.springframework.boot</groupId>
            <artifactId>spring-boot-starter-actuator</artifactId>
        </dependency>
        <!-- 一般通用配置 -->
        <dependency>
            <groupId>org.springframework.boot</groupId>
            <artifactId>spring-boot-devtools</artifactId>
            <scope>runtime</scope>
            <optional>true</optional>
        </dependency>
        <dependency>
            <groupId>org.projectlombok</groupId>
            <artifactId>lombok</artifactId>
            <optional>true</optional>
        </dependency>
        <dependency>
            <groupId>org.springframework.boot</groupId>
            <artifactId>spring-boot-starter-test</artifactId>
            <scope>test</scope>
        </dependency>
    </dependencies>
</project>
在host文件中添加 路径(C:WindowsSystem32driversetc)

创建application.yml
server:
  port: 7002

eureka:
  instance:
    hostname: eureka7002.com   #服务器的实例名称
  client:
    register-with-eureka: false #flase表示不向注册中心注册自己
    fetch-registry: false #false表示自己端就是注册中心,职责就是维护服务实例,并不需要检索服务
    service-url:
      #设置与Eureka Server交互地址查询服务和注册服务都需要依赖这个地址
      defaultZone: http://eureka7001.com/eureka/
创建一个主启动类EurekaMain7002
package com.atguigu.springcloud;

import org.springframework.boot.SpringApplication;
import org.springframework.boot.autoconfigure.SpringBootApplication;
import org.springframework.cloud.netflix.eureka.server.EnableEurekaServer;

@SpringBootApplication
@EnableEurekaServer
public class EurekaMain7002 {
    public static void main(String[] args) {
        SpringApplication.run(EurekaMain7002.class,args);
    }
}
修改项目(cloud-eureka-server-7001)的application.yml文件
server:
  port: 7001

eureka:
  instance:
    hostname: eureka7001.com   #服务器的实例名称
  client:
    register-with-eureka: false #flase表示不向注册中心注册自己
    fetch-registry: false #false表示自己端就是注册中心,职责就是维护服务实例,并不需要检索服务
    service-url:
      #设置与Eureka Server交互地址查询服务和注册服务都需要依赖这个地址
      defaultZone: http://eureka7002.com/eureka/
运行两个项目

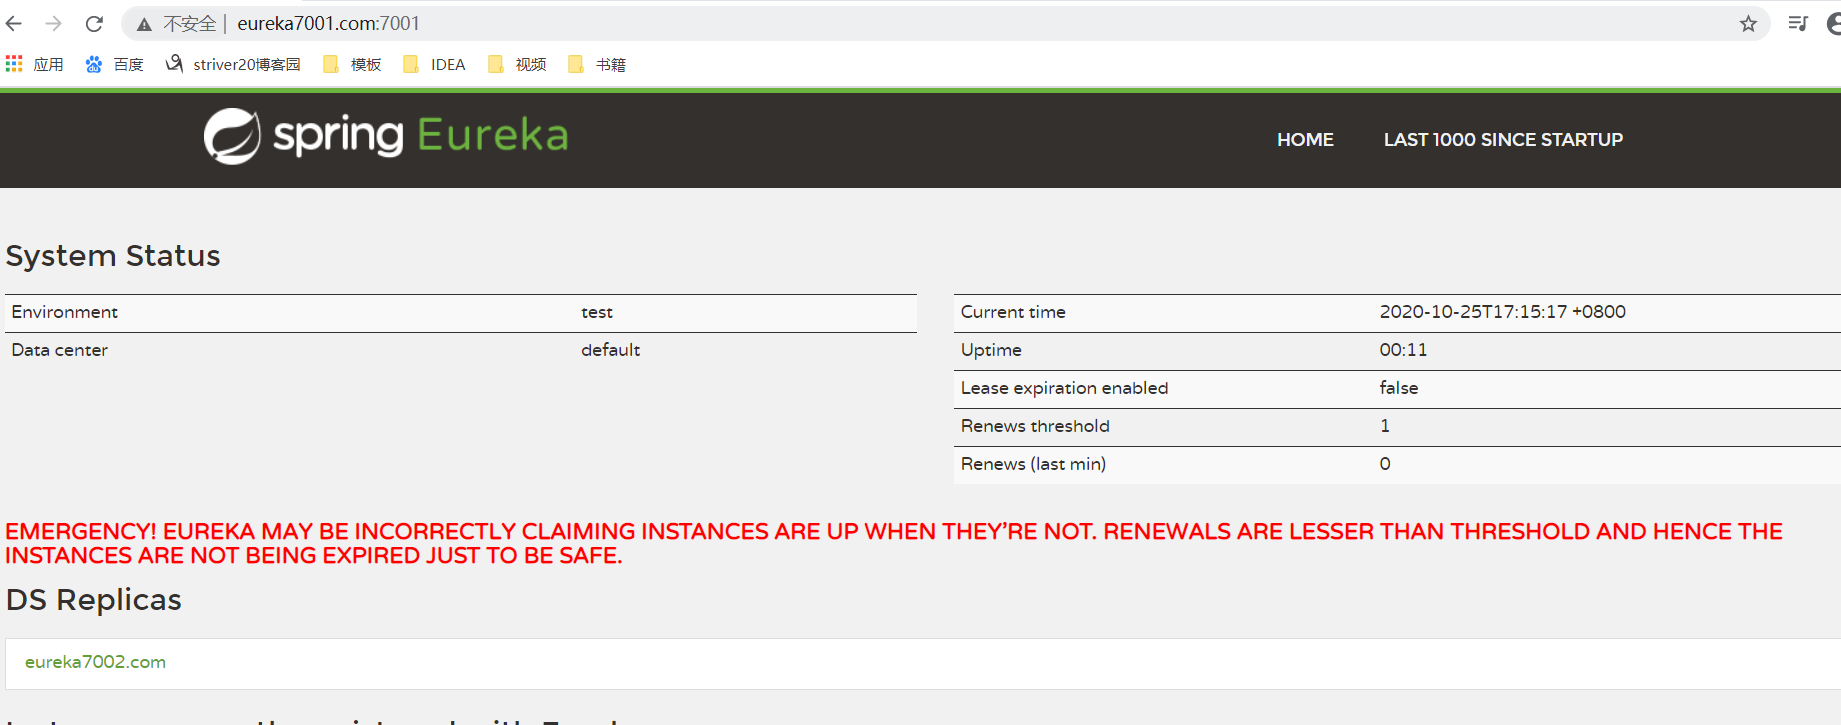
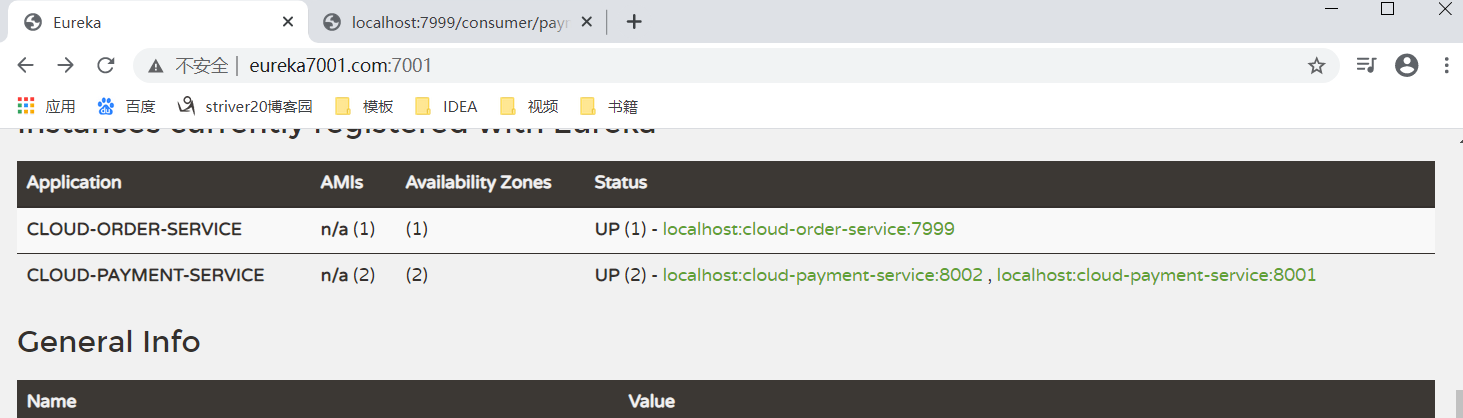
把两个服务注册到Eureka
#只需要把两个地址加上
defaultZone: http://eureka7001.com:7001/eureka,http://eureka7002.com:7002/eureka  #集群版
服务集群配置
创建一个子项目8002,复制8001pom.xml依赖到8002pom.xml.
将8001项目resources下的mapper文件夹和application.yml,复制到8002项目上
修改application,yml的端口号
server:
  port: 8002
复制8001com包下的所有业务类
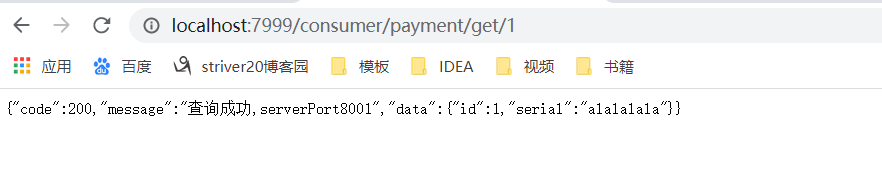
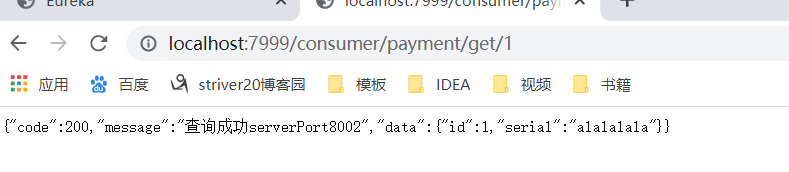
在8001和8002的Controller中加上
//用于观察它的端口号
@Value("${server.port}")
private String serverPort;
运行
修改80项目里的Controller文件
//public static final String PAYMENT_URL = "http://localhost:8001";
    public static final String PAYMENT_URL = "http://CLOUD-PAYMENT-SERVICE";
给80项目的config配置文件加上负载均衡的注解
@Configuration
public class ApplicationContextConfig {

    @Bean
    @LoadBalanced
    public RestTemplate getRestTemplate(){
        return new RestTemplate();
    }
}
运行
actuator微服务信息完善
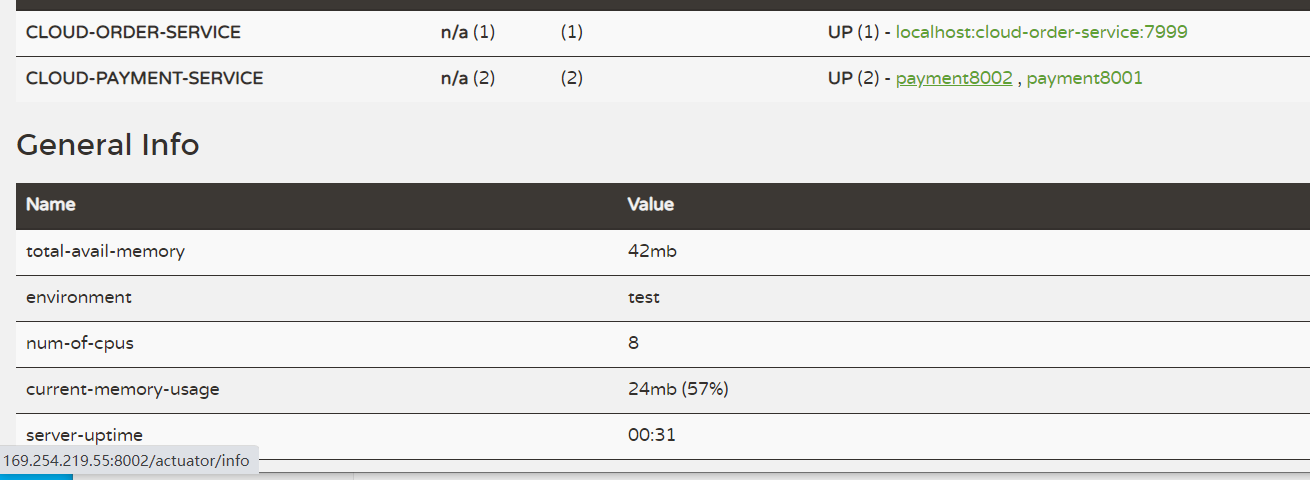
给8001和8002项目的application.yml文件添加上
instance:
    instance-id: payment8001
    prefer-ip-address: true   #访问路径可以显示IP地址
效果(当鼠标移上去会显示IP地址)
服务发现Discovery
修改8001项目的Controller文件
package com.atguigu.springcloud.controller;

import com.atguigu.springcloud.entities.CommonResult;
import com.atguigu.springcloud.entities.Payment;
import com.atguigu.springcloud.service.PaymentService;
import org.springframework.beans.factory.annotation.Value;
import org.springframework.cloud.client.ServiceInstance;
import org.springframework.cloud.client.discovery.DiscoveryClient;
import org.springframework.web.bind.annotation.GetMapping;
import org.springframework.web.bind.annotation.PathVariable;
import org.springframework.web.bind.annotation.PostMapping;
import org.springframework.web.bind.annotation.RestController;

import javax.annotation.Resource;

import java.util.List;

import static jdk.nashorn.internal.runtime.regexp.joni.Config.log;


@RestController
public class PaymentController {
    @Resource
    private PaymentService paymentService;

    @Value("${server.port}")
    private String serverPort;

    @Resource
    private DiscoveryClient discoveryClient;

    @PostMapping(value = "/payment/create")
    public CommonResult create(Payment payment){
        int result = paymentService.create(payment);
        log.print("插入结果:"+result);
        if(result>0){
            return new CommonResult(200,"插入数据库成功,serverPort"+serverPort,result);
        }else{
            return new CommonResult(404,"插入失败",null);
        }
    }

    @GetMapping(value = "/payment/get/{id}")
    public CommonResult getPaymentById(@PathVariable("id") Long id){
        Payment payment = paymentService.getPaymentById(id);
        if(payment!=null){
            return new CommonResult(200,"查询成功,serverPort"+serverPort,payment);
        }else{
            return new CommonResult(404,"没有对应记录"+id,null);
        }
    }
    @GetMapping(value = "/payment/discovery")
    public Object discovery() {
        List<String> services = discoveryClient.getServices();
        for (String element : services) {
            log.info(element);
            //System.out.println("element"+element);
        }
        List<ServiceInstance> instances = discoveryClient.getInstances("CLOUD-PAYMENT-SERVICE");
        for (ServiceInstance instance : instances) {
            log.info(instance.getServiceId()+"	"+instance.getHost()+"	"+instance.getUri());
        }
        return this.discoveryClient;
    }
}
给主启动类添加注解
package com.atguigu.springcloud;

import org.springframework.boot.SpringApplication;
import org.springframework.boot.autoconfigure.SpringBootApplication;
import org.springframework.cloud.client.discovery.EnableDiscoveryClient;
import org.springframework.cloud.netflix.eureka.EnableEurekaClient;

@SpringBootApplication
@EnableEurekaClient
@EnableDiscoveryClient
public class PaymentMain8001 {
    public static void main(String[] args) {
        SpringApplication.run(PaymentMain8001.class,args);
    }
}
项目运行
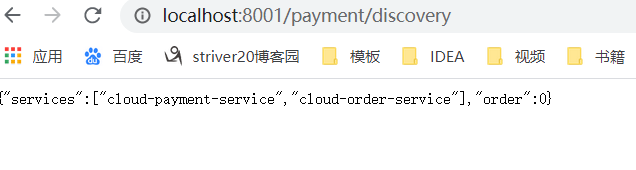
观察控制台打印出的日志,可以看出上面有服务的端口号,uri和名字等。