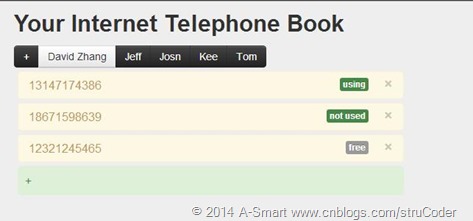
废话先:
在上一篇的文章里(也就是Meteor初级入门 一),给读者一些基本的读出数据,那么就那么光秃秃的将数据显示在浏览器上,实在有些不堪入目啊!本篇将介绍如何使用bootstrap进行美化界面和最基本的数据库操作。
前期准备工作:
1.上网下载Bootstrap
2.在工作目录F:/MeteorSpace/CloudTel下创建一个client文件也就是F:/MeteorSpace/client,之后在client文件夹里再创建一个文件夹bootstrap最后形成的目录也就是F:/MeteorSpace/client/bootstrap
3.在上一步创建好的bootstrap问价夹中放入我们从网上下载的Bootstrap里面的两个个文件:bootstrap.min.js 和 bootstrap.min.css
4.在我们的CloudTel.HTML中删除这个{{>Hello}} 和 与之对应的版块<template name=”Hello”>………</template>,并且在CloudTel.js文件里删除:Template.hello.greeting = function(){} 和 Template.hello.events = {} 因为我们不在需要它!
一切准备就绪后,Let‘s begin !
在CloudTel.js中编写如下代码:
1: <div id="categories" class="btn-group">
2: {{#each lists}}
3: <div class="category btn btn-inverse">
4: {{Category}}
5: </div>
6: {{/each}}
7: </div>
That's because under the hood, Meteor is tracking changes to our
reactive context (in this case, the lists collection) and template is being updated
immediately after a change is made
在这里还要提一下,Meteor还有一个令人amazing的地方,有句话叫做:Good things should be shared.
Meteor做到了,也就是Multiple clients,读者再打开另外一个浏览器,保证两个浏览器的内容都要见到,在其中的chrome浏览器的console里向数据库中插入一条数据,你会看到另外一个浏览器上的数据几乎是同时的得到了同步!
现在我们打开CloudTel.HTMl在{{#each lists}}前加入这么一段
1: {{#if new_cat}}
2: {{else}}
3: <div class="category btn btn-inverse" id="btnNewCat">+</div>
4: {{/if}}
在这里我就想说,我们添加了{{#if new_cat}}这句干什么用呢?结合上面的+我们可以想,当我们点击了这个+会出现一个input输入框,当我们输入内容后在下方会立马显示,恩,对!这就是我们现在的主要思路。
我们继续·····
我们紧接着需要做的就是完善上面的代码:
1: <template name="categories">
2: <h2 class ="title">Your Internet Telephone Book</h2>
3: <div id="categories" class="btn-group">
4: {{#if new_cat}}
5: <div class="category">
6: <input type="text" id="add-category" value=""/>
7: </div>
8: {{else}}
9: <div class="category btn btn-inverse" id="btnNewCat">+</div>
10: {{/if}}
11: {{#each lists}} <!--这里得备注下:一条数据就不用#each了-->
12: <div class="category btn {{list_status}}" id="{{_id}}">
13: {{Category}}
14: </div>
15: {{/each}}
16: </div>
17: </template>
现在我将这个整个的模块都贴上去了。
之后我们在CloudTel.js中添加如下代码【注:这是在if(Meteor.isClient){……..}中】
1: Template.categories.lists = function(){
2: return lists.find({},{sort:{Category:1}});
3: };
并且我们还要声明一个变量
Session.set('adding_category',false);
关于Session.set().在Meteor的官方文档里是这么解释的:
Session.set(key,value)
Set a variable in the session. Notify any listeners that the value has changed (eg: redraw templates, and rerun any Deps.autorun computations, that called Session.geton this key.)
Arguments
- key String
-
The key to set, eg,
selectedItem - value EJSON-able object or undefined
-
The new value for
key -
其主要意思呢就是:在这个会话中呢设置一个变量,当这个value变化了,它就会通知任何一个监听者 -
这一段的代码我这里就贴张去,免得出错: -
1: Template.categories.lists = function(){
2: //var l = lists.find({},{sort:{Category:1}});
3: return lists.find({},{sort:{Category:1}});
4: };5:6:7:8: //we are declaring the 'adding_category' flag
9: Session.set('adding_category',false);
10: Template.categories.new_cat = function(){
11: return Session.equals('adding_category',true);
12: };13:14: Template.categories.events({15: //The event that click
16: 'click #btnNewCat':function(e,t){
17: Session.set('adding_category',true);
18: Meteor.flush();19: focusText(t.find("#add-category"));
20: },21: //The event that 'enter' keyUp
22: 'keyup #add-category':function(e,t){
23: if(e.which == 13){
24: var catVal = String(e.target.value || "");
25: if(catVal){
26: lists.insert({Category:catVal,owner:Meteor.userId()});27: Session.set('adding_category',false);//here is hidden input
28: }29: }30: },31: //This step is order to when 'add-category' is focusout hidden the input
32: 'focusout #add-category':function(e,t){
33: Session.set('adding_category',false);
34: },35: 'click .category':function(e,t){
36: Session.set('current_list',this._id);
37: }38:39: });40: var focusText = function (input,val){
41: input.focus();42: input.value = val?val:"";
43: input.select();44: };
贴完了代码,我将给读者一一解释这些代码的作用。
在第10 - 11行,是设置那个new_cat是true or false,11行:Session.equlas(“adding_category”,true);也就是说呢,当变量adding_category的值为true时,我们return 一个true,只有这时浏览器里的input输入框才会显示出来,在第14 - 39行呢,是一些最基本的事件。具体的什么类型的事件我就不具体说了,这些单词还是经常用到的。关于在’ ‘中的#xxx或者是’ ‘中的.xxxx的意思呢,这里我要说一下,第一个#xxx意思就是获取一个HTML中的id。这个和Jquery中的$(‘#xxx’).bind(…)差不多。当然了它们的区别也是很大的,在Meteor模板中事件的id是<div id=”xxx”></div>中的Id,因为你是在Template.youTemplateName.events(function(){……});中监听事件,所以你在这里使用诸如$(“#xxx”).click(function(){….});是没有效果的,Jquery库的这些事件是针对<body></body>中的发生的事件,从而绑定其Id。所以呢,结论就是:Template.youTemplateName.events(function(){……});中使用Jquery库的事件没用,必须用Meteor默认的模板Handlebars规定的事件,而且其Id是<div>的Id,这个是要必须注意的,我自己在这个上花了些时间琢磨,希望你们不要在花不必要的时间。在然而这里的.xxx的意思就更简单了,就是这个事件是所有带有css class “category”的按钮通用的。
嗯,好。保存文件,我们看看浏览器里是什么样子吧。
当我们单击+后出现这样的:
如果读者是按我的步骤一步步的进行的,那么也会显示这样的结果。如果显示不出,我想读者可能某步出错,本章节最后会贴出现阶段全部代码![]()
现在呢我们将<body>….</body>中的代码改成这样:
1: <body>
2: <div id="lendlib">
3: <div id="categories-container">
4: {{>categories}}
5: </div>
6: <div id="list">
7: {{>list}}
8: </div>
9: </div>
10: </body>
在这里我要说的就是在每当有一个{{>xxx}}你必须与之添加一个<template name=”xxx”></template>否则会报错!
与{{>lists}}对应的<template name = “list”>…</template>就是:
1: <template name="list">
2: <ul id="lending_list">
3: {{#each items}}
4: <li class="lending_item alert">
5: <button type="button" class="close delete_item"
6: id="{{Name}}">×</button>
7: {{Name}}
8:
9: {{#if lendee_editing}}
10: <input type="text" id="edit_lendee" class="span2 pull-right" value="" />
11: {{else}}
12: <div class="lendee pull-right label {{LendClass}}">
13: {{Lendee}}
14: </div>
15: {{/if}}
16: </li>
17: {{/each}}
18: {{#if list_selected}}
19: <li class="alert-success" id="btnAddItem">+
20: {{#if list_adding}}
21: <input class="span4" id="item_to_add" size="32" type="32" />
22: {{/if}}
23: </li>
24: {{/if}}
25: </ul>
26: </template>
相信我在上面对{{#if xxx}}和{{#each xxx}}的解释,在这里我就不再对着两个做多余的阐述。
此时,我们有个这么一个模板,我们需要在CloudTel.js中进行相应的编码。
我们先来看看这:
1: Template.list.items = function(){
2: if(Session.equals('current_list',null)){
3: return null;
4: }else{
5: var cats = lists.findOne({_id:Session.get('current_list')});
6: if(cats && cats.items){
7: for(var i = 0;i<cats.items.length;i++){
8: var d = cats.items[i];
9: d.Lendee = d.LentTo ? d.LentTo:"free";
10: d.LendClass = d.LentTo ? "label-success":"label-default";
11: }
12: return cats.items;
13: }
14: }
15: };
这段代码与HTML中的{{#each items}}…..{{/each}}相对应。在第5行,Meteor查询MongoDB找出与_id相对应的数据。在这里我贴出Meteor documentation 中的API对Session.get()collection.findOne()的解释。
Session.get(key)
Get the value of a session variable. If inside a reactive computation, invalidate the computation the next time the value of the variable is changed by Session.set. This returns a clone of the session value, so if it's an object or an array, mutating the returned value has no effect on the value stored in the session.
Arguments
- key String
-
The name of the session variable to return
-
其主要意思也就是说呢,得到Session.set()的value
-
collection.findOne(selector, [options])
Finds the first document that matches the selector, as ordered by sort and skip options.
Arguments
- selector Mongo selector, or String
-
The query
Options
- sort Sort specifier
-
Sort order (default: natural order)
- skip Number
-
Number of results to skip at the beginning
- fields Field specifier
-
Dictionary of fields to return or exclude.
- reactive Boolean
-
(Client only) Default true; pass false to disable reactivity
- transform Function
-
Overrides
transformon theCollectionfor this cursor. Passnullto disable transformation. -
这里的意思也就是查询到与参数匹配的数据
其[Options]在这里我就不多说了,在接着的入门教程里我们会陆续的介绍!
接着我们要为list模板添加一些事件啦!
1: Template.list.events({
2: 'click #btnAddItem':function(e,t){
3: Session.set('list_adding',true);
4: Meteor.flush();
5: focusText(t.find("#item_to_add"));
6: },
7: 'keyup #item_to_add':function(e,t){
8: if(e.which ==13){
9: addItem(Session.get('current_list'),e.target.value);
10: Session.set('list_adding',false);
11: }
12: },
13: 'click .delete_item':function(e,t){
14: removeItem(Session.get('current_list'),e.target.id);
15: },
16: 'click .lendee':function(e,t){
17: Session.set('lendee_input',this.Name);
18: Meteor.flush();
19: focusText(t.find("#edit_lendee"),this.LentTo);
20: },
21: 'keyup #edit_lendee':function(e,t){
22: if(e.which==13){
23: updateLendee(Session.get('current_list'),this.Name,e.target.value);
24: Session.set('lendee_input',null);
25: }
26: if(e.which==27){
27: Session.set('lendee_input',null);
28: }
29: },
30: 'focusout #edit_lendee':function(e,t){
31: Session.set('lendee_input',null);
32: },
33: 'focusout #item_to_add':function(e,t){
34: Session.set('list_adding',false);
35: },
36: });
前面已经用到过Meter.flush()了,其意思也就是refresh UI
到现在,我们该做的已经差不多了,就差对数据的操作了。我们继续>>>>
到了现在读者可能对上面的addItem、removeItem和updateLendee感到奇怪,我想聪明的你一定想到这是一些方法了!
相应的方法如下:
1: //begin
2: var addItem = function(list_id,item_name){
3: if(!item_name && !list_id){
4: return;
5: }
6: lists.update({_id:list_id},{$addToSet:{items:{Name:item_name}}});
7: }
8:
9: var removeItem = function(list_id,item_name){
10: if(!item_name && list_id){
11: return;
12: }
13: lists.update({_id:list_id},{$pull:{items:{Name:item_name}}});
14: }
15:
16: var updateLendee = function(list_id,item_name,lendee_name){
17: var l = lists.findOne({"_id":list_id,"items.Name":item_name});
18: if(l && l.items){
19: for(var i = 0;i<l.items.length;i++){
20: if(l.items[i].Name == item_name){
21: l.items[i].LentTo = lendee_name;
22: }
23: }
24: lists.update({"_id":list_id},{$set:{"items":l.items}});
25: }
26: }//end
这些都是一些对数据的基本的操作,具体的MongoDB用法,博客园里其他的园友有很好的文章,这里我就不具体阐述了。
如果你以上的步骤没有出错的话你的浏览器的显示会是这样;
这里说下,这些颜色的配置是经过我css的设置,具体的我在Meteor 初级入门三中贴出。
这里准备贴出现阶段的全部代码,但想想,有些不合适,显得文章看起来不舒服。那就等Meteor 这个入门系列写完全部上传至GitHub和百度云盘与大家分享。
注:
因本人叙述能力和文章的表达能力有限,博文中有什么不足或者是出错的地方,希望园友们指出,同时也希望本系列能给对Meteor感兴趣并且想入门学习的IT一族提供参考和帮助。最后也希望彼此能交流进步。
本人也是学习Meteor不久,本系列也是本人在学习过程中的记录,与其藏在脑子里,不如写出来与大家分享,同时也为刚刚学习Meteor的同学们一个好的开始,而不是读蛋疼的Meteor的英文Docs,也为刚刚学习Meteor的同学们省去了很多时间。此外,就目前而言国内关于Meteor的中文文档甚少!此系列,也是本人阅读《Getting Started with Meteor.js JavaScript Framework》之后将此书的小项目拿出来作为本入门系列的project。特此声明!


