解析标签
以xml为例,<aop:aspectj-autoproxy />,全局搜索找到对应的解析器。
AopNamespaceHandler.java
@Override
public void init() {
    // In 2.0 XSD as well as in 2.5+ XSDs
    registerBeanDefinitionParser("config", new ConfigBeanDefinitionParser());
    // 注册了一个解析器
    registerBeanDefinitionParser("aspectj-autoproxy", new AspectJAutoProxyBeanDefinitionParser());
    registerBeanDefinitionDecorator("scoped-proxy", new ScopedProxyBeanDefinitionDecorator());

    // Only in 2.0 XSD: moved to context namespace in 2.5+
    registerBeanDefinitionParser("spring-configured", new SpringConfiguredBeanDefinitionParser());
}
看下解析器的解析方法:
public BeanDefinition parse(Element element, ParserContext parserContext) {
    // 注册ProxyCreator
    AopNamespaceUtils.registerAspectJAnnotationAutoProxyCreatorIfNecessary(parserContext, element);
    extendBeanDefinition(element, parserContext);
    return null;
}
再看ProxyCreator
public static void registerAspectJAnnotationAutoProxyCreatorIfNecessary(
    ParserContext parserContext, Element sourceElement) {
    // 这一句点进去之后发现,注册了一个AnnotationAwareAspectJAutoProxyCreator.class
    // registerOrEscalateApcAsRequired(AnnotationAwareAspectJAutoProxyCreator.class, registry, source)
    BeanDefinition beanDefinition = AopConfigUtils.registerAspectJAnnotationAutoProxyCreatorIfNecessary(
        parserContext.getRegistry(), parserContext.extractSource(sourceElement));
    // 对于proxy-target-class以及expose-proxy属性的处理
    useClassProxyingIfNecessary(parserContext.getRegistry(), sourceElement);
    registerComponentIfNecessary(beanDefinition, parserContext);
}
expose-proxy:有时候目标对象内部的自我调用将无法实施切面中的增强。
创建AOP代理
上一部分,注册了一个AnnotationAwareAspectJAutoProxyCreator继承体系如下
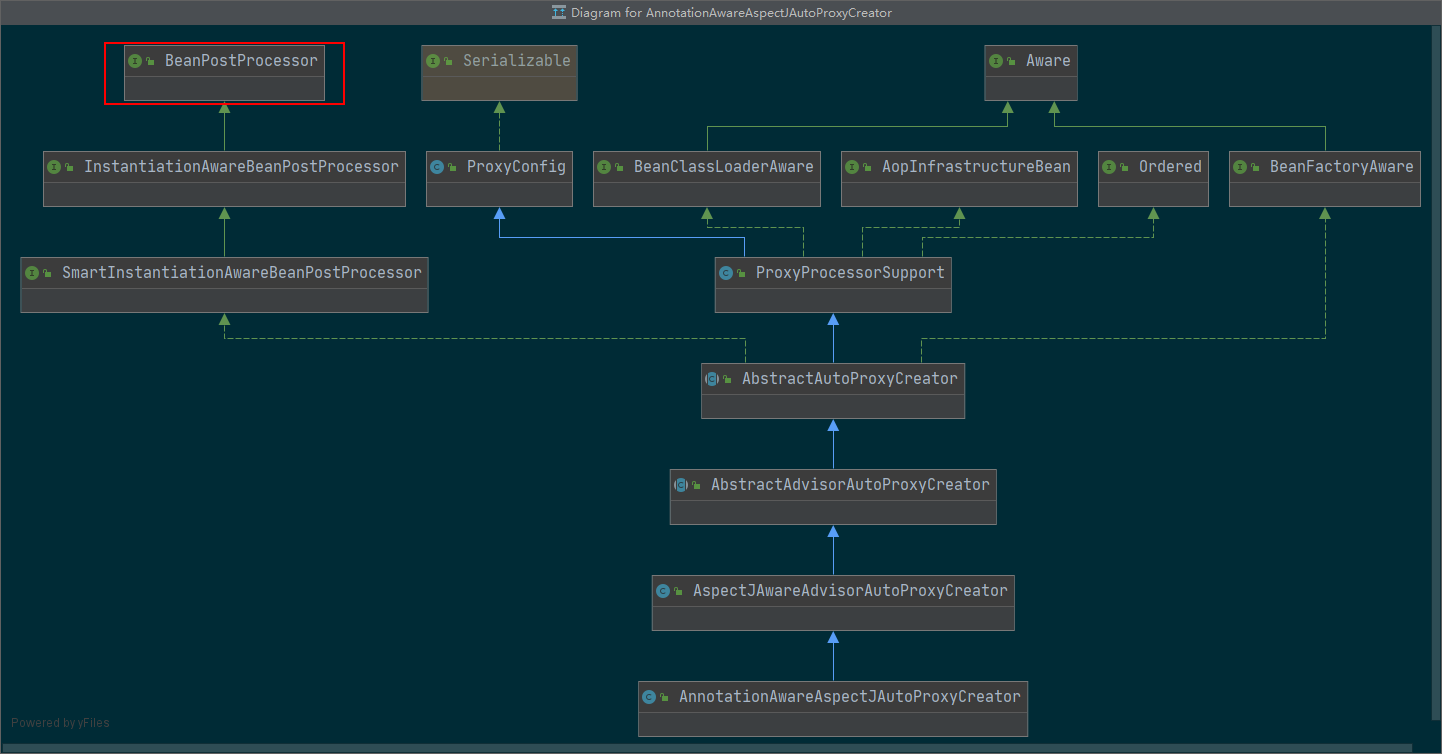
实现了BeanPostProcessor接口,那么就有相应的postProcess方法
public Object postProcessAfterInitialization(@Nullable Object bean, String beanName) {
    if (bean != null) {
        Object cacheKey = getCacheKey(bean.getClass(), beanName);
        if (this.earlyProxyReferences.remove(cacheKey) != bean) {
            return wrapIfNecessary(bean, beanName, cacheKey);
        }
    }
    return bean;
}
而wrapIfNecessary的关键在于
// Create proxy if we have advice.
// 获取Advices和Advisors
Object[] specificInterceptors = getAdvicesAndAdvisorsForBean(bean.getClass(), beanName, null);
if (specificInterceptors != DO_NOT_PROXY) {
    this.advisedBeans.put(cacheKey, Boolean.TRUE);
    // 创建代理
    Object proxy = createProxy(
        bean.getClass(), beanName, specificInterceptors, new SingletonTargetSource(bean));
    this.proxyTypes.put(cacheKey, proxy.getClass());
    return proxy;
}
getAdvicesAndAdvisorsForBean如下
protected List<Advisor> findEligibleAdvisors(Class<?> beanClass, String beanName) {
    // 再点进去发现有buildAspectJAdvisors()方法
    List<Advisor> candidateAdvisors = findCandidateAdvisors();
    List<Advisor> eligibleAdvisors = findAdvisorsThatCanApply(candidateAdvisors, beanClass, beanName);
    extendAdvisors(eligibleAdvisors);
    if (!eligibleAdvisors.isEmpty()) {
        eligibleAdvisors = sortAdvisors(eligibleAdvisors);
    }
    return eligibleAdvisors;
}
buildAspectJAdvisors()方法比较长,简单概括一下逻辑:
- 获取所有beanName
- 遍历所有beanName,找出
@Aspect声明的类 - 找出那些类的增强器(
this.advisorFactory.getAdvisors(factory)) - 结果放入缓存
获取增强器
第三步比较重要,贴下代码
public List<Advisor> getAdvisors(MetadataAwareAspectInstanceFactory aspectInstanceFactory) {
    Class<?> aspectClass = aspectInstanceFactory.getAspectMetadata().getAspectClass();
    String aspectName = aspectInstanceFactory.getAspectMetadata().getAspectName();
    validate(aspectClass);

    // We need to wrap the MetadataAwareAspectInstanceFactory with a decorator
    // so that it will only instantiate once.
    MetadataAwareAspectInstanceFactory lazySingletonAspectInstanceFactory =
        new LazySingletonAspectInstanceFactoryDecorator(aspectInstanceFactory);

    List<Advisor> advisors = new ArrayList<>();
    // 获取aspectClass下面的@Pointcut标记的方法,advisor: 顾问,建议者。挺符合的,pointcut建议了在哪些方法进行切面
    for (Method method : getAdvisorMethods(aspectClass)) {
        // Prior to Spring Framework 5.2.7, advisors.size() was supplied as the declarationOrderInAspect
        // to getAdvisor(...) to represent the "current position" in the declared methods list.
        // However, since Java 7 the "current position" is not valid since the JDK no longer
        // returns declared methods in the order in which they are declared in the source code.
        // Thus, we now hard code the declarationOrderInAspect to 0 for all advice methods
        // discovered via reflection in order to support reliable advice ordering across JVM launches.
        // Specifically, a value of 0 aligns with the default value used in
        // AspectJPrecedenceComparator.getAspectDeclarationOrder(Advisor).
        // 获取advisor
        Advisor advisor = getAdvisor(method, lazySingletonAspectInstanceFactory, 0, aspectName);
        if (advisor != null) {
            advisors.add(advisor);
        }
    }

    // If it's a per target aspect, emit the dummy instantiating aspect.
    if (!advisors.isEmpty() && lazySingletonAspectInstanceFactory.getAspectMetadata().isLazilyInstantiated()) {
        Advisor instantiationAdvisor = new SyntheticInstantiationAdvisor(lazySingletonAspectInstanceFactory);
        advisors.add(0, instantiationAdvisor);
    }

    // Find introduction fields.
    for (Field field : aspectClass.getDeclaredFields()) {
        Advisor advisor = getDeclareParentsAdvisor(field);
        if (advisor != null) {
            advisors.add(advisor);
        }
    }

    return advisors;
}
而getAdvisor的核心有两步
// 1.获取切点
AspectJExpressionPointcut expressionPointcut = getPointcut(
                candidateAdviceMethod, aspectInstanceFactory.getAspectMetadata().getAspectClass());
if (expressionPointcut == null) {
    return null;
}
// 2.生成增强器
return new InstantiationModelAwarePointcutAdvisorImpl(expressionPointcut, candidateAdviceMethod,
                                                      this, aspectInstanceFactory, declarationOrderInAspect, aspectName);
1的实现如下:
private AspectJExpressionPointcut getPointcut(Method candidateAdviceMethod, Class<?> candidateAspectClass) {
    // 这里去找方法上的注解包括:
    // Pointcut.class, Around.class, Before.class, After.class, AfterReturning.class, AfterThrowing.class
    AspectJAnnotation<?> aspectJAnnotation =
        AbstractAspectJAdvisorFactory.findAspectJAnnotationOnMethod(candidateAdviceMethod);
    if (aspectJAnnotation == null) {
        return null;
    }

    AspectJExpressionPointcut ajexp =
        new AspectJExpressionPointcut(candidateAspectClass, new String[0], new Class<?>[0]);
    // 获取@PointCut中的expression表达式
    ajexp.setExpression(aspectJAnnotation.getPointcutExpression());
    if (this.beanFactory != null) {
        ajexp.setBeanFactory(this.beanFactory);
    }
    return ajexp;
}
2看起来只是个简单的new了一个对象而已,实际上,实例化Advice的方法就隐藏在其中。
核心逻辑如下:
switch (aspectJAnnotation.getAnnotationType()) {
    case AtPointcut:
        if (logger.isDebugEnabled()) {
            logger.debug("Processing pointcut '" + candidateAdviceMethod.getName() + "'");
        }
        return null;
    case AtAround:
        springAdvice = new AspectJAroundAdvice(
            candidateAdviceMethod, expressionPointcut, aspectInstanceFactory);
        break;
    case AtBefore:
        springAdvice = new AspectJMethodBeforeAdvice(
            candidateAdviceMethod, expressionPointcut, aspectInstanceFactory);
        break;
    case AtAfter:
        springAdvice = new AspectJAfterAdvice(
            candidateAdviceMethod, expressionPointcut, aspectInstanceFactory);
        break;
    case AtAfterReturning:
        springAdvice = new AspectJAfterReturningAdvice(
            candidateAdviceMethod, expressionPointcut, aspectInstanceFactory);
        AfterReturning afterReturningAnnotation = (AfterReturning) aspectJAnnotation.getAnnotation();
        if (StringUtils.hasText(afterReturningAnnotation.returning())) {
            springAdvice.setReturningName(afterReturningAnnotation.returning());
        }
        break;
    case AtAfterThrowing:
        springAdvice = new AspectJAfterThrowingAdvice(
            candidateAdviceMethod, expressionPointcut, aspectInstanceFactory);
        AfterThrowing afterThrowingAnnotation = (AfterThrowing) aspectJAnnotation.getAnnotation();
        if (StringUtils.hasText(afterThrowingAnnotation.throwing())) {
            springAdvice.setThrowingName(afterThrowingAnnotation.throwing());
        }
        break;
    default:
        throw new UnsupportedOperationException(
            "Unsupported advice type on method: " + candidateAdviceMethod);
}
Advice家族合影如下
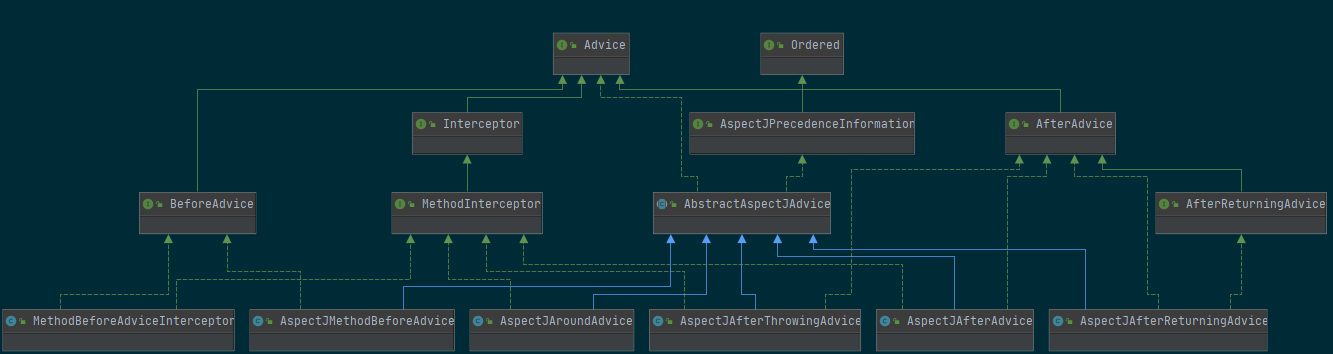
可以发现,这些通知的实现是直接或者间接的通过拦截器(Interceptor)的机制实现。如果是BeforeAdvice或者AfterReturningAdvice的话,需要借助于适配器来创建相应的MethodInterceptor.具体逻辑在DefaultAdvisorAdapterRegistry的Advisor wrap(Object adviceObject)方法中。
寻找匹配的增强器
起点是AopUtils.findAdvisorsThatCanApply(candidateAdvisors, beanClass)
这个不做介绍了,主要是判断了Advisor是否是IntroductionAdvisor等的一些判断。
创建代理
主要逻辑
protected Object createProxy(Class<?> beanClass, @Nullable String beanName,
            @Nullable Object[] specificInterceptors, TargetSource targetSource) {

    if (this.beanFactory instanceof ConfigurableListableBeanFactory) {
        AutoProxyUtils.exposeTargetClass((ConfigurableListableBeanFactory) this.beanFactory, beanName, beanClass);
    }

    ProxyFactory proxyFactory = new ProxyFactory();
    proxyFactory.copyFrom(this);

    if (!proxyFactory.isProxyTargetClass()) {
        if (shouldProxyTargetClass(beanClass, beanName)) {
            proxyFactory.setProxyTargetClass(true);
        }
        else {
            evaluateProxyInterfaces(beanClass, proxyFactory);
        }
    }

    // 这里进行了上面提到的advisor的转换
    Advisor[] advisors = buildAdvisors(beanName, specificInterceptors);
    proxyFactory.addAdvisors(advisors);
    proxyFactory.setTargetSource(targetSource);
    customizeProxyFactory(proxyFactory);

    proxyFactory.setFrozen(this.freezeProxy);
    if (advisorsPreFiltered()) {
        proxyFactory.setPreFiltered(true);
    }
    // 创建代理
    return proxyFactory.getProxy(getProxyClassLoader());
}
通过校验的逻辑可以看出,CGLIB的代理,方法不能被final修饰,不能是包访问或private权限。
代理有两种,一种是JDK动态代理一种CGLIB代理,Spring是如何选择的呢?
public AopProxy createAopProxy(AdvisedSupport config) throws AopConfigException {
    if (config.isOptimize() || config.isProxyTargetClass() || hasNoUserSuppliedProxyInterfaces(config)) {
        Class<?> targetClass = config.getTargetClass();
        if (targetClass == null) {
            throw new AopConfigException("TargetSource cannot determine target class: " +
                                         "Either an interface or a target is required for proxy creation.");
        }
        if (targetClass.isInterface() || Proxy.isProxyClass(targetClass)) {
            return new JdkDynamicAopProxy(config);
        }
        return new ObjenesisCglibAopProxy(config);
    }
    else {
        return new JdkDynamicAopProxy(config);
    }
}
JDK的动态代理非常简单
public Object getProxy(@Nullable ClassLoader classLoader) {
    if (logger.isTraceEnabled()) {
        logger.trace("Creating JDK dynamic proxy: " + this.advised.getTargetSource());
    }
    Class<?>[] proxiedInterfaces = AopProxyUtils.completeProxiedInterfaces(this.advised, true);
    findDefinedEqualsAndHashCodeMethods(proxiedInterfaces);
    // 归根结底,JDK动态代理创建代理对象逃不出这个方法
    return Proxy.newProxyInstance(classLoader, proxiedInterfaces, this);
}
exposed-proxy在config里面对应的是@EnableAspectJAutoProxy