Date: 2019-06-04
Author: Sun
Python多线程原理与实战
目的:
(1)了解python线程执行原理
(2)掌握多线程编程与线程同步
(3)了解线程池的使用
1 线程基本概念
1.1 线程是什么?
线程是指进程内的一个执行单元,也是进程内的可调度实体.
与进程的区别:
(1) 地址空间:进程内的一个执行单元;进程至少有一个线程;它们共享进程的地址空间;而进程有自己独立的地址空间;
(2) 资源拥有:进程是资源分配和拥有的单位,同一个进程内的线程共享进程的资源
(3) 线程是CPU处理器调度的基本单位,但进程不是.
(4) 二者均可并发执行.
简而言之,一个程序至少有一个进程,一个进程至少有一个线程.
线程的划分尺度小于进程,使得多线程程序的并发性高。
另外,进程在执行过程中拥有独立的内存单元,而多个线程共享内存,从而极大地提高了程序的运行效率。
1.2 线程和进程关系?
进程就是一个应用程序在处理机上的一次执行过程,它是一个动态的概念,而线程是进程中的一部分,进程包含多个线程在运行。
多线程可以共享全局变量,多进程不能。多线程中,所有子线程的进程号相同;多进程中,不同的子进程进程号不同。
进程是具有一定独立功能的程序关于某个数据集合上的一次运行活动,进程是系统进行资源分配和调度的一个独立单位.
线程是进程的一个实体,是CPU调度和分派的基本单位,它是比进程更小的能独立运行的基本单位.线程自己基本上不拥有系统资源,只拥有一点在运行中必不可少的资源(如程序计数器,一组寄存器和栈),但是它可与同属一个进程的其他的线程共享进程所拥有的全部资源.
一个线程可以创建和撤销另一个线程;同一个进程中的多个线程之间可以并发执行.
2 Python线程模块
python主要是通过thread和threading这两个模块来实现多线程支持。python的thread模块是比较底层的模块,python的threading模块是对thread做了一些封装,可以更加方便的被使用。但是python(cpython)由于GIL的存在无法使用threading充分利用CPU资源,如果想充分发挥多核CPU的计算能力需要使用multiprocessing模块(Windows下使用会有诸多问题)。
2.1 如何创建线程
python3.x中已经摒弃了Python2.x中采用函数式thread模块中的start_new_thread()函数来产生新线程方式。
python3.x中通过threading模块创建新的线程有两种方法:一种是通过threading.Thread(Target=executable Method)-即传递给Thread对象一个可执行方法(或对象);第二种是继承threading.Thread定义子类并重写run()方法。第二种方法中,唯一必须重写的方法是run().
(1)通过threading.Thread进行创建多线程
import threading
import time
def target():
    print("the current threading %s is runing"
       %(threading.current_thread().name))
    time.sleep(1)
    print("the current threading %s is ended"%(threading.current_thread().name))

print("the current threading %s is runing"%(threading.current_thread().name))
## 属于线程t的部分
t = threading.Thread(target=target)
t.start()
## 属于线程t的部分
t.join() # join是阻塞当前线程(此处的当前线程时主线程) 主线程直到Thread-1结束之后才结束
print("the current threading %s is ended"%(threading.current_thread().name))
(2)通过继承threading.Thread定义子类创建多线程
使用Threading模块创建线程,直接从threading.Thread继承,然后重写__init__方法和run方法:
import threading
import time

class myThread(threading.Thread):  # 继承父类threading.Thread
   def __init__(self, threadID, name, counter):
      threading.Thread.__init__(self)
      self.threadID = threadID
      self.name = name
      self.counter = counter

   def run(self):  # 把要执行的代码写到run函数里面 线程在创建后会直接运行run函数
      print("Starting " + self.name)
      print_time(self.name, self.counter, 5)
      print("Exiting " + self.name)


def print_time(threadName, delay, counter):
   while counter:
      time.sleep(delay)
      print("%s process at: %s" % (threadName, time.ctime(time.time())))
      counter -= 1

thread1 = myThread(1, "Thread-1", 1)  # 创建新线程
thread2 = myThread(2, "Thread-2", 2)

thread1.start() # 开启线程
thread2.start()

thread1.join()  # 等待线程结束
thread2.join()
print("Exiting Main Thread")
通过以上案例可以知道,thread1和thread2执行顺序是乱序的。要使之有序,需要进行线程同步
3 线程间同步
如果多个线程共同对某个数据修改,则可能出现不可预料的结果,为了保证数据的正确性,需要对多个线程进行同步。
使用Thread对象的Lock和Rlock可以实现简单的线程同步,这两个对象都有acquire方法和release方法,对于那些需要每次只允许一个线程操作的数据,可以将其操作放到acquire和release方法之间。
需要注意的是,Python有一个GIL(Global Interpreter Lock)机制,任何线程在运行之前必须获取这个全局锁才能执行,每当执行完100条字节码,全局锁才会释放,切换到其他线程执行。
3.1 线程同步问题
多线程实现同步有四种方式:
锁机制,信号量,条件判断和同步队列。
下面我主要关注两种同步机制:锁机制和同步队列。
(1)锁机制
threading的Lock类,用该类的acquire函数进行加锁,用realease函数进行解锁
import threading
import time
class myThread(threading.Thread):
   def __init__(self, threadID, name, counter):
      threading.Thread.__init__(self)
      self.threadID = threadID
      self.name = name
      self.counter = counter
   def run(self):
      print("Starting " + self.name)
      # 获得锁,成功获得锁定后返回True
      # 可选的timeout参数不填时将一直阻塞直到获得锁定
      # 否则超时后将返回False
      threadLock.acquire()
      print_time(self.name, self.counter, 5)
      # 释放锁
      threadLock.release()
def print_time(threadName, delay, counter):
   while counter:
      time.sleep(delay)
      print("%s: %s" % (threadName, time.ctime(time.time())))
      counter -= 1
threadLock = threading.Lock()
threads = []
thread1 = myThread(1, "Thread-1", 1) # 创建新线程
thread2 = myThread(2, "Thread-2", 2)
thread1.start()  # 开启新线程
thread2.start()
threads.append(thread1) # 添加线程到线程列表
threads.append(thread2)
for t in threads:  # 等待所有线程完成
   t.join()
print("Exiting Main Thread")
(2) 线程同步队列queue
python2.x中提供的Queue, Python3.x中提供的是queue
见import queue.
Python的queue模块中提供了同步的、线程安全的队列类,包括FIFO(先入先出)队列Queue,LIFO(后入先出)队列LifoQueue,和优先级队列PriorityQueue。这些队列都实现了锁原语,能够在多线程中直接使用。可以使用队列来实现线程间的同步。
queue模块中的常用方法:
- queue.qsize() 返回队列的大小
- queue.empty() 如果队列为空,返回True,反之False
- queue.full() 如果队列满了,返回True,反之False
- queue.full 与 maxsize 大小对应
- queue.get([block[, timeout]])获取队列,timeout等待时间
- queue.get_nowait() 相当Queue.get(False)
- queue.put(item) 写入队列,timeout等待时间
- queue.put_nowait(item) 相当Queue.put(item, False)
- queue.task_done() 在完成一项工作之后,Queue.task_done()函数向任务已经完成的队列发送一个信号
- queue.join() 实际上意味着等到队列为空,再执行别的操作
案例1:
import queue
import threading
import time

exitFlag = 0

class myThread(threading.Thread):
   def __init__(self, threadID, name, q):
      threading.Thread.__init__(self)
      self.threadID = threadID
      self.name = name
      self.q = q

   def run(self):
      print("Starting " + self.name)
      process_data(self.name, self.q)
      print("Exiting " + self.name)

def process_data(threadName, q):
   while not exitFlag:
      queueLock.acquire()
      if not workQueue.empty():
         data = q.get()
         queueLock.release()
         print("%s processing %s" % (threadName, data))
      else:
         queueLock.release()
      time.sleep(1)

threadList = ["Thread-1", "Thread-2", "Thread-3"]
nameList = ["One", "Two", "Three", "Four", "Five"]
queueLock = threading.Lock()
workQueue = queue.Queue(10)
threads = []
threadID = 1

# 创建新线程
for tName in threadList:
   thread = myThread(threadID, tName, workQueue)
   thread.start()
   threads.append(thread)
   threadID += 1

# 填充队列
queueLock.acquire()
for word in nameList:
   workQueue.put(word)
queueLock.release()

# 等待队列清空
while not workQueue.empty():
   pass

# 通知线程是时候退出
exitFlag = 1

# 等待所有线程完成
for t in threads:
   t.join()
print("Exiting Main Thread")
案例2:
import time
import threading
import queue

class Worker(threading.Thread):
    def __init__(self, name, queue):
        threading.Thread.__init__(self)
        self.queue = queue
        self.start()    #执行run()

    def run(self):
        #循环,保证接着跑下一个任务
        while True:
            # 队列为空则退出线程
            if self.queue.empty():
                break
            # 获取一个队列数据
            foo = self.queue.get()
            # 延时1S模拟你要做的事情
            time.sleep(1)
            # 打印
            print(self.getName() + " process " + str(foo))
            # 任务完成
            self.queue.task_done()


# 队列
queue = queue.Queue()
# 加入100个任务队列
for i in range(100):
    queue.put(i)
# 开10个线程
for i in range(10):
    threadName = 'Thread' + str(i)
    Worker(threadName, queue)
# 所有线程执行完毕后关闭
queue.join()
4. 多线程的生产者消费者模式
# -*- coding: utf-8 -*-
__author__ = 'sun'
__date__ = '2019/6/04 19:40'

from queue import Queue
import random, threading, time

# 生产者类
class Producer(threading.Thread):
    def __init__(self, name, queue):
        threading.Thread.__init__(self, name=name)
        self.data = queue

    def run(self):
        for i in range(5):
            print("%s is producing %d to the queue!" % (self.getName(), i))
            self.data.put(i)
            time.sleep(random.randrange(10) / 5)
        print("%s finished!" % self.getName())

# 消费者类
class Consumer(threading.Thread):
    def __init__(self, name, queue):
        threading.Thread.__init__(self, name=name)
        self.data = queue

    def run(self):
        for i in range(5):
            val = self.data.get()
            print("%s is consuming. %d in the queue is consumed!" % (self.getName(), val))
            time.sleep(random.randrange(10))
        print("%s finished!" % self.getName())


def main():
    queue = Queue()
    producer = Producer('Producer', queue)
    consumer = Consumer('Consumer', queue)

    producer.start()
    consumer.start()

    producer.join()
    consumer.join()
    print('All threads finished!')


if __name__ == '__main__':
    main()
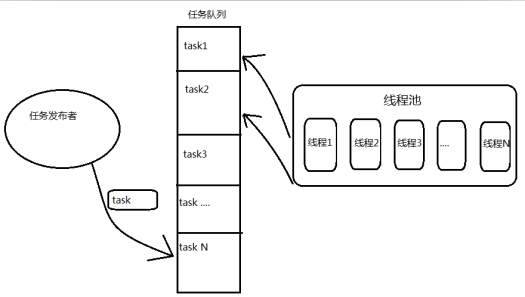
5 线程池
传统多线程问题?
传统多线程方案会使用“即时创建, 即时销毁”的策略。尽管与创建进程相比,创建线程的时间已经大大的缩短,但是如果提交给线程的任务是执行时间较短,而且执行次数极其频繁,那么服务器将处于不停的创建线程,销毁线程的状态。
一个线程的运行时间可以分为3部分:线程的启动时间、线程体的运行时间和线程的销毁时间。在多线程处理的情景中,如果线程不能被重用,就意味着每次创建都需要经过启动、销毁和运行3个过程。这必然会增加系统相应的时间,降低了效率。
有没有一种高效的解决方案呢? —— 线程池
线程池基本原理:
我们把任务放进队列中去,然后开N个线程,每个线程都去队列中取一个任务,执行完了之后告诉系统说我执行完了,然后接着去队列中取下一个任务,直至队列中所有任务取空,退出线程。
使用线程池:
由于线程预先被创建并放入线程池中,同时处理完当前任务之后并不销毁而是被安排处理下一个任务,因此能够避免多次创建线程,从而节省线程创建和销毁的开销,能带来更好的性能和系统稳定性。
线程池要设置为多少?
服务器CPU核数有限,能够同时并发的线程数有限,并不是开得越多越好,以及线程切换是有开销的,如果线程切换过于频繁,反而会使性能降低
线程执行过程中,计算时间分为两部分:
- CPU计算,占用CPU
- 不需要CPU计算,不占用CPU,等待IO返回,比如recv(), accept(), sleep()等操作,具体操作就是比如
访问cache、RPC调用下游service、访问DB,等需要网络调用的操作
那么如果计算时间占50%, 等待时间50%,那么为了利用率达到最高,可以开2个线程:
假如工作时间是2秒, CPU计算完1秒后,线程等待IO的时候需要1秒,此时CPU空闲了,这时就可以切换到另外一个线程,让CPU工作1秒后,线程等待IO需要1秒,此时CPU又可以切回去,第一个线程这时刚好完成了1秒的IO等待,可以让CPU继续工作,就这样循环的在两个线程之前切换操作。
那么如果计算时间占20%, 等待时间80%,那么为了利用率达到最高,可以开5个线程:
可以想象成完成任务需要5秒,CPU占用1秒,等待时间4秒,CPU在线程等待时,可以同时再激活4个线程,这样就把CPU和IO等待时间,最大化的重叠起来
抽象一下,计算线程数设置的公式就是:
N核服务器,通过执行业务的单线程分析出本地计算时间为x,等待时间为y,则工作线程数(线程池线程数)设置为 N*(x+y)/x,能让CPU的利用率最大化。
由于有GIL的影响,python只能使用到1个核,所以这里设置N=1
import queue
import threading
import time


class WorkManager(object):
   def __init__(self, work_num=1000, thread_num=2):
      self.work_queue = queue.Queue()
      self.threads = []
      self.__init_work_queue(work_num)
      self.__init_thread_pool(thread_num)

   """
      初始化线程
   """

   def __init_thread_pool(self, thread_num):
      for i in range(thread_num):
         self.threads.append(Work(self.work_queue))


   """
      初始化工作队列
   """

   def __init_work_queue(self, jobs_num):
      for i in range(jobs_num):
         self.add_job(do_job, i)

   """
      添加一项工作入队
   """

   def add_job(self, func, *args):
      self.work_queue.put((func, list(args)))  # 任务入队,Queue内部实现了同步机制

   """
      等待所有线程运行完毕
   """

   def wait_allcomplete(self):
      for item in self.threads:
         if item.isAlive(): item.join()


class Work(threading.Thread):
   def __init__(self, work_queue):
      threading.Thread.__init__(self)
      self.work_queue = work_queue
      self.start()

   def run(self):
      # 死循环,从而让创建的线程在一定条件下关闭退出
      while True:
         try:
            do, args = self.work_queue.get(block=False)  # 任务异步出队,Queue内部实现了同步机制
            do(args)
            self.work_queue.task_done()  # 通知系统任务完成
         except:
            break

         # 具体要做的任务


def do_job(args):
   time.sleep(0.1)  # 模拟处理时间
   print(threading.current_thread())
   print(list(args))


if __name__ == '__main__':
   start = time.time()
   work_manager = WorkManager(100, 10)  # 或者work_manager =  WorkManager(10000, 20)
   work_manager.wait_allcomplete()
   end = time.time()
   print("cost all time: %s" % (end - start))
6. python 进行并发编程
在Python 2的时代,高性能的网络编程主要是使用Twisted、Tornado和Gevent这三个库,但是它们的异步代码相互之间既不兼容也不能移植。 asyncio是Python 3.4版本引入的标准库,直接内置了对异步IO的支持。
asyncio的编程模型就是一个消息循环。我们从asyncio模块中直接获取一个EventLoop的引用,然后把需要执行的协程扔到EventLoop中执行,就实现了异步IO。
Python的在3.4中引入了协程的概念,可是这个还是以生成器对象为基础。
Python 3.5添加了async和await这两个关键字,分别用来替换asyncio.coroutine和yield from。
python3.5则确定了协程的语法。下面将简单介绍asyncio的使用。实现协程的不仅仅是asyncio,tornado和gevent都实现了类似的功能。
(1)协程定义
用asyncio实现Hello world代码如下:
import asyncio

@asyncio.coroutine
def hello():
    print("Hello world!")
    # 异步调用asyncio.sleep(1):
    r = yield from asyncio.sleep(1)
    print("Hello again!")
# 获取EventLoop:
loop = asyncio.get_event_loop()
# 执行coroutine
loop.run_until_complete(hello())
loop.close()
@asyncio.coroutine把一个generator标记为coroutine类型,然后,我们就把这个coroutine扔到EventLoop中执行。 hello()会首先打印出Hello world!,然后,yield from语法可以让我们方便地调用另一个generator。由于asyncio.sleep()也是一个coroutine,所以线程不会等待asyncio.sleep(),而是直接中断并执行下一个消息循环。当asyncio.sleep()返回时,线程就可以从yield from拿到返回值(此处是None),然后接着执行下一行语句。
把asyncio.sleep(1)看成是一个耗时1秒的IO操作,在此期间,主线程并未等待,而是去执行EventLoop中其他可以执行的coroutine了,因此可以实现并发执行。
我们用Task封装两个coroutine试试:
import threading
import asyncio

@asyncio.coroutine
def hello():
    print('Hello world! (%s)' % threading.currentThread())
    yield from asyncio.sleep(1)
    print('Hello again! (%s)' % threading.currentThread())

loop = asyncio.get_event_loop()
tasks = [hello(), hello()]
loop.run_until_complete(asyncio.wait(tasks))
loop.close()
观察执行过程:
Hello world! (<_MainThread(MainThread, started 140735195337472)>)
Hello world! (<_MainThread(MainThread, started 140735195337472)>)
(暂停约1秒)
Hello again! (<_MainThread(MainThread, started 140735195337472)>)
Hello again! (<_MainThread(MainThread, started 140735195337472)>)
由打印的当前线程名称可以看出,两个coroutine是由同一个线程并发执行的。
如果把asyncio.sleep()换成真正的IO操作,则多个coroutine就可以由一个线程并发执行。
asyncio案例实战
我们用asyncio的异步网络连接来获取sina、sohu和163的网站首页:
async_wget.py
import asyncio

@asyncio.coroutine
def wget(host):
    print('wget %s...' % host)
    connect = asyncio.open_connection(host, 80)
    reader, writer = yield from connect
    header = 'GET / HTTP/1.0\r\nHost: %s\r\n\r\n' % host
    writer.write(header.encode('utf-8'))
    yield from writer.drain()
    while True:
        line = yield from reader.readline()
        if line == b'\r\n':
            break
        print('%s header > %s' % (host, line.decode('utf-8').rstrip()))
    # Ignore the body, close the socket
    writer.close()

loop = asyncio.get_event_loop()
tasks = [wget(host) for host in ['www.sina.com.cn', 'www.sohu.com', 'www.163.com']]
loop.run_until_complete(asyncio.wait(tasks))
loop.close()
结果信息如下:
wget www.sohu.com...
wget www.sina.com.cn...
wget www.163.com...
(等待一段时间)
(打印出sohu的header)
www.sohu.com header > HTTP/1.1 200 OK
www.sohu.com header > Content-Type: text/html
...
(打印出sina的header)
www.sina.com.cn header > HTTP/1.1 200 OK
www.sina.com.cn header > Date: Wed, 20 May 2015 04:56:33 GMT
...
(打印出163的header)
www.163.com header > HTTP/1.0 302 Moved Temporarily
www.163.com header > Server: Cdn Cache Server V2.0
...
可见3个连接由一个线程通过coroutine并发完成。
小结
asyncio提供了完善的异步IO支持;
异步操作需要在coroutine中通过yield from完成;
多个coroutine可以封装成一组Task然后并发执行。