前言
因为后面要探索分布式相关的技术,因此我在腾讯云申请了一台免费试用的云服务器。后续会续费,支持云服务。拿到的云服务器,很多的的开发所需要的环境需要我们自己去构建,因此,我在此稍微做一下分享。
Linux服务器介绍

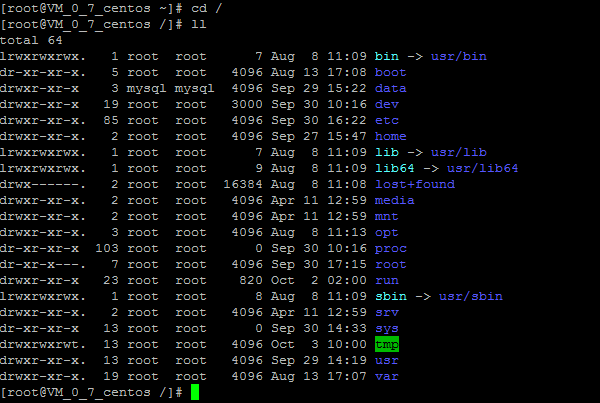
上图中是取到云服务器时,在根目录下最初始的目录。linux系统的目录是一个树状的目录结构。在此着重介绍几个目录。
①/bin:bin是binary的缩写,用于存储最经常使用的命令。
②/boot:存放启动Linux时使用的一些核心文件,包括一些连接文件以及镜像文件。
③/dev:存放linux的外部设备,在Linux中访问设备的方式和访问文件的方式相同。
④/etc:存放所有系统管理员所需要的配置文件和目录。
⑤/home:用户的主目录,每一个用户都有自己的目录,而且这个目录是以用户账号命名的。
⑥/lost+found:这个目录一般为空,除非非法关机后,会存储一些文件。
⑦/root:这个目录是系统管理员,也称作超级用户的主目录。
⑧/src:存放一些服务启动之后需要提取的一些文件。
⑨/usr:非常重要的一个目录,许多应用程序和文件都存放在这个目录下。
⑩/var:存放不断扩充的文件,比如日志文件等等。
JDK准备

1.将tar文件解压,同时复制到 /usr/local/java 目录下。
2.配置环境变量 vim /etv/profile ,在该文件下追加,source /etc/profile不需要重启系统,重新加载一下该文件即可。
export JAVA_HOME=/usr/local/java/jdk1.8.0_181
export JRE_HOME=${JAVA_HOME}/jre
export CLASSPATH=.:${JAVA_HOME}/lib:${JRE_HOME}/lib
export PATH=${JAVA_HOME}/bin:$PATH
使用java -version验证一下是否配置正确。

MYSQL准备
1.安装部分包:yum -y install numactl libaio*
2. 下载tar文件

3.解压复制到/usr/local/mysql目录下
①首先将tar文件解压,tar -zxvf mysql-5.6.41-linux-glibc2.12-x86_64.tar.gz.
②将mysql-5.6.41-linux-glibc2.12-x86_64这个目录包含目录下的所有文件复制到/user/local。并且新目录指定为mysql。cp -r mysql-5.6.41-linux-glibc2.12-x86_64 /usr/local/mysql。
4.添加系统mysql组和mysql用户
[root@localhost src]# groupadd mysql
[root@localhost src]# useradd -r -g mysql mysql
5.安装数据库
创建mysql数据和日志存放目录
[root@localhost src]# cd /
[root@localhost /]# mkdir data
[root@localhost /]# cd data
[root@localhost data]# mkdir mysql
[root@localhost data]# cd mysql
[root@localhost mysql]# mkdir data
[root@localhost mysql]# mkdir log
[root@localhost mysql]# cd log
[root@localhost log]# touch error.log
[root@localhost log]# chown -R mysql:mysql /data/mysql/log
[root@localhost log]# chown -R mysql:mysql /data/mysql/data

切到mysql安装目录
[root@localhost src]# cd /usr/local/mysql

修改当前目录拥有者为mysql用户
[root@localhost mysql]# chown -R mysql:mysql ./

安装数据库
[root@localhost mysql]# ./scripts/mysql_install_db --basedir=/usr/local/mysql --datadir=/data/mysql/data --user=mysql
在执行安装时出现了错误。此时我们主要安装安装autoconf库。 命令:yum-y install autoconf (此包安装时会安装Data:Dumper模块)
FATAL ERROR: please install the following Perl modules before executing ./scripts/mysql_install_db:
Data::Dumper。
继续执行,无报错。
6.设置mysql开机自启动
将服务文件拷贝到init.d下,并重命名为mysqld
[root@localhost mysql]# cp /usr/local/mysql/support-files/mysql.server  /etc/init.d/mysqld

修改/etc/init.d/mysqld文件
[root@localhost mysql]# vi /etc/init.d/mysqld
设置basedir和datadir的路径,配置如下:
basedir=/usr/local/mysql
datadir=/usr/local/mysql/data

赋予可执行权限
[root@localhost mysql]# chmod +x /etc/init.d/mysqld

加入开机启动
[root@localhost mysql]# chkconfig --add mysqld
接下来需要安装修改/etc/my.cnf文件
[mysqld]
user = mysql
port = 3306
autocommit = 1
server_id = 20180827
character-set-server=utf8
lower_case_table_names=1
basedir = /usr/local/mysql
datadir = /data/mysql/data
socket = /tmp/mysql.sock
pid-file = /data/mysql/data/mysqld.pid

# connection settings #
interactive_timeout=1800
wait_timeout=1800
max_connections =1000

# session memory settings #
read_buffer_size=16M
read_rnd_buffer_size=64M

# log settings #
log_error = /data/mysql/log/error.log
slow_query_log_file = /data/mysql/log/slow.log
log-bin=/data/mysql/log/mysql-bin
expire_logs_days=7
slow_query_log = 1
long-query-time = 1 #慢查询时间 超过1秒则为慢查询

# innodb settings #
innodb_log_buffer_size=64M
innodb_sort_buffer_size=2M
sort_buffer_size=64M
thread_cache_size=80

# replication settings #
master_info_repository = TABLE
relay_log_info_repository = TABLE
sync_binlog = 1
log_slave_updates
binlog_format=row
binlog_rows_query_log_events = 1
relay_log = relay.log
relay_log_recovery = 1
slave_skip_errors = ddl_exist_errors
slave-rows-search-algorithms = 'INDEX_SCAN,HASH_SCAN'

replicate-ignore-db=mysql
replicate-ignore-db=information_schema
replicate-ignore-db=performance_schema
replicate-ignore-db=test
7.启动服务并且初始化密码
启动mysql服务
[root@localhost mysql]# service mysqld start
Starting MySQL.. SUCCESS!

配置环境变量(也可以用不配置环境变量,设置软链接)
[root@localhost mysql]# vi /etc/profile
加入以下内容:
PATH=/usr/local/mysql/bin:$PATH
export PATH

使配置立即生效
[root@localhost mysql]# source /etc/profile

修改密码
[root@localhost mysql]# mysql
Welcome to the MySQL monitor.  Commands end with ; or /g.
Your MySQL connection id is 1
Server version: 5.6.41-log MySQL Community Server (GPL)

Copyright (c) 2000, 2018, Oracle and/or its affiliates. All rights reserved.

Oracle is a registered trademark of Oracle Corporation and/or its
affiliates. Other names may be trademarks of their respective
owners.

Type 'help;' or '/h' for help. Type '/c' to clear the current input statement.

mysql> set password for root@localhost = password('root');
Query OK, 0 rows affected (0.00 sec)

mysql> grant all privileges on *.* to root@'%' identified by 'root';
Query OK, 0 rows affected (0.00 sec)

mysql> flush privileges;
Query OK, 0 rows affected (0.00 sec)

重新登录
mysql> exit
Bye
[root@localhost mysql]# mysql -uroot -p
Enter password:
Welcome to the MySQL monitor.  Commands end with ; or /g.
Your MySQL connection id is 2
Server version: 5.6.41-log MySQL Community Server (GPL)

Copyright (c) 2000, 2018, Oracle and/or its affiliates. All rights reserved.

Oracle is a registered trademark of Oracle Corporation and/or its
affiliates. Other names may be trademarks of their respective
owners.

Type 'help;' or '/h' for help. Type '/c' to clear the current input statement.

mysql> show databases;
+--------------------+
| Database           |
+--------------------+
| information_schema |
| mysql              |
| performance_schema |
| test               |
+--------------------+
4 rows in set (0.00 sec)
如果出现ERROR 1045 (28000): Access denied for user 'root'@'localhost' (using password: YES)的问题,表明密码设置不正确,可采取以下的方式修改密码,重新尝试连接。
1.关闭mysql
# service mysqld stop
2.屏蔽权限
# mysqld_safe --skip-grant-table
屏幕出现: Starting demo from .....
3.新开起一个终端输入
# mysql -u root mysql
mysql> UPDATE user SET Password=PASSWORD('newpassword') where USER='root';
mysql> FLUSH PRIVILEGES;//记得要这句话,否则如果关闭先前的终端,又会出现原来的错误
mysql> q
ZOOKEEPER准备
1.下载并且解压到/usr/local/zookeeper目录下

2.配置环境变量
% export ZOOKEEPER_INSTALL=/home/tom/zookeeper-x.y.z
% export PATH=$PATH:$ZOOKEEPER_INSTALL/bin
3.在运行Zookeepr前,应先建立配置文件,按惯例命名为zoo.cfg,并把它放在conf子目录下,也可以把它放在/etc/zookeeper下。
tickTime=2000(是Zookeeper独立的工作时间单元)
dataDir=/Users/tom/zookeeper(存储数据的地址)
clientPort=2181(2181是经常的选择,此处是关于用户和Zookeeper相连的地方)
4.独立模式配置
配置conf/zoo.conf文件
tickTime=2000
dataDir=/usr/zdatadir
dataLogDir=/usr/zlogdir
clientPort=2181
initLimit=5
syncLimit=2
5.启动zookeeper
bin/zkServer.sh start
bin/zkCli.sh –server 127.0.0.1:2181