前边
业务流程:
客户端在上传资源到七牛云存储之前要先从业务服务器获取一个有效的上传凭证,因此需要先后和两个服务端打交道。
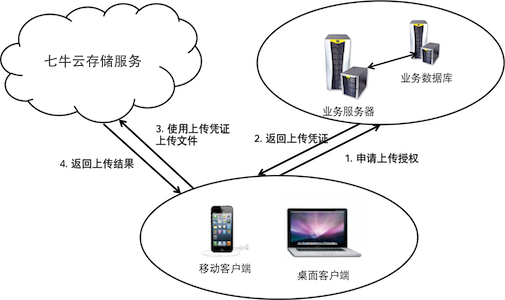
如果有设置回调,则上传完成时七牛云存储会自动发起回调到指定的业务服务器。

对于下载,公开资源不需要对应的下载凭证,客户端可以直接从七牛云存储下载对应资源。私有资源需要对应的下载凭证,因此必须先和业务服务器打交道。
官方文档:https://developer.qiniu.com/kodo
PDF文档: http://78re52.com0.z0.glb.qiniucdn.com/tsdocs/七牛云存储文件上传-基础上传服务.pdf
JS-SDK:http://jssdk.demo.qiniu.io/
许多细节方面的,需要去看文档。比如文件重名,上传回调,参数传递。七牛提供十几种语言的sdk接入,而平常项目使用的是ci框架,所以这里要总结的是CI框架怎么接入七牛。只有先接入php-sdk,你才好走完整个流程。比如第一步,生成token。
开始
按照下边几个步骤,依次操作。
一、下载SDK。
正常下载: https://developer.qiniu.com/kodo/sdk/1241/php
composer下载:composer require qiniu/php-sdk
二、将 php-sdk-master/src 下的 Qiniu 复制到CI的 libraries 目录下。
三、在 Qiniu 目录下新建文件名为 Autoloader.php 的文件,即 Qiniu/Autoloader.php。
<?php

namespace Qiniu;

class Autoloader {
    private $directory;
    private $prefix;
    private $prefixLength;

    public function __construct($baseDirectory = __DIR__)
    {
        $this->directory = $baseDirectory;
        $this->prefix = __NAMESPACE__.'\';
        $this->prefixLength = strlen($this->prefix);
    }

    public function autoload($class)
    {
        if (0 === strpos($class, $this->prefix)) {
            $parts = explode('\', substr($class, $this->prefixLength));
            $filepath = $this->directory . DIRECTORY_SEPARATOR . implode(DIRECTORY_SEPARATOR, $parts) . '.php';

            if (is_file($filepath)) {
                require $filepath;
            }
        }
    }

    public static function register()
    {
        spl_autoload_register(array(new self(), 'autoload'));
    }
}
上面这一段代码几乎照搬了Predis的。
四、在 libraries 目录下,新建文件 Qiniu.php。
<?php

require 'Qiniu/Autoloader.php';

class Qiniu {

    public function __construct() {
        QiniuAutoloader::register();
        require 'Qiniu/functions.php';
    }
}
完成后的,目录结构如下:
- libraries
- Qiniu.php
- Qiniu
- Auth.php
- Config.php
- Autoloader.php
- Cdn
- Http
- Client.php
- Request.php
- ……
- ……
五、在 Controller 中使用七牛库。
在controller下,建立 QiniuTest.php,新建第一个函数:
public function getToken()
{
    $accessKey = 'xxxxxxx';
    $secretKey = 'xxxxxxxxxxxxxx';

    $this->load->library('Qiniu');
    $auth = new QiniuAuth($accessKey, $secretKey);
    $bucket = 'xxx';
    $token = $auth->uploadToken($bucket);
    $this->output->json(array('code' => 0, 'token' => $token));
}
如果配置都正确,访问: http://localhost:8080/qiniu/gettoken/ 就可以得到token了。
使用
view 下建立一个 qiniu.index.php 。表单如下:
<form onsubmit="return false;">
    <div class="form-group">
        <label>文件:</label>
        <input id="file" name="file" class="form-control" type="file" />
    </div>

    <div id="progressbar">
        <span></span>
    </div>

    <div class="form-group">
        <input type="button" class="form-control" id="upbtn" name="upbtn" value="上传">
    </div>
</form>
js如下:
var token  = "<?php echo $token; ?>";

$(document).ready(function(){

    var uploadUrl = "https://up.qbox.me";

    var progress = {
            change: function(value) {
                $("#progressbar").find('span').text(value);
            },
            complete: function() {
                $("#progressbar").find('span').text("Complete!");
        }}

    $("#upbtn").click(function() {
            //普通上传
            var exeupload = function(f, token, key) {
                var xhr = new XMLHttpRequest();
                xhr.open('POST', uploadUrl, true);

                var formData, startDate, taking;
                formData = new FormData();
                formData.append('token', token);
                formData.append('file', f);
                if (key !== null && key !== undefined) formData.append('key', key);

                xhr.upload.addEventListener("progress", function(evt) {
                    if (evt.lengthComputable) {
                        var nowDate = new Date().getTime();
                        taking = nowDate - startDate;
                        var x = (evt.loaded) / 1024;
                        var y = taking / 1000;
                        var uploadSpeed = (x / y);
                        var formatSpeed;
                        if (uploadSpeed > 1024) {
                            formatSpeed = (uploadSpeed / 1024).toFixed(2) + "Mb/s";
                        } else {
                            formatSpeed = uploadSpeed.toFixed(2) + "Kb/s";
                        }

                        var percentComplete = Math.round(evt.loaded * 100 / evt.total);
                        var str = "当前上传百分比:" + percentComplete + "% 当前上传速度:" + formatSpeed;
                        progress.change(str);
                        console.log(str);
                    }
                }, false);

                xhr.onreadystatechange = function(response) {
                    if (xhr.readyState == 4 && xhr.status == 200 && xhr.responseText != "") {
                        var blkRet = xhr.responseText;
                        progress.change("上传完成:" + blkRet);
                    } else if (xhr.status != 200 && xhr.responseText) {

                    }
                };

                startDate = new Date().getTime();
                $("#progressbar").show();
                xhr.send(formData);
            };

            if ($("#file")[0].files.length > 0 && token != "") {
                $key = $("#file").val().split("\").pop();
                exeupload($("#file")[0].files[0], token, $key);
            } else {
                console.log("form input error");
            }
    })
});
再controller下,建立 QiniuTest.php,新建第一个函数:
public function index()
{
    $accessKey = 'xxxxxxx';
    $secretKey = 'xxxxxxxxxxxxxx';

    $this->load->library('Qiniu');
    $auth = new QiniuAuth($accessKey, $secretKey);
    $bucket = 'xxx';
    $token = $auth->uploadToken($bucket);

    $this->load->vars('token', $token);
    $this->load->view('qiniu.index.php');
}
访问 http://xxx.com/qiniuTest 开始测试。
如果服务器正常,代码正常,发现一个上传的测试已经完成。进入你七牛后台,在内容管理下边,你会看到你刚上传的文件。
尾巴
仅仅代码实现上传还是不够的,你至少要将上传的文件相关信息保存到数据库。要不,七牛仅仅是个远程磁盘,使用价值就没体现出来。还有,要怎么实现多文件上传呢,怎么更好的封装上传呢。这些都需要花时间去搞定的。