day63---Django框架学习初阶(四)
昨日内容回顾
无名分组和有名分组反向解析
"""
反向解析的本质:通过一些方法得到一个结果,由该结果可以访问到对应的url,并触发相关视图函数的执行。
"""
# 无名分组的反向解析
总路由
day63/urls.py
from django.conf.urls import url,include
from django.contrib import admin

urlpatterns = [
    url(r'^admin/', admin.site.urls),
    url(r'^app01/',include(('app01.urls','app01')))
]

子路由
app01/urls.py
from django.conf.urls import url
from app01 import views

urlpatterns = [
    url(r'^login/(d+)/$', views.login,name='login')
]

视图函数views.py
from django.shortcuts from reverse
from django.shortcuts from redirect

def home(request):
    return redirect(reverser('app01:login',args=(1,)))

模板文件login.html
<body>
    <form action="{% url 'app01:login' 1 %}" method="post" >
        ...
    </form>
</body>

# 有名分组的反向解析
总路由
day63/urls.py
from django.conf.urls import url,include
from django.contrib import admin

urlpatterns = [
    url(r'^admin/', admin.site.urls),
    url(r'^app02/',include(('app02.urls','app02')))
]

子路由
app02/urls.py
from django.conf.urls import url
from app02 import views

urlpatterns = [
    url(r'^login/(?P<id>d+)/$', views.login,name='login')
]

视图函数views.py
from django.shortcuts from reverse
from django.shortcuts from redirect

def home(request):
    return redirect(reverser('app02:login',kwargs={'id':1})

模板文件login.html
<body>
    <form action="{% url 'app01:login' id=1 %}" method="post" >
        ...
    </form>
</body>
django版本的区别
django 1.x版本使用url正则匹配路径,django 2.x和django 3.x版本使用path匹配路径,同时也提供了re_path来正则匹配路径。

path不支持正则匹配路径,它解决了url匹配路径存在的数据类型转换问题和匹配规则冗余等问题,内存支持5种转换器,同时也可以自定义转换器。

在django 1.x版本默认外键是级联更新和级联删除的,django 2.x和django 3.x版本需要自己手动设置参数。
三大神器和JsonResponse对象
视图函数返回的都是一个HttpResponse对象

# 三大神器
"""
HttpResponse   返回一个字符串
render         返回一个页面
redirect       重定向页面
"""

django使用JsonResponse从后端给前端返回json格式的数据

from django.http import JsonResponse

给前端返回一个字典,如user_dic = {'name':'一根','age':'88','gender':'中'}

JsonResponse(user_dic,json_dumps_params={'ensure_ascii':False})

给前端返回一个非字典,可序列化得对象,如列表beast = ['一根哥','鸡哥','坦克']
JsonResponse(beast,safe=False,json_dumps_params={'ensure_ascii':False})

"""
前端序列化与反序列化              后端序列化与反序列化
JSON.stringify()               json.dumps()
JSON.parse()                   json.loads()
"""
request对象的方法
request.POST
request.GET
request.method
request.body
request.FILES
request.path
request.path_info
reqeust.get_full_path() # 可以获取url?后面的参数
今日内容
CBV源码解析
# 突破口在 urls.py
url(r'^login/',views.MyLogin.as_view())
# url(r'^login/',views.view) CBV本质上与FBV是一致的


@classonlymethod   # 类方法
    def as_view(cls, **initkwargs):
        ...
        # cls就是我们自己定义的类MyLogin

        def view(request, *args, **kwargs):  # 闭包函数
            self = cls(**initkwargs)
            # self = MyLogin(**initkwargs) 类实例化产生一个对象
            ...
            self.request = request
            self.args = args
            self.kwargs = kwargs
            return self.dispatch(request, *args, **kwargs) # 调用分发函数
        ...
        return view


# 看一下调用的分发函数
 def dispatch(self, request, *args, **kwargs):
        """
        http_method_names = ['get', 'post', 'put', 'patch', 'delete', 'head', 'options', 'trace'] 一共有8种请求方式
        """
        # 获取请求方式的小写,然后与http_method_names里面的请求方式匹配匹配,如果请求方式不存在则logger.warning,若存在,则判断对象是否有该方法,比如self是MyLogin对象,有get和post方式,当请求方式为“POST”或“GET”时,能够匹配到get或post,handler=get 或者 handler=post 则返回get(request,*args, **kwargs)或post(request,*args, **kwargs)
        if request.method.lower() in self.http_method_names:
            handler = getattr(self, request.method.lower(), self.http_method_not_allowed)
        else:
            handler = self.http_method_not_allowed
        return handler(request, *args, **kwargs)

# 看一下http_method_not_allowed
    def http_method_not_allowed(self, request, *args, **kwargs):
        logger.warning(
            'Method Not Allowed (%s): %s', request.method, request.path,
            extra={'status_code': 405, 'request': request}
        )
        return http.HttpResponseNotAllowed(self._allowed_methods())
模板语法的传值
"""
{{}}:变量相关
{% %}:逻辑相关
"""
慢板语法可以传递给前端的数据类型
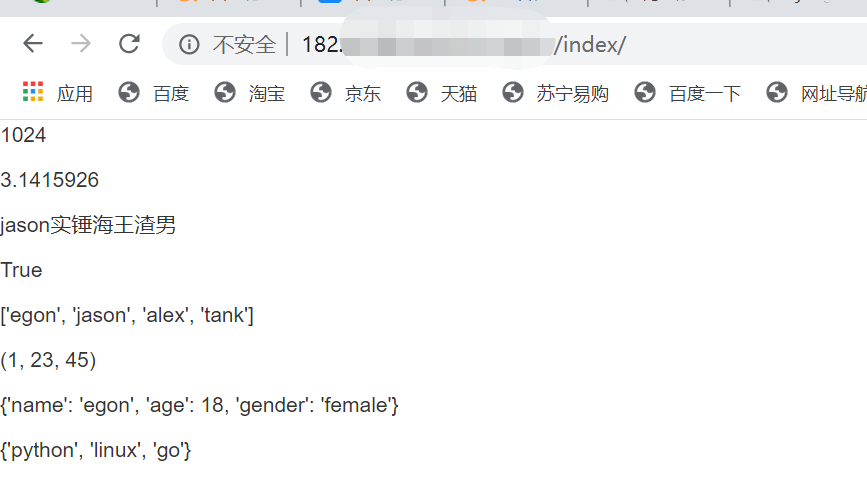
def index(request):
    buf_size = 1024
    pi = 3.1415926
    str_1 = 'jason实锤海王渣男'
    is_admin = True
    beast = ['egon','jason','alex','tank']
    t = (1,23,45)
    user_info = {'name':'egon','age':18,'gender':'female'}
    s = {'python','go','linux'}
    return render(request,'index.html',locals())

index.html

<body>
<p>{{ buf_size }}</p>
<p>{{ pi }}</p>
<p>{{ str_1 }}</p>
<p>{{ is_admin }}</p>
<p>{{ beast }}</p>
<p>{{ t }}</p>
<p>{{ user_info }}</p>
<p>{{ s }}</p>
</body>

"""
由上图可知,模板语法支持python的基本数据类型,那么,是否支持函数与类了
"""

    def func():
        x = 1
        y = 4
        return x if x > y else y

    class Beast(object):
        @staticmethod
        def get_name():
            return 'egon'

        def get_age(self):
            return self

        @classmethod
        def class_name(cls):
            return 'cls'

        def __str__(self):
            return '渣男jason'
    p = Beast()

    return render(request, 'index.html', locals())

"""
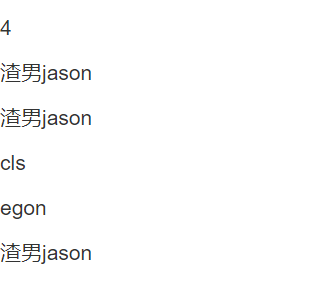
4         调用func()

渣男jason  p 触发__str__方法

渣男jason  执行get_age(),返回对象,触发__str__方法

cls       执行class_name()

egon      执行get_name()

渣男jason  实例化对象Beast(),触发__str__方法
"""

小节:
"""
模板语法:
(1)支持python的所有基本数据类型;
(2)支持函数,类,对象
(3)传递函数名会自动加括号调用(但是模版语法不支持给函数传额外的参数)
(4)传类名的时候也会自动加括号调用(实例化)
(5)内部能够自动判断出当前的变量名是否可以加括号调用 如果可以就会自动执行  针对的是函数名和类名
"""

django模板语法的取值是才用“句点符”的方式
可以点键,也可以点索引,也可以两者混合使用
exp:
    {{ beast.name }}
    {{t.1}}
    {{b.0.hobby.2 }}
过滤器(过滤器最多只能有两个参数)
"""
过滤器:就相当于模板语法的内置函数
"""

基本语法格式:
{{数据|过滤器:参数}}

注意:
"""
过滤器最多接收两个参数:管道符号前一个,管道符号后面一个
比如 {{current_time|date:'Y-m-d H:i:s'}}
"""
过滤器safe起到保护作用可以起到页面的保护作用
后端来实现:
from django.utils.safestring import mark_safe


def index(request):
    res = mark_safe('<h3>egon一米五</h3>')
    return render(request, 'index.html', locals())

<p>转义:{{ res }}</p>


前端来实现:
def index(request):
    res = '<h3>egon一米五</h3>'
    return render(request, 'index.html', locals())

<p>转义:{{ res|safe }}</p>
常用的几种过滤器
<p>统计长度:{{ beast|length }}</p>
<p>默认值(第一个参数是布尔值是True就展示第一个参数的值,否则就展示default的值):{{ user_info.is_female|default:"你说的都对"}}</p>
<p>文件大小:{{ file_size|filesizeformat }}</p>
<p>日期格式化:{{ now_str|date:'Y-m-d H:i:s' }}</p>
<p>切片操作(支持步长):{{ beast|slice:'0:3:2' }}</p>
<p>切取字符(包含三个点):{{ message|truncatechars:18 }}</p>
<p>切取单词(不包含三个点,按空格切):{{ content|truncatewords:3 }}</p>     """三个点不参与单词的切取"""
<p>移除指定的字符串:{{ content|cut:' ' }}</p>
<p>拼接操作:{{ beast|join:'$' }}</p>
<p>拼接操作(加法):{{ file_size|add:1024}}</p>
<p>拼接操作(加法):{{ content|add:'heh' }}</p>
<p>转义:{{ str_1|safe }}</p>
<p>转义:{{ str_2|safe }}</p>
<p>转义:{{ str_3 }}</p>

"""
import datetime
from django.utils.safestring import mark_safe

def index(request):
    file_size = 10240000
    now_str = datetime.datetime.now()
    beast = ['egon', 'jason', 'alex', 'tank']
    message = "2013年2月,正式推出百度翻译手机客户端。"
    content = "呵呵 你好呀 我来了 怎么样 还好吗"
    user_info = {'name': 'egon', 'age': 18, 'is_female': True}
    str_1 = 'Hello world!'
    str_2 = '<h3>咪咪</h3>'
    str_3 = mark_safe('<h2>敏敏</h2>')
    return render(request, 'index.html', locals())

"""

常用的几个标签
- for循环
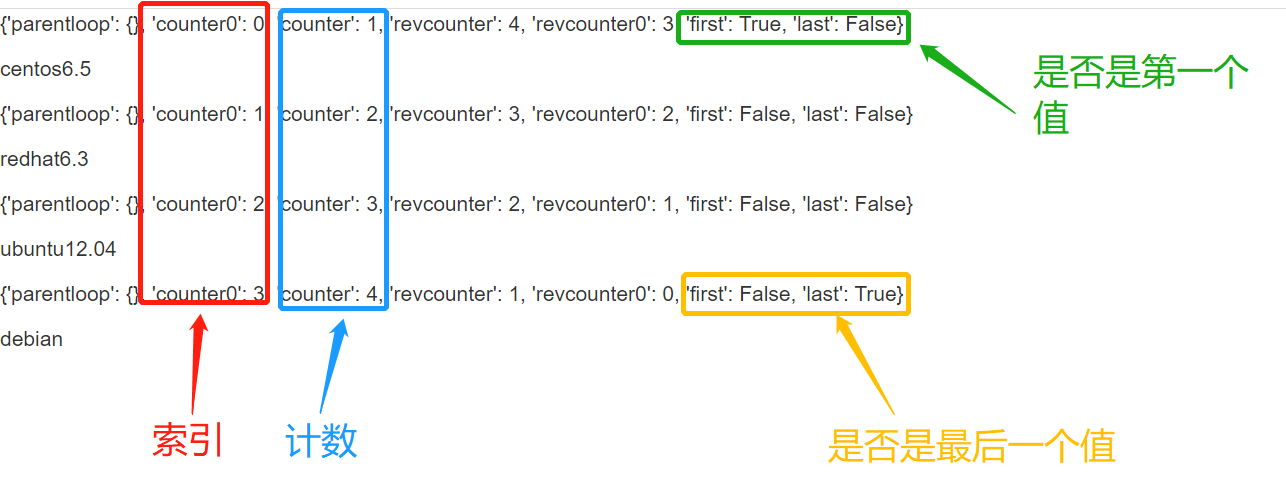
{% for item in machine %}
    <p>{{ forloop }}</p>
    <p>{{ item }}</p>
{% endfor %}

- if判断
{% if b %}
    <p>baby</p>
{% elif s%}
    <p>都来把</p>
{% else %}
    <p>老baby</p>
{% endif %}


# if和for混合使用

{% for foo in lll %}
    {% if forloop.first %}
        <p>这是我的第一次</p>
    {% elif forloop.last %}
        <p>这是最后一次啊</p>
    {% else %}
        <p>{{ foo }}</p>
    {% endif %}
    {% empty %}
        <p>for循环的可迭代对象内部没有元素 根本没法循环</p>
{% endfor %}

# 处理字典的方法

{% for foo in d.keys %}
    <p>{{ foo }}</p>
{% endfor %}
{% for foo in d.values %}
    <p>{{ foo }}</p>
{% endfor %}
{% for foo in d.items %}
    <p>{{ foo }}</p>
{% endfor %}
empty表示,for循环的可迭代对象内部没有元素时,执行的分支。
- with起别名
在with语法内就可以通过as后面的别名快速的使用到前面非常复杂获取数据的方式
{% with d.hobby.3.info as nb  %}
    <p>{{ nb }}</p>
    在with语法内就可以通过as后面的别名快速的使用到前面非常复杂获取数据的方式
    <p>{{ d.hobby.3.info }}</p>
{% endwith %}
自定义过滤器&标签&inclusion_tag
创建并使用自定义过滤器filter、标签simple_tag、inclusion_tag的流程完全一致。
主要分为以下三个步骤:
- 在应用
app01创建一个名为templatetags的文件夹 - 在
templatetags文件夹下创建任意名字的py文件,如mytag.py - 在
mytag.py文件中做如下设置:
from django import template

register = template.Library()
自定义过滤器
@register.filter(name='mydate')   # 过滤器的名字mydate
def my_date(time_str):       # 传参 time_str = now_str
    import time
    return time.strftime('%Y-%m-%d %H:%M:%S')

使用index.html
{% load mytag %}    # 先导入模块的名字,这里是mytag
<p>自定义过滤器:{{ now_str|mydate }}</p>
注意:自定义过滤器和内置过滤器一样,最多只能接收2个参数;
自定义标签simple_tag
功能:simple_tag与自定义过滤器的功能一致,都是接收视图层传递过来的数据进行进一步的处理。
不同的是:simple_tag可以接收多个参数
@register.simple_tag(name='connect')
def connect(x, y, z, h):
    process_list = [x, y, z, h]
    return '$'.join(process_list)

{% load mytag %}
<p>{% connect 'jason' 'is' '海王' '渣男' %}</p>
自定义inclusion_tag
功能:将数据和html页面绑在一起,传给模版文件。数据一般是视图层从数据库里面取出的;html页面一般是模版文件的局部页面。
内部实现原理:
先定义一个方法
	在页面上调用该方法 并且可以传值
	该方法会生成一些数据然后传递给一个html页面
	之后将渲染好的结果放到调用的位置
left_menu.html
<ul>
    {% for foo in data %}
        <li>{{ foo }}</li>
    {% endfor %}

</ul>
mytag.py
@register.inclusion_tag('left_menu.html')
def left(n):
    data = ['第{}项'.format(i) for i in range(n)]
    return locals()
index.html
{% left 8 %}
小节:
局部left_menu.html页面,仅仅是书写局部的html语句,在这里面接收left方法的返回值,形成了一个绑定数据的html页面。
模版文件中使用标签left的位置处,渲染这个绑定了数据的left_menu.html页面。
总结:当html页面某一个地方的页面需要传参数才能够动态的渲染出来,并且在多个页面上都需要使用到该局部 那么就考虑将该局部页面做成inclusion_tag形式
模板的继承
目的:减少模板文件代码的冗余量。相同的部分继承使用,不同的部分自己定制。
具体的实现:
- 提前在父模板中规划好子模板需要自定制的区域,该操作不会影响父模板的内容。
{% block content %}
	模版内容
{% endblock %}
- 在子模版中,继承父模版,此时会子模版会完全继承父模版,两者的页面内容完全一样。
{% extends 'home.html' %}
- 子页面就可以声明想要修改哪块划定了的区域。
{% block content %}		         # 自定制名字为'content'的区域
	子页面内容
{% endblock %}
一般情况下,模版页面上应该至少有三块可以被修改的区域
"""
1.css区域
2.html区域
3.js区域
"""

{% block css %}

{% endblock %}

{% block content %}

{% endblock %}

{% block js %}

{% endblock %}

# 每一个子页面就都可以有自己独有的css代码 html代码 js代码
#一般情况下 模版的页面上划定的区域越多 那么该模版的扩展性就越高
模板的导入
功能:将页面的某一个局部当成模块的形式,哪个地方需要就可以直接导入使用即可。
{% include 'side_bar.html' %}