阅读qml示例代码已有一小段时间,也陆续的写了一些自己关于qml示例代码的理解,可能由于自己没有大量的qml开发经验,总感觉复杂的ui交互qml处理起来可能会比较棘手,但事实总是会出人意料,今天我们就来分析一个关于油耗交互的qml代码。从毕业后就一直从事qt的相关开发,一直在使用QWidget窗口做产品,看多了qml后才发现原来还有这么好的ui开发利器,完全的数据和展示分离,ui可以做到想怎么变怎么变,没有了QBoxLayout的帮助(同样是约束),ui再也不用那么死板,对于灵活、绚丽的桌面程序个人觉着qml可以逐步取代QWidget窗口。
一、效果展示
如图1所示是photosurface的效果展示,是不是觉着功能还挺强大,完成这些功能真正起作用的代码却没有几行,下边就让我们一起来分析下这个示例代码吧。
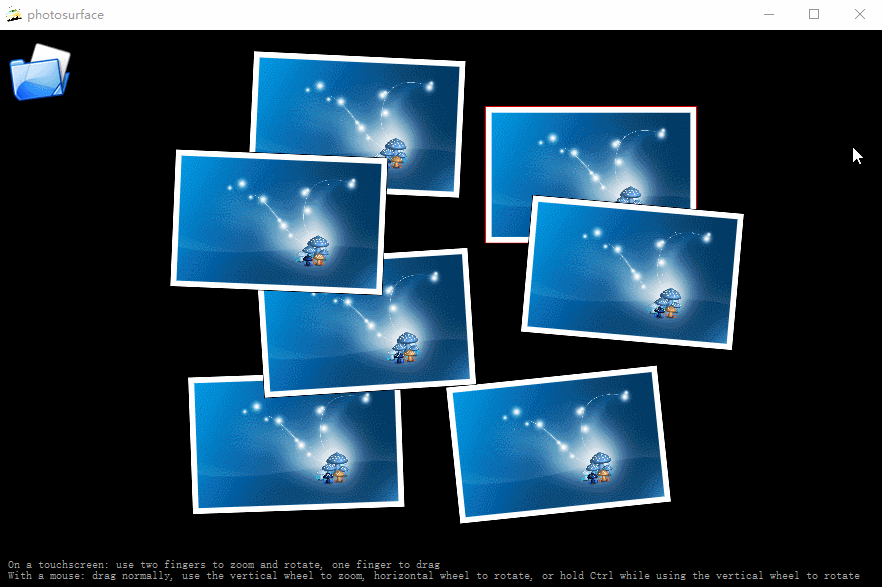
图1 photosurface效果展示
二、源码分析
图片展示窗口默认拉取的系统目录为C:UsersAdministratorPictures,也就是我们通常所指的系统图库目录,如图2所示即是photosurface效果展示所拉取的图片数据。

图2 系统图库目录
这个示例代码也是相对比较简单,主要的代码都是使用qml实现,C++部分提供了程序所能支持读取的图片文件格式和获取当前系统图库目录,最后使用QQmlContext的setContextProperty接口将获取到的值注册到qml上下文系统中。
1、获取支持的图片格式文件
 1 static QStringList imageNameFilters()
 2 {
 3     QStringList result;
 4     QMimeDatabase mimeDatabase;
 5     foreach (const QByteArray &m, QImageReader::supportedMimeTypes()) {
 6         foreach (const QString &suffix, mimeDatabase.mimeTypeForName(m).suffixes())
 7             result.append(QStringLiteral("*.") + suffix);
 8     }
 9     return result;
10 }
如上代码是通过QImageReader获取当前所支持的图片格式后缀,并组装成*.suffixes字符串,例如:*.png。
2、获取当前系统目录
 1     QQmlApplicationEngine engine;
 2     QQmlContext *context = engine.rootContext();
 3
 4     QUrl picturesLocationUrl = QUrl::fromLocalFile(QDir::homePath());
 5     const QStringList picturesLocations = QStandardPaths::standardLocations(QStandardPaths::PicturesLocation);
 6     if (!picturesLocations.isEmpty()) {
 7         picturesLocationUrl = QUrl::fromLocalFile(picturesLocations.first());
 8         if (initialUrl.isEmpty()
 9             && !QDir(picturesLocations.first()).entryInfoList(nameFilters, QDir::Files).isEmpty()) {
10             initialUrl = picturesLocationUrl;
11         }
12     }
13
14     context->setContextProperty(QStringLiteral("contextPicturesLocation"), picturesLocationUrl);
15     context->setContextProperty(QStringLiteral("contextInitialUrl"), initialUrl);
16     context->setContextProperty(QStringLiteral("contextImageNameFilters"), nameFilters);
qt5之后获取系统路径的类变为QStandardPaths,通过该类可以获取到系统图库目录、系统音乐目录等,具体参见StandardLocation参数,如图3所示
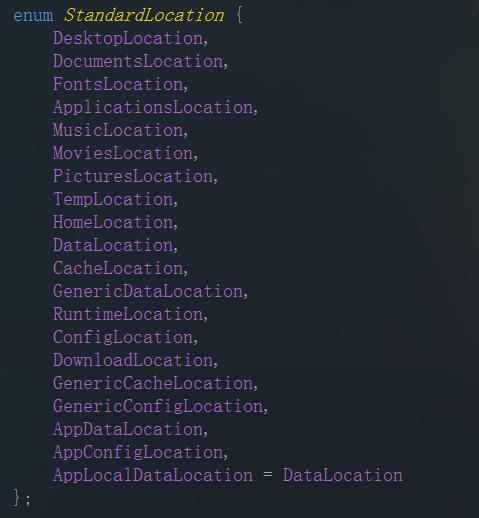
图3 支持系统目录
3、qml部分
开篇我就感慨了下,就因为qml写ui时可以随意写,接下来就让我们一起看看有多么的随意
3.1打开目录选择对话框
1 FileDialog {//打开文件夹
2         id: fileDialog
3         title: "Choose a folder with some images"
4         selectFolder: true
5         folder: picturesLocation
6         onAccepted: folderModel.folder = fileUrl + "/"
7     }
picturesLocation是通过C++程序获取的变量并注册到qml上下文系统中,该变量指明了当前对话框打开时默认选中的目录
3.2窗口底部文字说明
 1     //窗口最底下说明
 2     Text {
 3         anchors.bottom: parent.bottom
 4         anchors.left: parent.left
 5         anchors.right: parent.right
 6         anchors.margins: 10
 7         color: "darkgrey"
 8         wrapMode: Text.WordWrap
 9         font.pointSize: 8
10         text: "On a touchscreen: use two fingers to zoom and rotate, one finger to drag
" +
11               "With a mouse: drag normally, use the vertical wheel to zoom, horizontal wheel to rotate, or hold Ctrl while using the vertical wheel to rotate"
12     }
该组件使用了anchors锚点,可以始终停留在主窗口底部
3.3组件加载完毕动作
 1     Component.onCompleted: {
 2         if (typeof contextInitialUrl !== 'undefined') {
 3             // Launched from C++ with context properties set.
 4             imageNameFilters = contextImageNameFilters;//QImageReader支持的图片格式
 5             picturesLocation = contextPicturesLocation;//组件加载完毕时  初始化打开图片路径
 6             if (contextInitialUrl == "")
 7                 fileDialog.open();//没有获取到系统图片路径 直接打开
 8             else
 9                 folderModel.folder = contextInitialUrl + "/";//指定对话框默认打开文件夹路径
10         } else {
11             // Launched via QML viewer without context properties set. 当没有使用C++代码设置context值时
12             fileDialog.open();
13         }
14     }
3.4左上角文件夹图标
 1 //左上角文件夹图标  点击弹出系统文件夹选择框
 2     Image {
 3         anchors.top: parent.top
 4         anchors.left: parent.left
 5         anchors.margins: 10
 6         source: "resources/folder.png"
 7         MouseArea {
 8             anchors.fill: parent
 9             anchors.margins: -10
10             onClicked: fileDialog.open()//点击打开文件夹对话框
11             hoverEnabled: true
12             onPositionChanged: {
13                 tooltip.visible = false//位置改变时 隐藏提示框
14                 hoverTimer.start()
15             }
16             onExited: {
17                 tooltip.visible = false//鼠标离开时 隐藏提示框
18                 hoverTimer.stop()
19             }
20             Timer {
21                 id: hoverTimer
22                 interval: 1000
23                 onTriggered: {
24                     tooltip.x = parent.mouseX
25                     tooltip.y = parent.mouseY
26                     tooltip.visible = true
27                 }
28             }
29             Rectangle {//提示框
30                 id: tooltip
31                 border.color: "black"
32                 color: "beige"
33                  tooltipText.implicitWidth + 8
34                 height: tooltipText.implicitHeight + 8
35                 visible: false
36                 Text {
37                     id: tooltipText
38                     anchors.centerIn: parent
39                     text: "Open an image directory (" + openShortcut.sequenceString + ")"
40                 }
41             }
42         }
43         Shortcut {
44             id: openShortcut
45             sequence: StandardKey.Open
46             onActivated: fileDialog.open()
47         }
48     }
习惯了C++这种编译性语言,qml这种声明性语言用起来感觉好简单,就拿这段代码中的提示框来说,不管数据怎么样,提示框的行为和效果展示我们都可以随意定制,这在使用QWidget来实现时就没有这么容易。提示框的显示和隐藏只需要在交互合适的时机通过id来设置visible属性即可。
3.5滚动条
 1 //右侧垂直滚动条
 2 Rectangle {
 3     id: verticalScrollDecorator
 4     anchors.right: parent.right//锚定父窗口右侧
 5     anchors.margins: 2//距离边界2px
 6     color: "cyan"
 7     border.color: "black"//滚动条边框颜色
 8     border. 1//滚动条边框宽度
 9      5//滚动条宽度
10     radius: 2//四角圆角半径
11     antialiasing: true//反锯齿
12     height: flick.height * (flick.height / flick.contentHeight) - (width - anchors.margins) * 2//滚动条高度
13     y:  flick.contentY * (flick.height / flick.contentHeight)//滚动条y值
14     NumberAnimation on opacity { id: vfade; to: 0; duration: 500 }//使用动画将滚动条透明度设置为0,即不可见
15     onYChanged: { opacity = 1.0; scrollFadeTimer.restart() }//启动滚动条小时定时器->调用水平和垂直透明度渐变动画,知道滚动条消失
16 }
水平滚动条和垂直滚动条一样
 1 //水平底部滚动条
 2 Rectangle {
 3     id: horizontalScrollDecorator
 4     anchors.bottom: parent.bottom
 5     anchors.margins: 2
 6     color: "cyan"
 7     border.color: "black"
 8     border. 1
 9     height: 5
10     radius: 2
11     antialiasing: true
12      flick.width * (flick.width / flick.contentWidth) - (height - anchors.margins) * 2
13     x:  flick.contentX * (flick.width / flick.contentWidth)
14     NumberAnimation on opacity { id: hfade; to: 0; duration: 500 }
15     onXChanged: { opacity = 1.0; scrollFadeTimer.restart() }
16 }
3.6 可滑动区域
最后一个,也是最重要的一个滑动区域


  1 Flickable {
  2     id: flick
  3     anchors.fill: parent
  4     contentWidth: width * surfaceViewportRatio//可展示组件区域宽度
  5     contentHeight: height * surfaceViewportRatio//可展示组件区域高度
  6     Repeater {
  7         model: FolderListModel {//FolderListModel:文件夹系统model
  8             id: folderModel
  9             objectName: "folderModel"
 10             showDirs: false
 11             nameFilters: imageNameFilters//过滤文件夹格式"*.png", "*.jpg", "*.gif"
 12         }
 13         Rectangle {
 14             id: photoFrame
 15              image.width * (1 + 0.10 * image.height / image.width)
 16             height: image.height * 1.10
 17             scale: defaultSize / Math.max(image.sourceSize.width, image.sourceSize.height)
 18             Behavior on scale { NumberAnimation { duration: 200 } }//缩放、x坐标和y坐标发生变化时都使用动画在200ms完成
 19             Behavior on x { NumberAnimation { duration: 200 } }
 20             Behavior on y { NumberAnimation { duration: 200 } }
 21             border.color: "black"//图片边框别景色
 22             border. 2
 23             smooth: true//平滑
 24             antialiasing: true//反锯齿
 25             Component.onCompleted: {
 26                 x = Math.random() * root.width - width / 2
 27                 y = Math.random() * root.height - height / 2
 28                 rotation = Math.random() * 13 - 6//随机一个角度
 29             }
 30             Image {
 31                 id: image
 32                 anchors.centerIn: parent
 33                 fillMode: Image.PreserveAspectFit//图片均匀缩放 不剪裁
 34                 source: folderModel.folder + fileName//filename是FolderListModel提供的属性
 35                 antialiasing: true
 36             }
 37             //通常和一个可见的 Item 配合使用来处理捏拉手势
 38             PinchArea {//http://blog.csdn.net/foruok/article/details/32078761
 39                 anchors.fill: parent
 40                 pinch.target: photoFrame//pinch 属性知名与捏拉手势的详情
 41                 pinch.minimumRotation: -360//涅拉逆向旋转最大360°
 42                 pinch.maximumRotation: 360//涅拉顺时旋转最大360°
 43                 pinch.minimumScale: 0.1//涅拉最小缩放到原始大小10%
 44                 pinch.maximumScale: 10//涅拉最大缩放到原始大小10倍
 45                 pinch.dragAxis: Pinch.XAndYAxis//拖拽x轴和y轴都可以
 46                 onPinchStarted: setFrameColor();//第一次识别到捏拉手势时发出 修改当前图片
 47                 property real zRestore: 0
 48                 onSmartZoom: {
 49                     if (pinch.scale > 0) {//放大
 50                         photoFrame.rotation = 0;
 51                         photoFrame.scale = Math.min(root.width, root.height) / Math.max(image.sourceSize.width, image.sourceSize.height) * 0.85
 52                         photoFrame.x = flick.contentX + (flick.width - photoFrame.width) / 2
 53                         photoFrame.y = flick.contentY + (flick.height - photoFrame.height) / 2
 54                         zRestore = photoFrame.z
 55                         photoFrame.z = ++root.highestZ;//涅拉时z值增大
 56                     } else {
 57                         photoFrame.rotation = pinch.previousAngle
 58                         photoFrame.scale = pinch.previousScale
 59                         photoFrame.x = pinch.previousCenter.x - photoFrame.width / 2
 60                         photoFrame.y = pinch.previousCenter.y - photoFrame.height / 2
 61                         photoFrame.z = zRestore//缩小时还原z值
 62                         --root.highestZ
 63                     }
 64                 }
 65
 66                 MouseArea {
 67                     id: dragArea
 68                     hoverEnabled: true
 69                     anchors.fill: parent
 70                     drag.target: photoFrame//拖拽对象  为Flickable中Model数据的绘制代理
 71                     scrollGestureEnabled: false  // 2-finger-flick gesture should pass through to the Flickable
 72                     onPressed: {
 73                         photoFrame.z = ++root.highestZ;
 74                         parent.setFrameColor();//鼠标按下图片区域时 重置当前图片currentFrame  主要重置属性z  代表图片显示层
 75                     }
 76                     onEntered: parent.setFrameColor();//鼠标进入图片区域时 重置当前图片currentFrame
 77                     onWheel: {//鼠标滚轮滚动时 如果按下contrl键 则当前图片进行旋转  否则进行缩放
 78                         if (wheel.modifiers & Qt.ControlModifier) {
 79                             photoFrame.rotation += wheel.angleDelta.y / 120 * 5;
 80                             if (Math.abs(photoFrame.rotation) < 4)
 81                                 photoFrame.rotation = 0;
 82                         } else {
 83                             photoFrame.rotation += wheel.angleDelta.x / 120;
 84                             if (Math.abs(photoFrame.rotation) < 0.6)
 85                                 photoFrame.rotation = 0;
 86                             var scaleBefore = photoFrame.scale;
 87                             photoFrame.scale += photoFrame.scale * wheel.angleDelta.y / 120 / 10;
 88                         }
 89                     }
 90                 }
 91                 function setFrameColor() {
 92                     if (currentFrame)
 93                         currentFrame.border.color = "black";//设置上一张图片边框颜色为黑色
 94                     currentFrame = photoFrame;
 95                     currentFrame.border.color = "red";//设置当前图片边框颜色为红色
 96                 }
 97             }
 98         }
 99     }
100 }
源码中有大量的注释,针对大多数代码都有了注释,应该不难理解。
这个滑动区域使用了Repeater元素来生成多个对象,对象来自模型FolderListModel,id为photoFrame的Rectangle为绘制代理,在绘制代理中有两个事件响应组件PinchArea和MouseArea,这两个事件所针对的情况不一样,MouseArea是鼠标事件,PinchArea是涅拉事件主要针对触屏操作。PinchArea细节