看到一个小伙子写的言简意赅很不错,摘录如下:
https://www.npmjs.com/package/vue-lazyload
首先我们先在npm上下载vue-lazyload的包
|
1
|
npm install vue-lazyload --save |
然后我们在main.js里面import这个包,当然,单单这一个包是不够的,还得其他的文件
|
1
2
3
|
import Vue from 'vue'import App from '@/App'import VueLazyload from 'vue-lazyload' |
然后我们配置vue-lazyload;
我是这样写的
|
1
2
3
4
5
|
Vue.use(VueLazyload, {error: 'dist/error.png',//这个是请求失败后显示的图片loading: 'dist/loading.gif',//这个是加载的loading过渡效果try: 2 // 这个是加载图片数量}) |
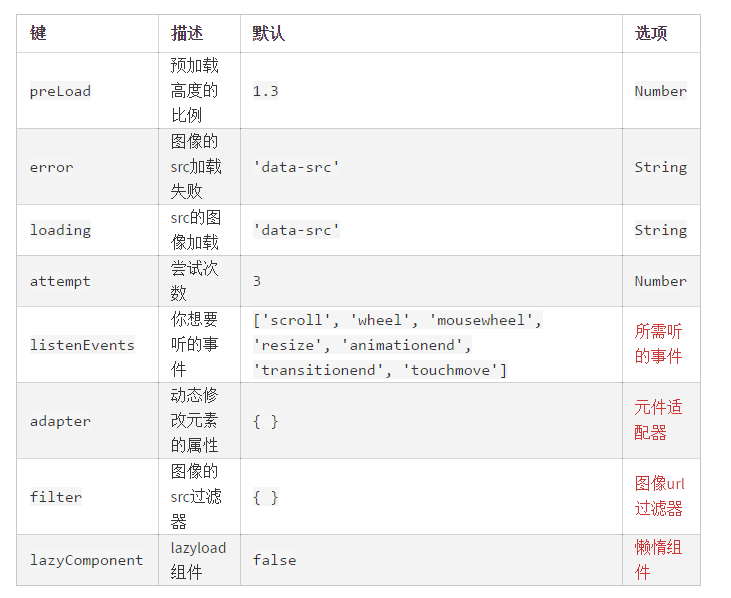
官方给出的具体配置api可以看下图
然后在组件里写法是
|
1
2
3
4
5
6
7
8
9
10
11
12
13
14
15
16
17
18
19
20
21
22
23
24
25
26
|
<template> <div id="rj"> <ul id="container"> <li v-for="img in list"> <img v-lazy="img"> </li> </ul> </div></template><script> export default { data () { return { list: [ 'http://st2.depositphotos.com/thumbs/2627021/image/9638/96385166/api_thumb_450.jpg!thumb', 'http://st2.depositphotos.com/thumbs/2627021/image/9638/96385166/api_thumb_450.jpg!thumb', 'http://st2.depositphotos.com/thumbs/2627021/image/9638/96385166/api_thumb_450.jpg!thumb', 'http://st2.depositphotos.com/thumbs/2627021/image/9638/96385166/api_thumb_450.jpg!thumb', 'http://st2.depositphotos.com/thumbs/2627021/image/9638/96385166/api_thumb_450.jpg!thumb', 'http://st2.depositphotos.com/thumbs/2627021/image/9638/96385166/api_thumb_450.jpg!thumb', 'http://st2.depositphotos.com/thumbs/2627021/image/9638/96385166/api_thumb_450.jpg!thumb', ] } } }</script> |
这样就可以在页面里实现图片懒加载效果了,当然,官方给出的写法可能和我这个有点出入,但是木有关系啦。
还可以用css的写法,但是没试过,所以就不在这里讲了,要是说错了,丢人啊!
|
1
2
3
4
5
6
7
8
9
10
11
12
13
14
15
16
17
18
19
20
21
22
23
|
<style> img[lazy=loading] { /*your style here*/ } img[lazy=error] { /*your style here*/ } img[lazy=loaded] { /*your style here*/ } /* or background-image */ .yourclass[lazy=loading] { /*your style here*/ } .yourclass[lazy=error] { /*your style here*/ } .yourclass[lazy=loaded] { /*your style here*/ }</style> |
这个是官方的写法,有兴趣的可以试试。