API网关是一个更为智能的应用服务器,它的存在就像是整个微服务架构系统的门面一样,所有的外部客户端访问都需要经过它来进行调度和过滤。它除了要实现请求路由、负载均衡、校验过滤等功能之外,还需要更多能力,比如与服务治理框架的结合、请求转发时的熔断机制、服务的聚合等一系列高级功能。
正此Spring Cloud中提供了基于Netflix Zuul实现的API网关组件-------Spring Cloud Zuul
一、搭建请求路由(面向应用)
创建springboot模块,命名我api-gateway,在pom.xml中引入相关依赖
        <dependency>
            <groupId>org.springframework.cloud</groupId>
            <artifactId>spring-cloud-starter-zuul</artifactId>
        </dependency>
    <dependencyManagement>
        <dependencies>
            <dependency>
                <groupId>org.springframework.cloud</groupId>
                <artifactId>spring-cloud-dependencies</artifactId>
                <version>Brixton.SR5</version>
                <type>pom</type>
                <scope>import</scope>
            </dependency>
        </dependencies>
    </dependencyManagement>
在主类ApiGatewayApplication.class中添加注解@EnableZuulProxy来开启Zuul的API网关服务功能
package com.stonegeek;

import org.springframework.boot.SpringApplication;
import org.springframework.boot.autoconfigure.SpringBootApplication;
import org.springframework.cloud.netflix.zuul.EnableZuulProxy;

/**
 * Created by StoneGeek on 2018/5/28.
 * 博客地址:http://www.cnblogs.com/sxkgeek
 */
@EnableZuulProxy
@SpringBootApplication
public class ApiGatewayApplication {

    public static void main(String[] args) {
        SpringApplication.run(ApiGatewayApplication.class, args);
    }
}
在application.properties中配置Zuul应用的基础信息,和请求路由的配置
server.port=5555

spring.application.name=api-gateway

#配置属性zuul.routes.api.path中的api部分为路由的名字,可以任意定义,但是一组path与url映射关系的路由名要相同
zuul.routes.api.path=/api-a-url/**
zuul.routes.api.url=http://localhost:8080/
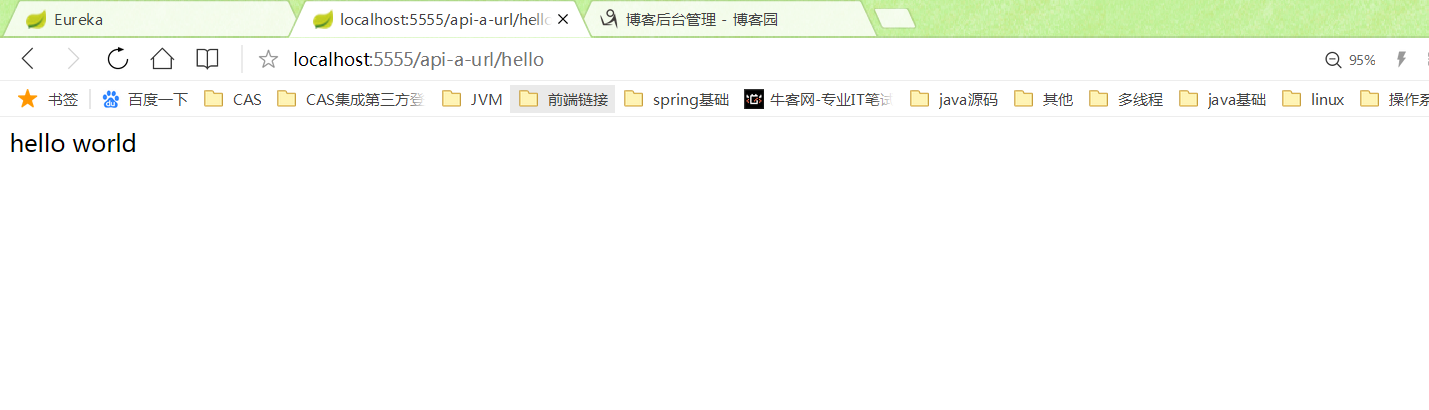
配置完成之后,开启eureka-server和service-hello、api-gateway这三个模块,所有符合/api-a-url/**规则的访问都将被路由转发到http://localhost:8080/地址上,也就是说,当我们访问http://localhost:5555/api-a-url/hello的时候,API网关服务会将请求路由到http://localhost:8080/hello提供的微服务接口上。
结果展示:
二、搭建请求路由(面向服务)
很显然,上述传统的配置方式并不太好,它需要开发人员花费大量的时间去维护各个路由path与url的关系,而我们本节要讲的是面向服务的路由,在这里Spring Cloud Zuul与Spring Cloud Eureka整合到一起,此时路由的path不是映射具体的url,而是让它映射到某个具体的服务,而具体的url交给Eureka的服务发现机制去自动维护
此时,要在pom.xml中加入相关依赖文件(否则会出现注册不成功的情况):
        <dependency>
            <groupId>org.springframework.cloud</groupId>
            <artifactId>spring-cloud-starter-eureka-server</artifactId>
        </dependency>
        <dependency>
            <groupId>org.springframework.cloud</groupId>
            <artifactId>spring-cloud-starter-eureka</artifactId>
        </dependency>
然后,针对我们之前创建的两个微服务应用,service-hello和ribbon-consumer,在api-gateway的配置文件中分别定义了两个名为api-a和api-b的路由来映射他们,另外,通过指定Eureka Server服务注册中心的位置,作用是将自己注册成服务,同时也使Zuul能够获取service-hello和ribbon-consumer服务的实例清单,以实现path映射服务,再从服务中挑选实例来进行请求转发的完整路由机制。
server.port=5555

spring.application.name=api-gateway
eureka.client.service-url.defaultZone=http://localhost:1111/eureka/

#配置属性zuul.routes.api.path中的api部分为路由的名字,可以任意定义,但是一组path与url映射关系的路由名要相同
zuul.routes.api-a.path=/api-a/**
zuul.routes.api-a.serviceId=service-hello

zuul.routes.api-b.path=/api-b/**
zuul.routes.api-b.serviceId=ribbon-consumer
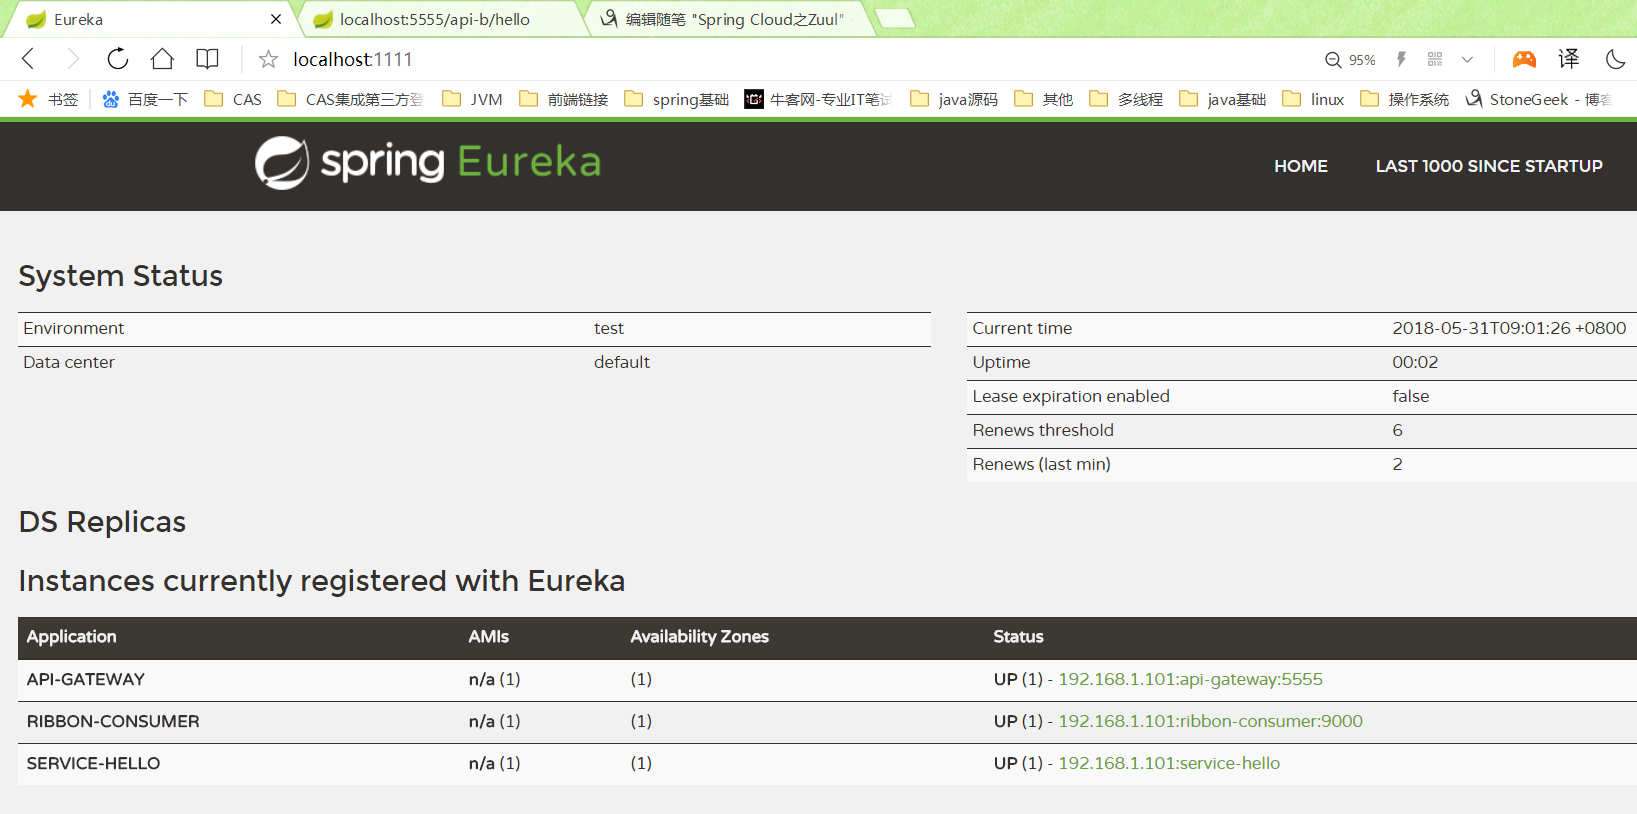
之后,将我们的服务注册中心模块Eureka-server、服务客户端service-hello和ribbon-consumer、API网关模块api-gateway都启动,从Eureka信息面板上看出存在的服务清单:
通过上面的搭建工作,我们已经可以通过服务网关来访问service-hello和ribbon-consumer这两个服务了,根据配置的映射关系,分别向网关发起下面请求:
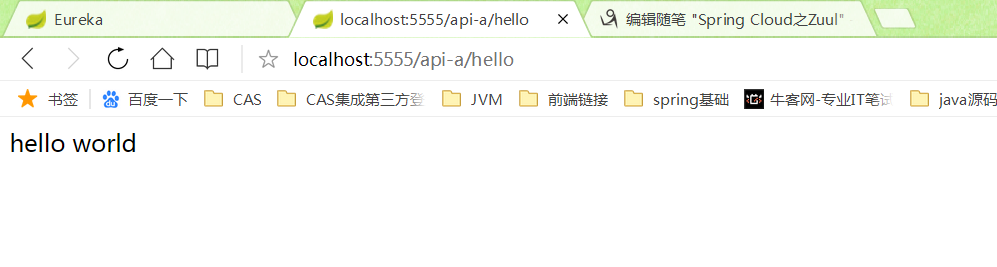
- http://localhost:5555/api-a/hello:该url符合/api-a/**规则,由api-a路由负责转发,该路由映射的serviceid为service-hello,所以最终的/hello请求会被发送到service-hello服务的某个实例上去。
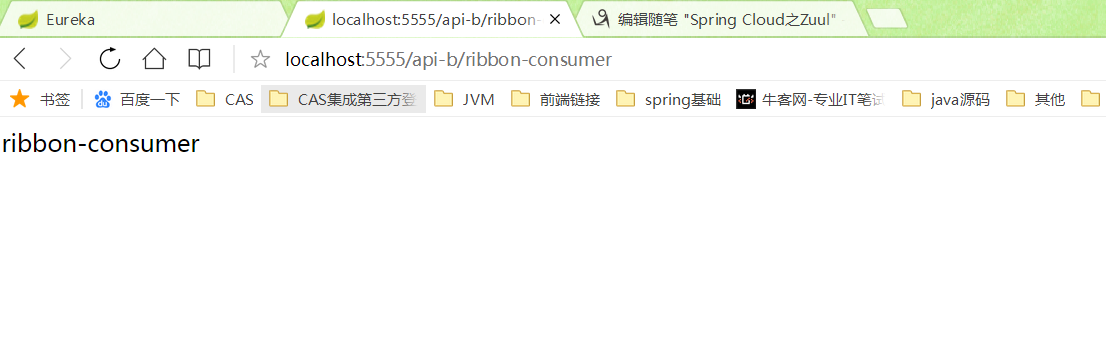
- http://localhost:5555/api-b/ribbon-consumer:该url符合/api-b/**规则,由api-b路由负责转发,该路由映射的serviceid为ribbon-consumer,所以最终的/ribbon-consumer请求会被发送到ribbon-consumer服务的某个实例上去。
三、搭建请求过滤
在实现了请求路由功能之后,我们的微服务应用的接口就可以通过统一的API网关入口被客户端访问到了,但是每个客户端用户请求微服务应用提供的接口时,它们的访问权限往往都有一定的限制,系统并不会将所有的微服务接口都对外开放。做法是通过前置的网关服务来完成这些非业务性质的校验。由于网关服务的加入,外部客户端访问我们的系统有了统一的入口,既然这些校验与具体的业务无关,那我们可以在请求到达 的时候就完成校验和过滤,而不是转发后再过滤而导致更长的请求延迟
1、首先定义一个AccessToken.class的utils工具类(继承ZuulFilter抽象类并实现它定义的4个抽象函数就可以完成对请求的拦截和过滤了),
package com.stonegeek.utils;

import com.netflix.zuul.ZuulFilter;
import com.netflix.zuul.context.RequestContext;

import javax.servlet.http.HttpServletRequest;
import java.util.logging.Logger;

/**
 * Created by StoneGeek on 2018/5/31.
 * 博客地址:http://www.cnblogs.com/sxkgeek
 *
 */
public class AccessFilter extends ZuulFilter {
    private final Logger logger =Logger.getLogger(String.valueOf(AccessFilter.class));

    @Override
    public String filterType() {
        return "pre";
    }

    @Override
    public int filterOrder() {
        return 0;
    }

    @Override
    public boolean shouldFilter() {
        return true;
    }

    @Override
    public Object run() {
        RequestContext ctx=RequestContext.getCurrentContext();
        HttpServletRequest request=ctx.getRequest();
        logger.info("send {] request to {}"+request.getMethod()+request.getRequestURL().toString());
        Object accessToken=request.getParameter("accessToken");
        System.out.println(accessToken);
        if(accessToken == null){
            logger.warning("access token is empty");
            ctx.setSendZuulResponse(false);
            ctx.setResponseStatusCode(401);
            return null;
        }
        logger.info("access token ok");
        return null;
    }
}
上述实现的4个抽象方法的作用分别是:
- filterType:过滤器的类型,它决定过滤器在请求的哪个生命周期执行。这里定义为pre,代表会在请求被路由之前执行,routind在路由请求时被调用,post在routing和error过滤器之后被调用,error处理请求发生错误时被调用
- filterOrder:过滤器的执行顺序。当请求在一个阶段中存在多个过滤器时,需要根据方法返回的值来依次执行
- shouldFilter:判断该过滤器是否需要被执行。这里我们直接返回了true,因此该过滤器对所有请求都会生效。实际应用中我们可以利用该函数来指定过滤器的有效范围。
- run:过滤器的具体逻辑。这里我们通过ctx.setSendZuulResponse(false)令zuul过滤该请求,不对其进行路由,然后通过ctx.setResponStatusCode(401)设置其返回的错误码,当然也可以进一步优化我们的返回,比如,通过ctx.setResponseBody(body)对返回的body内容进行编辑等。
在实现了自定义过滤器之后,它并不会直接生效,我们还需要为其创建具体的Bean才能启动过滤器,在ApiGatewayApplication.class中修改:
package com.stonegeek;

import com.stonegeek.utils.AccessFilter;
import org.springframework.boot.SpringApplication;
import org.springframework.boot.autoconfigure.SpringBootApplication;
import org.springframework.boot.builder.SpringApplicationBuilder;
import org.springframework.cloud.client.discovery.EnableDiscoveryClient;
import org.springframework.cloud.netflix.zuul.EnableZuulProxy;
import org.springframework.context.annotation.Bean;

/**
 * Created by StoneGeek on 2018/5/28.
 * 博客地址:http://www.cnblogs.com/sxkgeek
 */
@EnableZuulProxy
@EnableDiscoveryClient
@SpringBootApplication
public class ApiGatewayApplication {

    public static void main(String[] args) {
//        SpringApplication.run(ApiGatewayApplication.class, args);
        //此处为请求过滤配置
        new SpringApplicationBuilder(ApiGatewayApplication.class).web(true).run(args);

    }
    @Bean
    public AccessFilter accessFilter(){
        return new AccessFilter();
    }
}
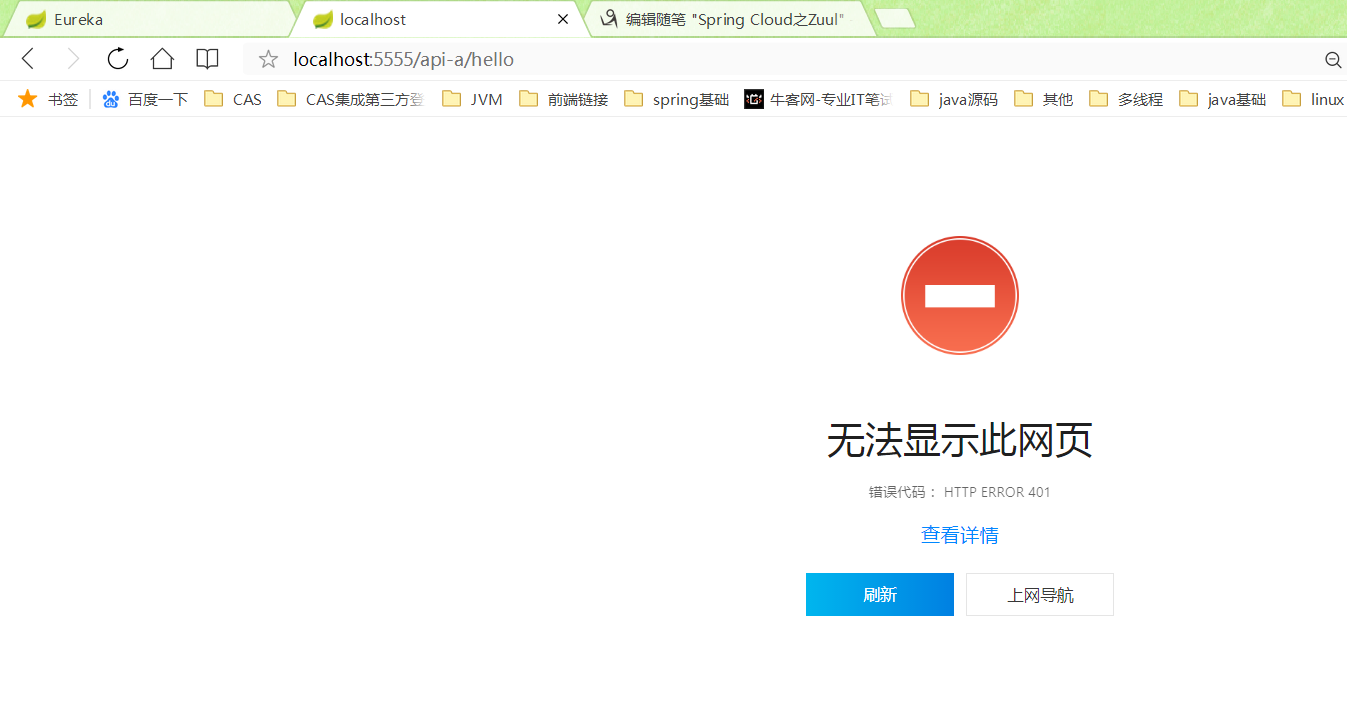
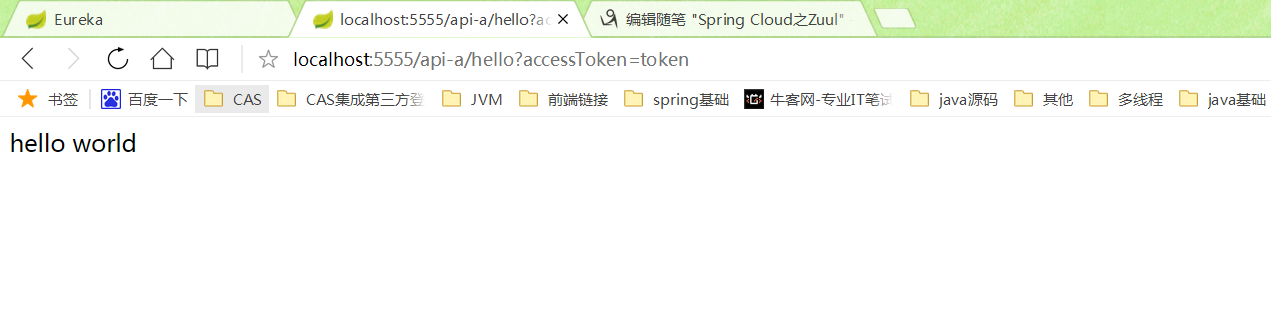
然后开始验证过滤器的存在:
- http://localhost:5555/api-a/hello:返回401错误
- http://localhost:5555/api-a/hello?accessToken=token:正确路由到service-hello的/hello接口上